Unity Cloud Build or how to build iOS build on Windows
Many Unity3D developers use Windows, and when building a game for iOS, there are a lot of problems and dances with a tambourine around virtual machines with OS X. The
guys from Unity took us a big step forward: they made it possible to build builds for various devices in the cloud, completely ignoring on what device we are working on.
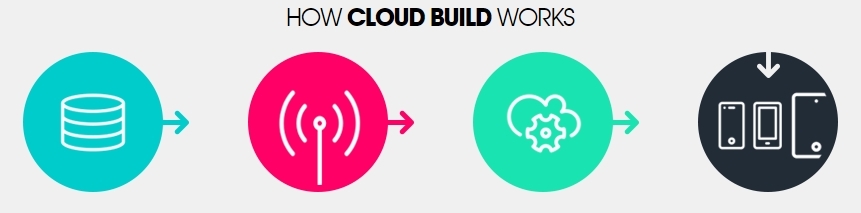
The logic of the work is as follows:
1. Perform the initial setup
2. Pour the project sources into the version control system
3. Create a special branch for the build and fill in the current version of the game
4. The cloud pumps out this version and builds
Here's how to do it:
We select a version control system, git mercurial svn perfoce is now supported. I tried everything and settled on mercurial. We create a repository and upload our sources to the selected hosting. I’ll omit the choice of a system, creating a repository and other basics of working with a version control system; there are enough articles on this subject on Habré.
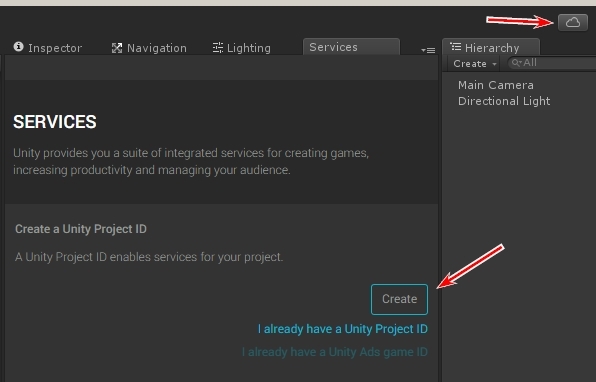
In the repository, create a branch for builds from which Unity Cloud will pump out the sources and upload the working version to it. Install the latest version of Unity3D and click the button with the cloud, then logs in to the Unity cloud and creates a new project:
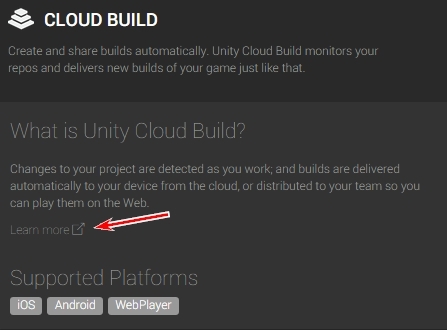
Go to the Cloud Build section and click on the external link:
We will go to the project management web interface, I switched to the new beta version:

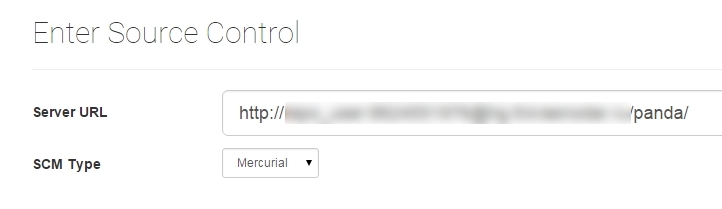
We indicate the address of our repository, its type and user to connect:
Next, select the platform under which the build will be collected, in our case ios:

Fill in the information about the build, it is important to note the Branch section, it indicates the name of the branch from which the sources for assembly will be pumped out.

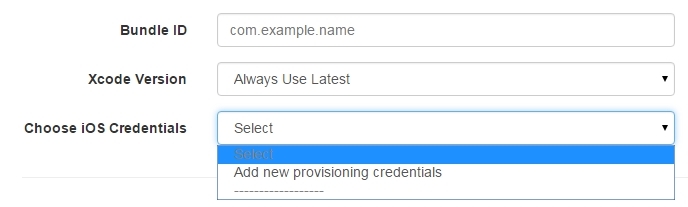
In the next step, we will need a computer with OS X, we will need to obtain a certificate, .mobileprovision and specify the Bundle ID:
Let's get the Bundle ID in order at itunesconnect.apple.com/ :

The developer p12 certificate needs to be created in advance using xcode, there are also plenty of instructions and I will not describe them here, I will only indicate where to download them. Having found a machine with OS X or using a virtual machine with this OS, you need to go to https://developer.apple.com , then to the section Certificates, Identifiers & Profiles . Next, select the certificates section:

In the Provisioning Profiles section . In the All section, download our iOS Distribution certificate. On OS X, open it and add it to the login / login section:

In the Keychain Access application in the left column, select the Login and My certificates sections . Choose our certificate and clickFile -> Export Items ... In the export window that appears, make sure that the format selected is Personal Information Exchange (.p12) . Next, you will create a password for the certificate, which you will specify in Unity Cloud Build when you add it.
Now create a .mobileprovision file. We also go to the portal https://developer.apple.com
we are interested in the iOS Provisioning Profiles section , click on + in it

and select one of these options, one for publishing to the App Store and the second for testing on testers' devices:

Next, select the developer account , the application and a list of devices for testing, in the end we get the coveted download button.
The next step is to upload the received mobileprovision and certificate to Unity Cloud Build and specify its password. If you did everything correctly, the message start building appears and a list of the current status of the build appears in the list of projects:

That's all, at the end of the build you can get detailed information about its progress. In the next article, I will describe working with other Unity3d cloud services.
guys from Unity took us a big step forward: they made it possible to build builds for various devices in the cloud, completely ignoring on what device we are working on.
The logic of the work is as follows:
1. Perform the initial setup
2. Pour the project sources into the version control system
3. Create a special branch for the build and fill in the current version of the game
4. The cloud pumps out this version and builds
Here's how to do it:
We select a version control system, git mercurial svn perfoce is now supported. I tried everything and settled on mercurial. We create a repository and upload our sources to the selected hosting. I’ll omit the choice of a system, creating a repository and other basics of working with a version control system; there are enough articles on this subject on Habré.
In the repository, create a branch for builds from which Unity Cloud will pump out the sources and upload the working version to it. Install the latest version of Unity3D and click the button with the cloud, then logs in to the Unity cloud and creates a new project:
Go to the Cloud Build section and click on the external link:
We will go to the project management web interface, I switched to the new beta version:
We indicate the address of our repository, its type and user to connect:
Next, select the platform under which the build will be collected, in our case ios:
Fill in the information about the build, it is important to note the Branch section, it indicates the name of the branch from which the sources for assembly will be pumped out.
In the next step, we will need a computer with OS X, we will need to obtain a certificate, .mobileprovision and specify the Bundle ID:
Let's get the Bundle ID in order at itunesconnect.apple.com/ :
The developer p12 certificate needs to be created in advance using xcode, there are also plenty of instructions and I will not describe them here, I will only indicate where to download them. Having found a machine with OS X or using a virtual machine with this OS, you need to go to https://developer.apple.com , then to the section Certificates, Identifiers & Profiles . Next, select the certificates section:
In the Provisioning Profiles section . In the All section, download our iOS Distribution certificate. On OS X, open it and add it to the login / login section:
In the Keychain Access application in the left column, select the Login and My certificates sections . Choose our certificate and clickFile -> Export Items ... In the export window that appears, make sure that the format selected is Personal Information Exchange (.p12) . Next, you will create a password for the certificate, which you will specify in Unity Cloud Build when you add it.
Now create a .mobileprovision file. We also go to the portal https://developer.apple.com
we are interested in the iOS Provisioning Profiles section , click on + in it
and select one of these options, one for publishing to the App Store and the second for testing on testers' devices:
Next, select the developer account , the application and a list of devices for testing, in the end we get the coveted download button.
The next step is to upload the received mobileprovision and certificate to Unity Cloud Build and specify its password. If you did everything correctly, the message start building appears and a list of the current status of the build appears in the list of projects:
That's all, at the end of the build you can get detailed information about its progress. In the next article, I will describe working with other Unity3d cloud services.