Install OTRS v4 on Windows
- Tutorial

OTRS (abbreviation from the English Open-source Ticket Request System) is an open application processing system. OTRS allows organizations involved in technical support of any projects to work together to solve user problems. The program is written in Perl, supports many DBMSs (MySQL, PostgreSQL, etc.), can be integrated with the LDAP directory, distributed under license - AGPL version 3.
OTRS is perfectly installed without any hassle on any LAMP (Linux, Apache, MySQL , PHP). But what if there is no experience and administration of Linux?
The fourth version of OTRS does not have a Windows installer. I decided to lay out my way to install OTRS from source in a Windows environment. However, it is important to understand that the performance of OTRS running in the native Linux environment will be higher than on similar hardware in the Windows environment.
The biggest problem I encountered while installing OTRS is the working mod_perl for Apache. Fortunately, enthusiasts regularly post fresh versions of the mod for new versions of Perl and Apache.
So, we need:
• MySQL Server v 5.5 64-bit .
• Apache v 2.2 32-bit .
• Strawberry Perl 5.20.1.1 32-bit .
• Well, mod_perl itself .
• Cron for Windows Scheduler (optional).
• Visual C ++ 2008 SP1 Redistributable Package (x86) .
• Visual C ++ 2010 SP1 Redistributable Package (x86) .
• Actually OTRS itself .
Install Apache HTTP Server
Apache requires the Visual C ++ 2008 SP1 Redistributable Package to work. Download from the link above and install.
Download the archive with Apache and unpack the apache2 folder from the archive into the c: / apache2 folder (by default, ServerRoot is located along this path). If you chose a different location for Apache, you need to change ServerRoot to httpd.conf, as well as the location of Documenroot, Directories, ScriptAlias.
To install the Apache service from the c: \ Apache2 \ bin folder, at the command line, enter
httpd.exe -k install
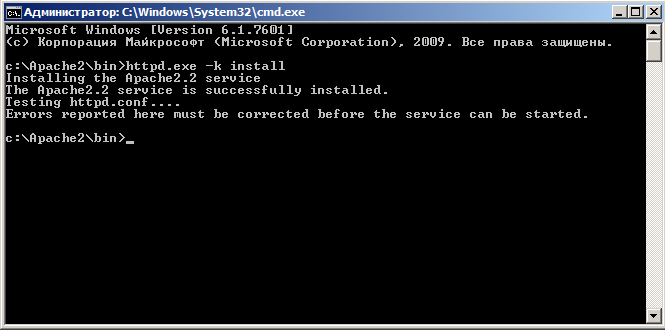
The service was successfully installed.
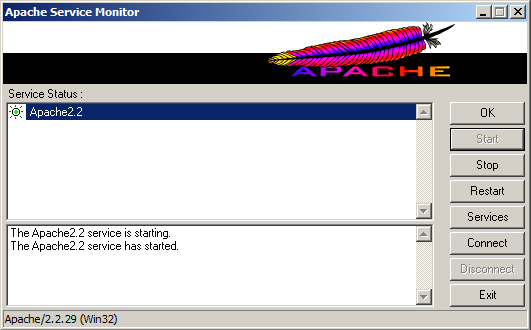
Run the file c: \ Apache2 \ bin \ ApacheMonitor.exe and put it in autoload. Launch the Apache service.
In the browser in the address bar, go to the address http: // localhost. If all is well, then we will see a page with the text “It works!”.

Install Strawberry Perl
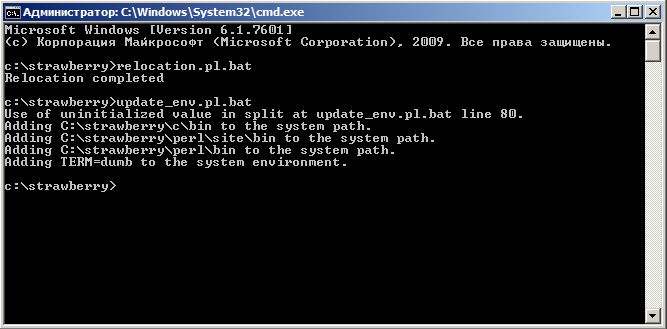
Download Strawberry Perl from the link above, unpack everything into the c: / strawberry folder. At the command prompt, run the following files.
c: \ strawberry \ relocation.pl.bat
c: \ strawberry \ update_env.pl.bat
Install mod_perl for Apache
Download mod_perl. There are two folders in the archive - with apache and perl. Unpack their contents with the replacement of the files, respectively, in the folders where we have installed Apache and Perl.
Restarting the Apache service.
Install MySQL Server
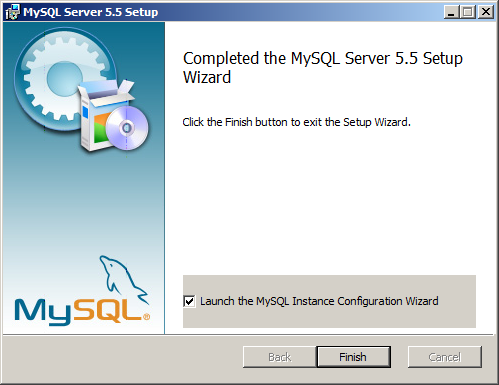
Download and run mysql-5.5.43-winx64.msi. Installation without features.
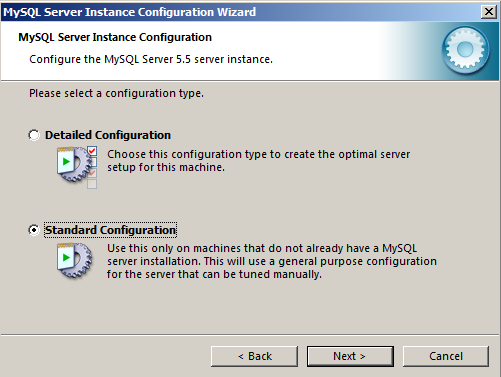
After the installation is completed, the Setup Wizard starts.
Choose a standard configuration.
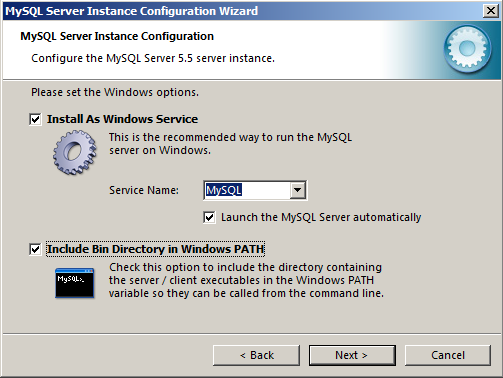
Set a name for the service.
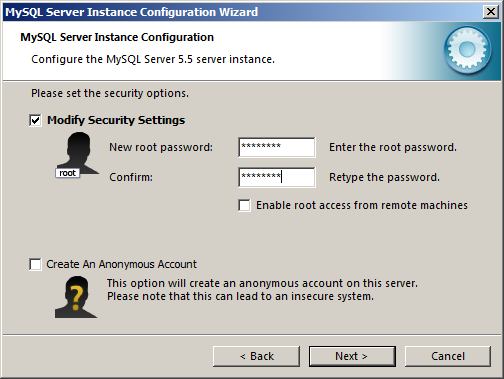
Set the root password.
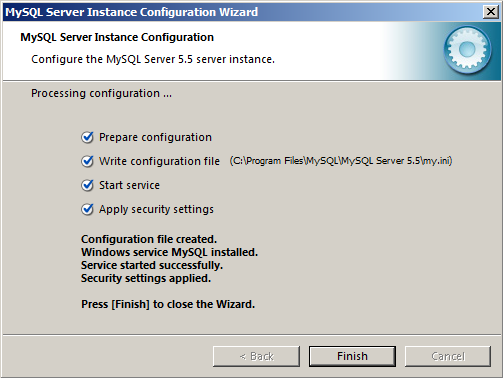
After the installation is complete, edit the my.ini file.
For better performance, in the file c: \ Program Files \ MySQL \ MySQL Server 5.5 \ my.ini, set the
query_cache_size = 32M parameter value. We
restart the MySQL service.
Install OTRS
Download the zip archive with the latest version of OTRS (at the time of writing, version 4-0-8) and unpack it into the c: \ otrs \ folder.
Almost everything is ready.
Install the required perl packages
From the command line from the folder c: \ otrs \ bin, run the script
perl otrs.CheckModules.pl
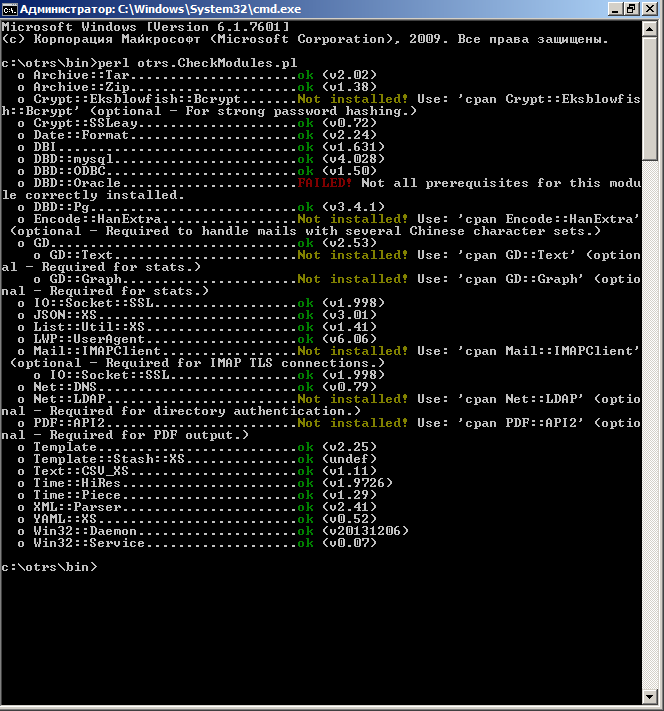
Install the necessary packages. Among them there are both mandatory (required) and optional (optional). Install everything except Encode :: HanExtra.
cpan crypt :: eksblowfish
cpan GD :: Text
cpan GD :: Graph
cpan Mail :: IMAPClient
cpan Net :: LDAP
cpan PDF :: API2
We also get one error per DBD :: Oracle package.
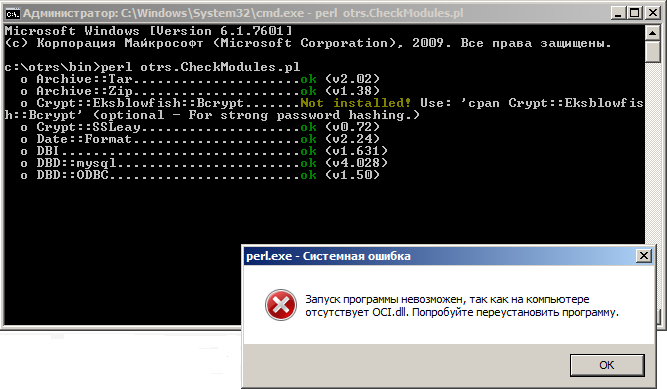
An internal perfectionist needs to eliminate this error, although the Oracle database is not used in this example. Oci.dll is an Oracle client library . We download the client, you do not need to install it, just take the Oci.dll library from the archive and put it in c: \ Windows \ System32 \.
Now a message appears about the missing MSVCR100.dll library.
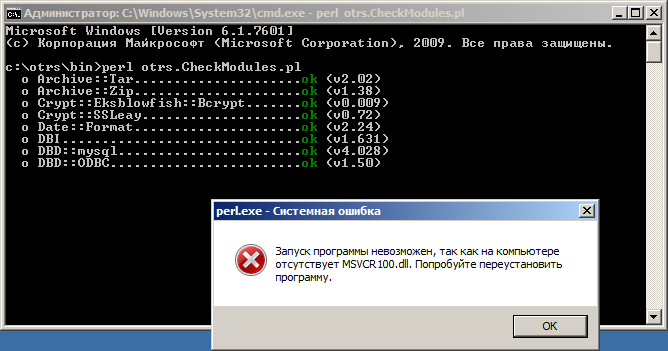
Install Visual C ++ 2010 SP1 Redistributable Package (x86).
Run the script again
perl otrs.CheckModules.pl

All necessary modules are installed.
Configure OTRS
The whole setup is to change the installation path of OTRS in the configuration files.
c: \ otrs \ scripts \ apache2-httpd.include.conf
| Change it | … on this |
| ScriptAlias / otrs / “/ opt / otrs / bin / cgi-bin /” | ScriptAlias / otrs / “c: / otrs / bin / cgi-bin /” |
| Alias / otrs-web / “/ opt / otrs / var / httpd / htdocs /” | Alias / otrs-web / “c: / otrs / var / httpd / htdocs /” |
| Perlrequire /opt/otrs/scripts/apache2-perl-startup.pl | Perlrequire c: /otrs/scripts/apache2-perl-startup.pl |
The easiest way is to search / replace “/ opt” with “c:”
c: \ otrs \ scripts \ apache2-perl-startup.pl
| Change it | … on this |
| use lib “/ opt / otrs /”; | use lib “c: / otrs /”; |
| use lib “/ opt / otrs / Kernel / cpan-lib”; | use lib “c: / otrs / Kernel / cpan-lib”; |
| use lib “/ opt / otrs / Custom”; | use lib “c: / otrs / Custom”; |
c: \ otrs \ Kernel \ Config.pm
Rename the file c: \ otrs \ Kernel \ Config.pm.dist to c: \ otrs \ Kernel \ Config.pm. In a text editor
| Change it | … on this |
| $ Self -> {Home} = '/ opt / otrs'; | $ Self -> {Home} = 'c: / otrs'; |
To maintain the logs, add the following lines:
$ Self -> {'LogModule'} = 'Kernel :: System :: Log :: File';
$ Self -> {'LogModule :: LogFile'} = "$ Self -> {Home} /var/log/otrs.log";
Configure Apache
In the c: \ Apache2 \ conf \ folder, edit the httpd.conf file, add the following lines:
# indicate the apache where we installed the
LoadFile pearl “c: /strawberry/perl/bin/perl520.dll”
# load mod_perl
LoadModule perl_module modules / mod_perl .so
# Indicate where OTRS is installed.
Include “c: /otrs/scripts/apache2-httpd.include.conf”
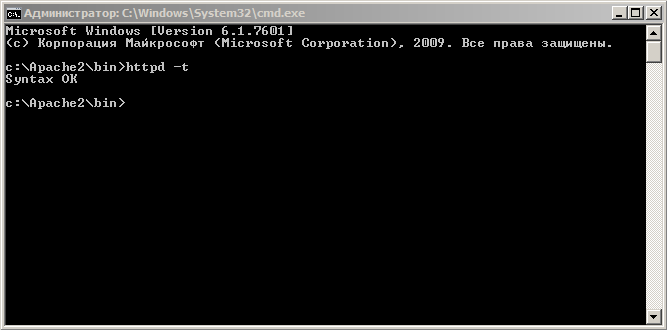
Make sure that everything is fine with the syntax. At the command prompt from the folder c: \ Apache2 \ bin, execute
httpd –t
Restarting the Apache service.
If such an error occurs:
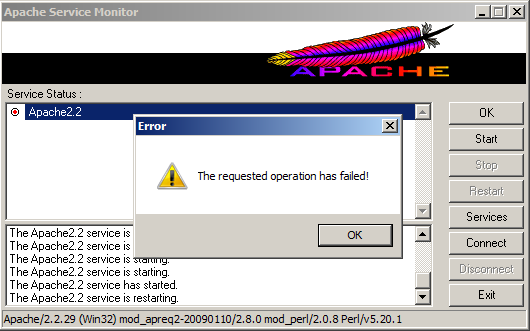
You need to check whether in all the configs we changed the installation path when configuring OTRS.
We start web installation
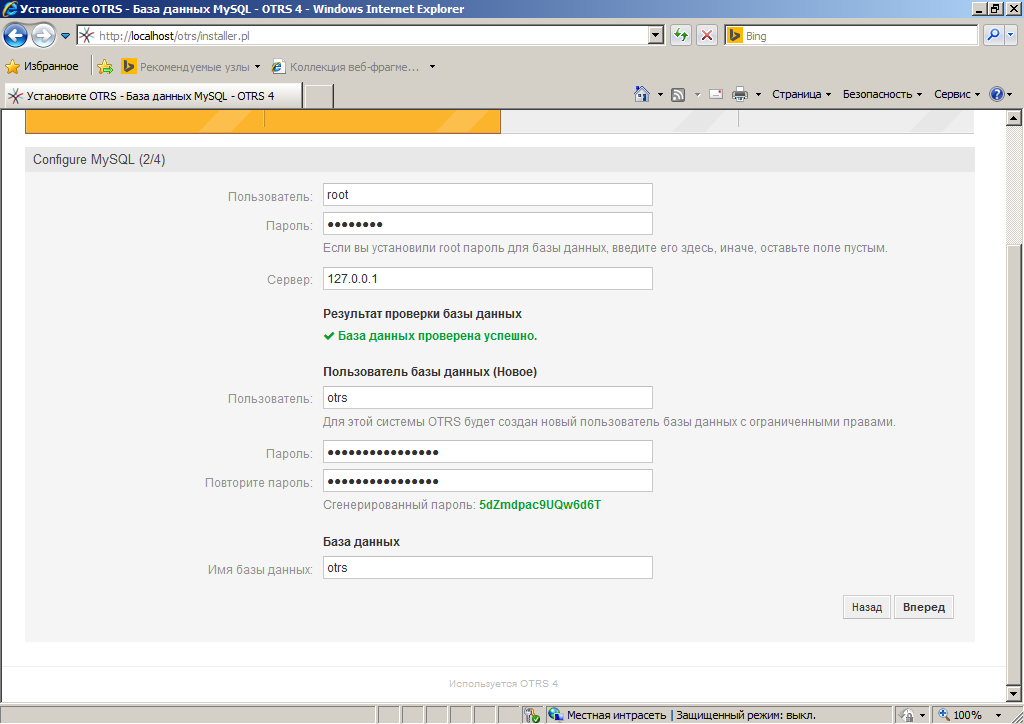
In the address bar, run http: //localhost/otrs/installer.pl
We accept the license agreement, select the type of MySQL database, enter the password for the root account.
When we click the button to check the database settings, we get an error. OTRS asks to increase the value of the max_allowed_packet parameter.
Add the line
max_allowed_packet = 20M to the file c: \ Program Files \ MySQL \ MySQL Server 5.5 \ my.ini
Restart the MySQL service and check the database again.

We are getting another message.
The innodb_log_file_size parameter is responsible for the size of MySQL logs. Stop the MySQL service. In this version of MySQL, the logs are located in the folder c: \ ProgramData \ MySQL \ MySQL Server 5.5 \ data \
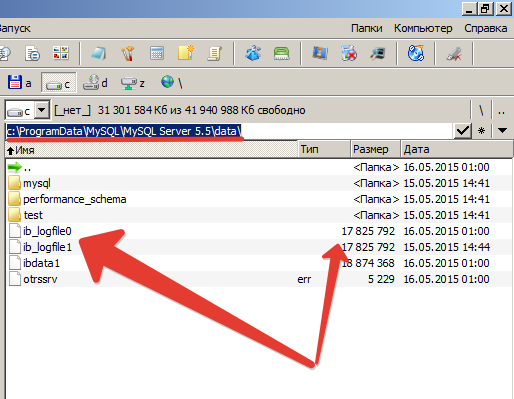
Delete the ib_logfile0 and ib_logfile1 files. In the my.ini file, set the value of the parameter
innodb_log_file_size = 512M
We start the MySQL service. We see that the ib_logfile0 and ib_logfile1 files have become the right size.
Once again, click on the button to check the database. Everything worked out. OTRS created a new account for the new OTRS database and generated a password.
At Step 3, you are prompted to configure the system and mail. This can be done at any time.
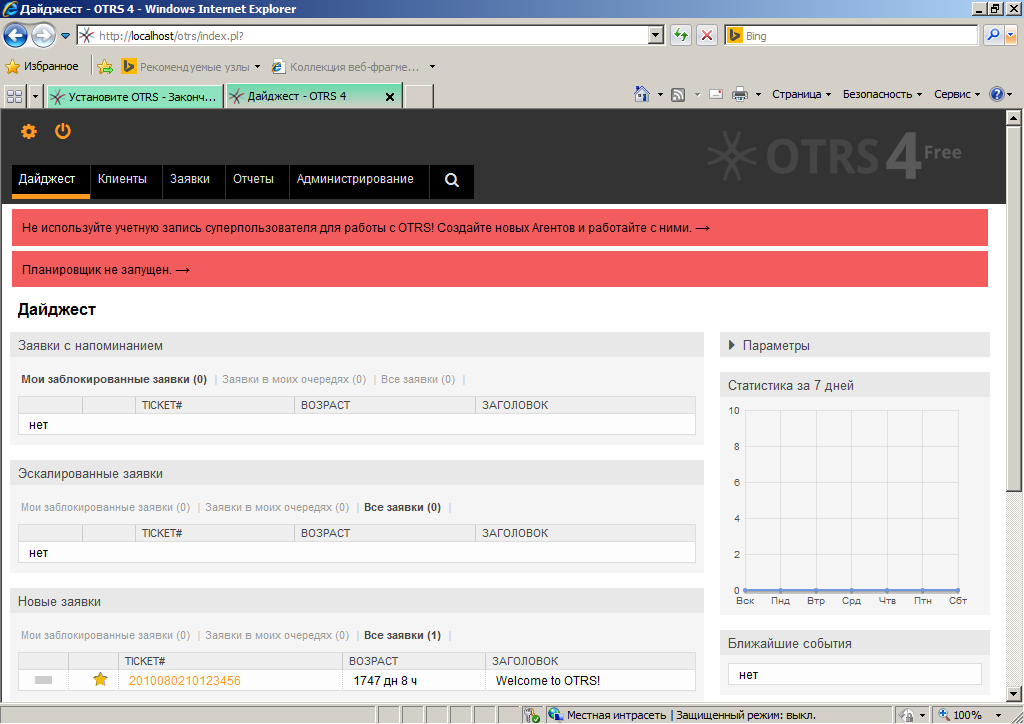
Finally, in Step 4, we generate a password for the user root @ localhost. We go under this account.
Scheduler Setting
When entering under the agent, we see a message that the scheduler is not running. This refers to the internal OTRS service.
At the command prompt, execute the script
c: \ otrs \ bin \ otrs.Scheduler4winInstaller.pl -a install
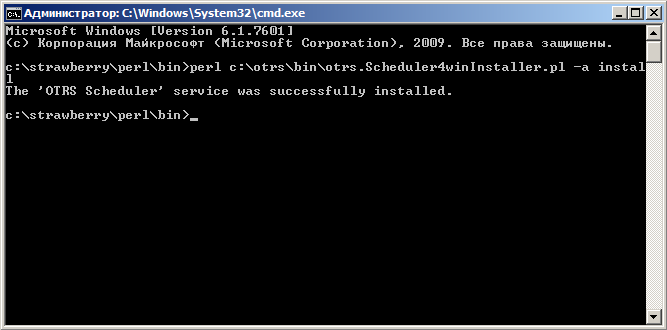
Then we start the service. We refresh the page, we see that the message has disappeared, and in the snap-in of services a new one has appeared - OTRS Scheduler.
Now you need to configure the work of the scheduler itself. You can use either Windows Task Scheduler or CRON.
CRON setup
OTRS natively uses the CRON scheduler. The scheduler is designed to clear the cache, update statistics, send notifications, etc.
Download CRONw and unpack it into the c: \ cronw folder. For CRONw to work correctly, we need to install several pearl modules.
At the command prompt, do:
Все задания в CRONw хранятся в специальном файле crontab. Его можно создать, запустив C:/otrs/bin/otrs.Cron4Win32.pl, предварительно его отредактировав следующим образом:
my $PerlExe = «c:/strawberry/perl/bin/perl.exe»;
my $CronTabFile = «c:/cronw/crontab.txt»;
my $OTRSHome = «c:/otrs»;
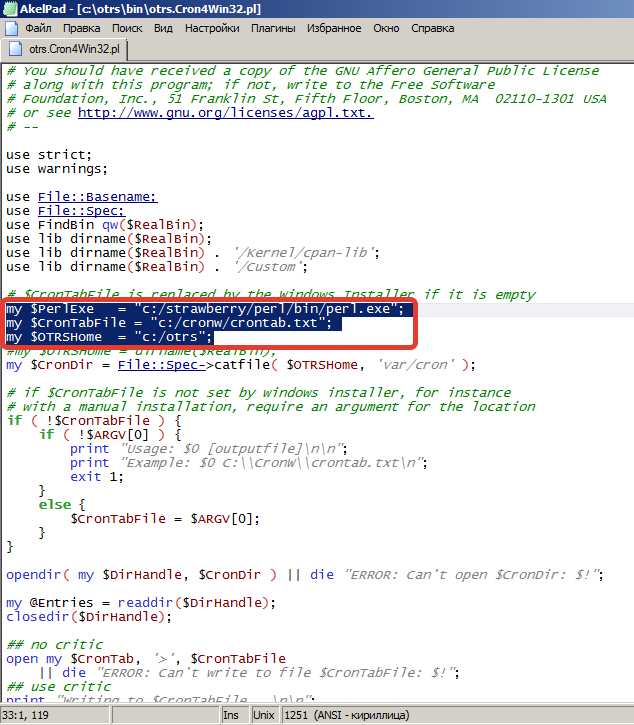
Запустим скрипт из командной строки:
Скрипт отработал, в папке c:\CRONw\ появился файл crontab.txt.
Установим CRON в качестве службы Windows. В командной строке запускаем скрипт
Служба установлена. Запускаем ее.
Download CRONw and unpack it into the c: \ cronw folder. For CRONw to work correctly, we need to install several pearl modules.
At the command prompt, do:
cpan Date :: Manip
cpan Log :: Dispatch
cpan Log :: Dispatch :: FileRotate
Все задания в CRONw хранятся в специальном файле crontab. Его можно создать, запустив C:/otrs/bin/otrs.Cron4Win32.pl, предварительно его отредактировав следующим образом:
my $PerlExe = «c:/strawberry/perl/bin/perl.exe»;
my $CronTabFile = «c:/cronw/crontab.txt»;
my $OTRSHome = «c:/otrs»;
Запустим скрипт из командной строки:
perl c:\otrs\bin\otrs.Cron4Win32.pl
Скрипт отработал, в папке c:\CRONw\ появился файл crontab.txt.
Установим CRON в качестве службы Windows. В командной строке запускаем скрипт
perl cronHelper.pl –install
Служба установлена. Запускаем ее.
Настройка планировщика заданий Windows
Раз уж мы взялись устанавливать OTRS в Windows-окружении, то и планировщик можно использовать местный.
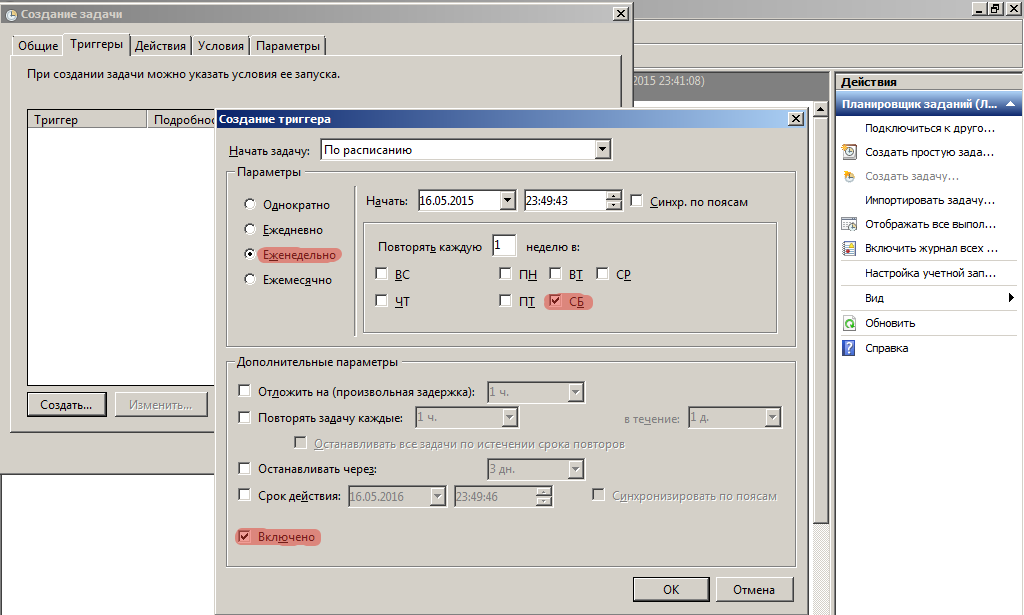
В папке c:/otrs/var/cron/ есть несколько стандартных заданий. По сути данные задания запускают perl-скрипты. Запустим планировщик заданий, меню Действия – Создать задачу.
Откроем в папке c:/otrs/var/cron/ первый файл cache.dist
# delete expired cache weekly (Sunday mornings)
20 0 * * 0 $HOME/bin/otrs.DeleteCache.pl --expired >> /dev/null
30 0 * * 0 $HOME/bin/otrs.LoaderCache.pl -o delete >> /dev/null
Дадим задаче имя — OTRS Weekly. Очистка кэша. Настроим выполнение задачи вне зависимости от регистрации пользователя и с наивысшими правами.

Go to the Triggers tab, click on the Create button. We indicate the schedule is the same as OTRS offers us.
Go to the Actions tab, click the Create button. Action - Run the program. As a program, specify the path to perl.exe, as an argument - the required script with parameters.

By analogy, we create an Action for the second script.
We repeat the operation for all the tasks we need. We start each task manually to make sure that it is running.
В папке c:/otrs/var/cron/ есть несколько стандартных заданий. По сути данные задания запускают perl-скрипты. Запустим планировщик заданий, меню Действия – Создать задачу.
Откроем в папке c:/otrs/var/cron/ первый файл cache.dist
# delete expired cache weekly (Sunday mornings)
20 0 * * 0 $HOME/bin/otrs.DeleteCache.pl --expired >> /dev/null
30 0 * * 0 $HOME/bin/otrs.LoaderCache.pl -o delete >> /dev/null
Дадим задаче имя — OTRS Weekly. Очистка кэша. Настроим выполнение задачи вне зависимости от регистрации пользователя и с наивысшими правами.
Go to the Triggers tab, click on the Create button. We indicate the schedule is the same as OTRS offers us.
Go to the Actions tab, click the Create button. Action - Run the program. As a program, specify the path to perl.exe, as an argument - the required script with parameters.
By analogy, we create an Action for the second script.
We repeat the operation for all the tasks we need. We start each task manually to make sure that it is running.
That's all, OTRS is ready for further configuration.
If it’s interesting, in the future guides will be published on setting up authorization through Active Directory and SSO authentication.