UI testing: checking the system at different resolutions
Testing of long web-forms in various browsers and in permissions is not only extremely necessary, but also for the third or fourth - an extremely tedious and concentration-intensive process. So, this is exactly the area that itself asks for automation. This is what we do.
In this article on Habr we will tell about our experience in testing large screens with Protractor, Zalenium and Selenium-grid tools. How we gradually introduced these automatic UI testing tools and what difficulties we had to go through.

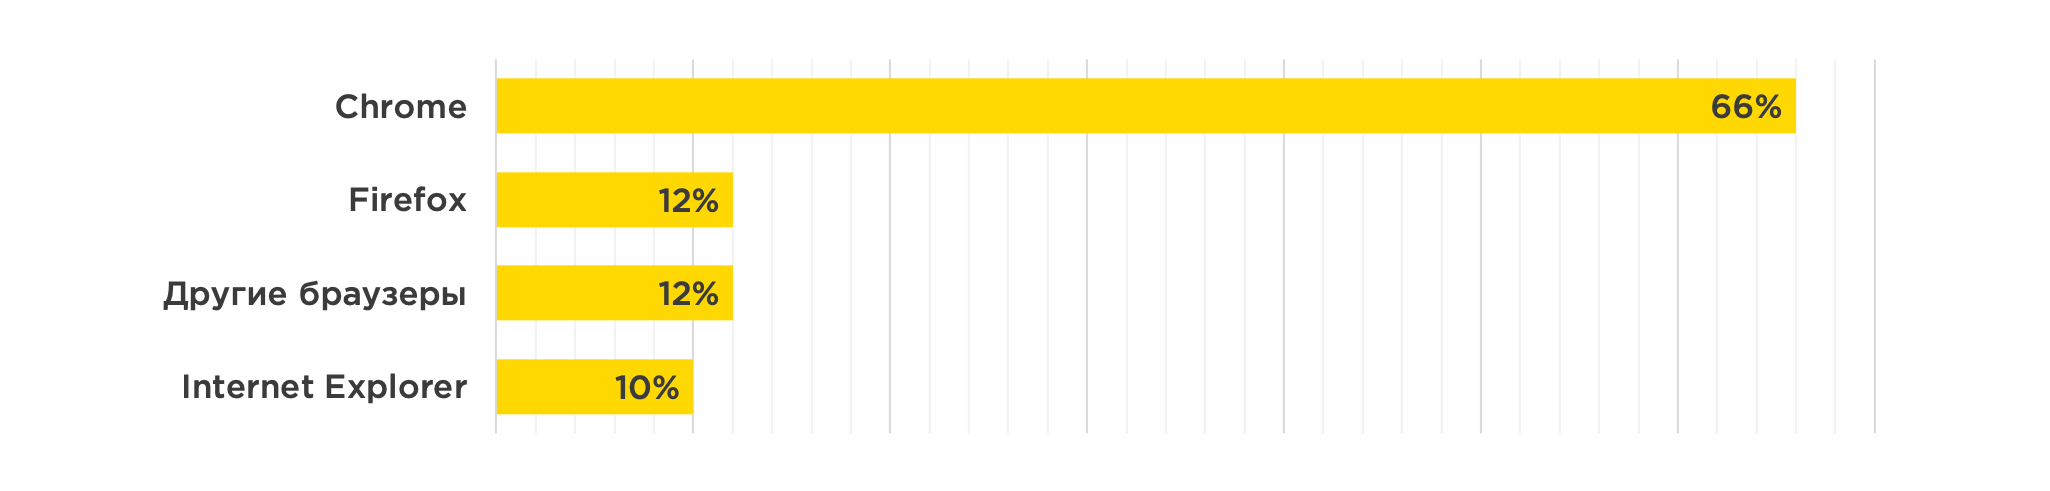
We create and maintain a system in which there are 7 thousand active users. Most often they use these browsers:
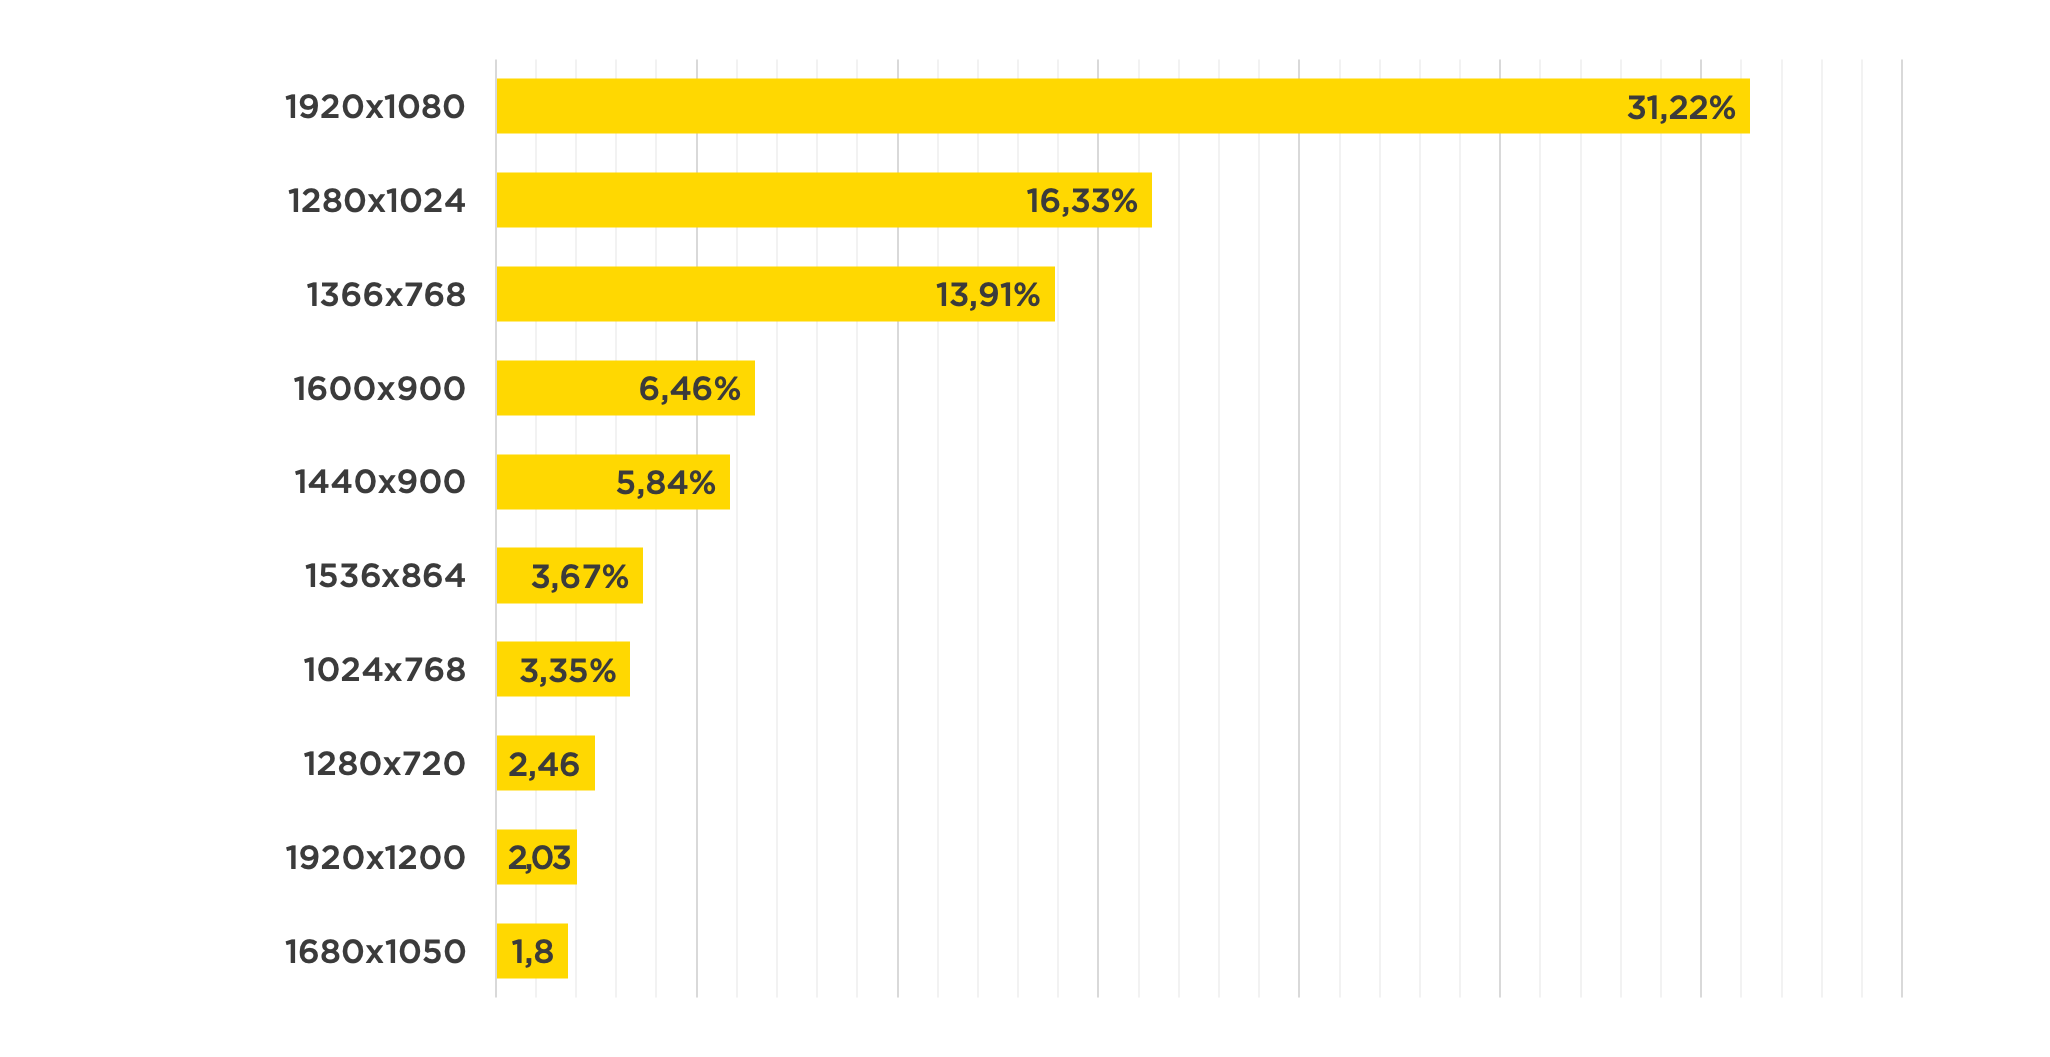
And the following screen resolutions:
Every time after the release of a new version, you need to check it for operability in these browsers and resolutions.
To better understand how UI tests usually work in our case, consider a simple case: testing the password recovery request functionality. Accordingly, there are two pages. On one you need to specify the username or e-mail, which will receive a letter with a link to change the password. After sending the application, the user goes to the page confirming that everything went well.

Password recovery form The

page to which the redirect occurs after the successful submission of the application
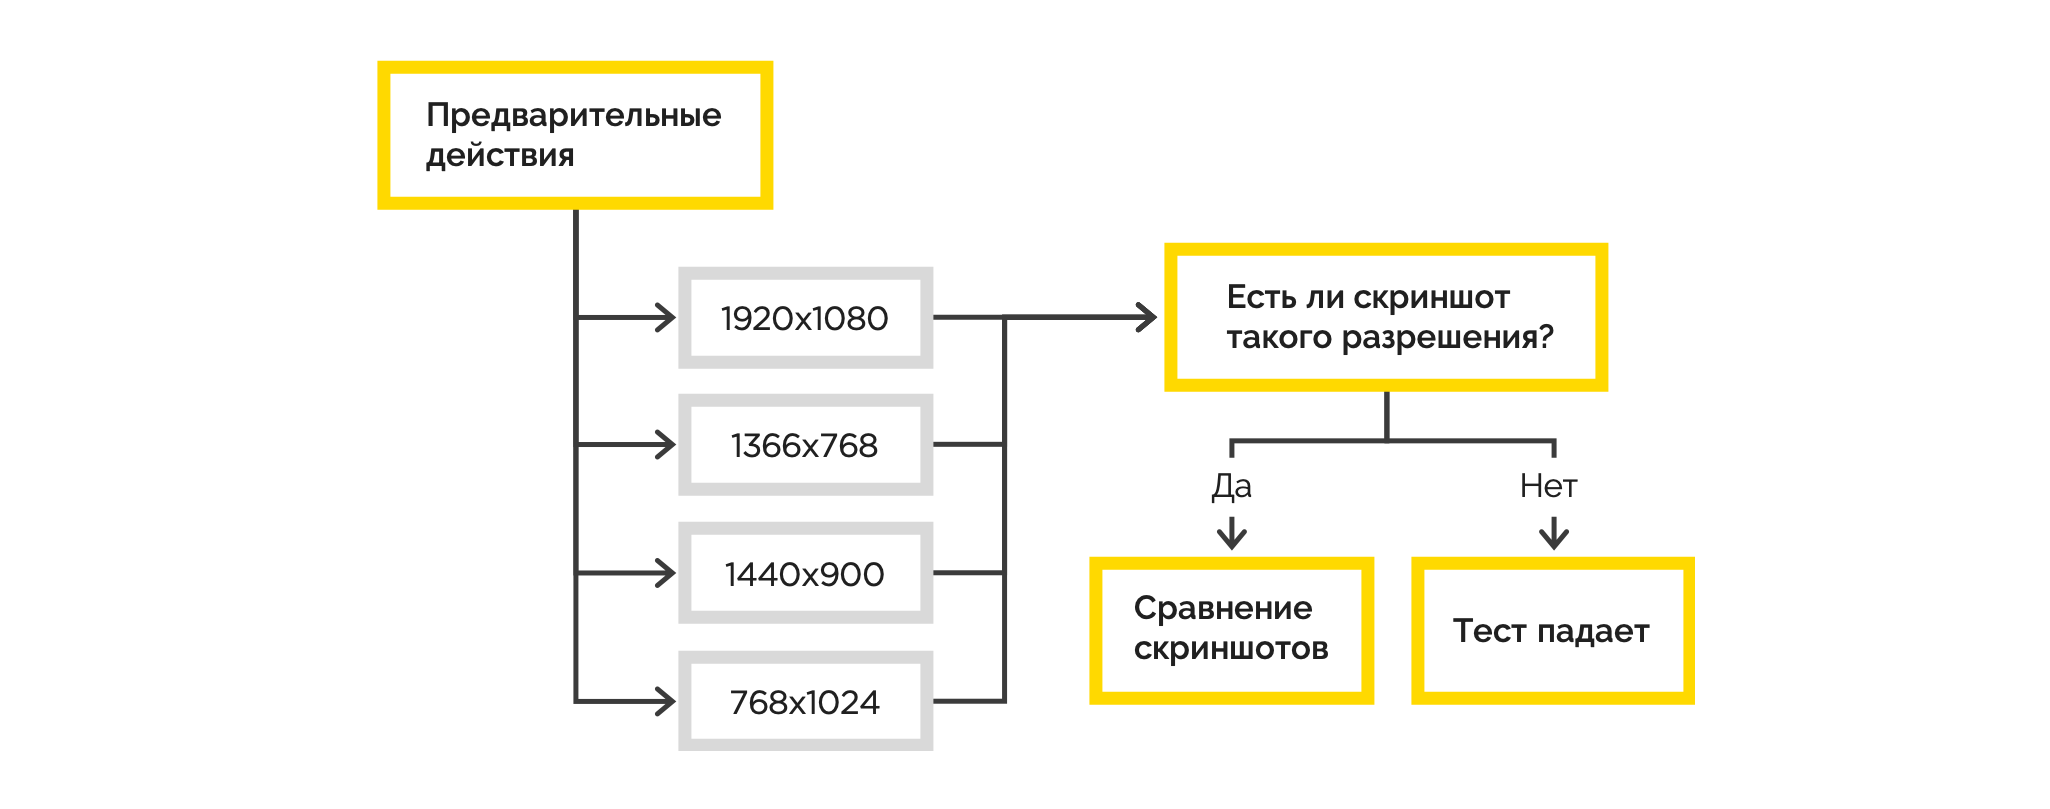
Testing this mechanism in a simplified form looks like this:

The same script in the form of code:
As you can see, the test code looks quite simple, it literally repeats what was depicted in the flowchart.
Now we will show which tools came in handy to implement this scheme at different screen resolutions, and what difficulties we encountered.
To automate testing, we chose Protractor - this is an e2e framework for testing Angular applications. We have an application just on Angular. With Protractor, we did two types of tests:
For example, if you continue to disassemble the example described above.

Screenshot with an incorrect link message

Differences (text and layout of buttons) are highlighted purple on the reference and actual screenshots.
If the page has dynamically changing data (for example, date or order number), you need to put a mask on them - such functionality is in the blue-harvest library . Otherwise, a comparison of screenshots will give a negative result.
Over time, our requirements for the existing UI testing system increased:
So let's make our tests run in parallel in both Chrome and FF.
To do this, in the Protractor'a configuration config we replace it with the following:
It's all obvious what each setting is responsible for. Attention deserves only
this flag, we provide a parallel launch of all specs in all browsers that are specified in multiCapabilities.
Under the word specs, there is a config parameter that determines which template to search for files with tests.
The theory of splitting all tests into several spec files seems logical, since parallelism works on them (for example, to create a separate spec file for each application feature).
In addition, in Protractor'e present the ability to select suites.
As you can understand from this part of the config, when running one suite, tests are performed from only one spec file. This is certainly useful if you want to run tests for only one part of the application.
As for testing the application at different resolutions, we went the following way. Some of the most popular ones were chosen as the experimental resolutions: 1920x1080, 1366x768, 1440x900, 768x1024. At the start of each test, all the necessary actions were initially performed, and then a series of screenshots checks was performed.
Screenshot tests that we did, unfortunately, worked only on the basis of the initially visible part of the page. And if there was a scroll on the page, then everything below remained unexplored for the layout.
In addition, we also need to support IE, for which our tests are currently not designed. We began to look for an adequate opportunity to run tests in IE and take full-size screenshots.

We settled on two solutions: Zalenium and Selenium-Grid . We omit the description of which one of them boasts of something, and tell about what they found / did not find in this or that solution.
Zalenium: this solution is launched in the Docker container and, following the main container, N other containers come up — to launch browsers. Allows at execution
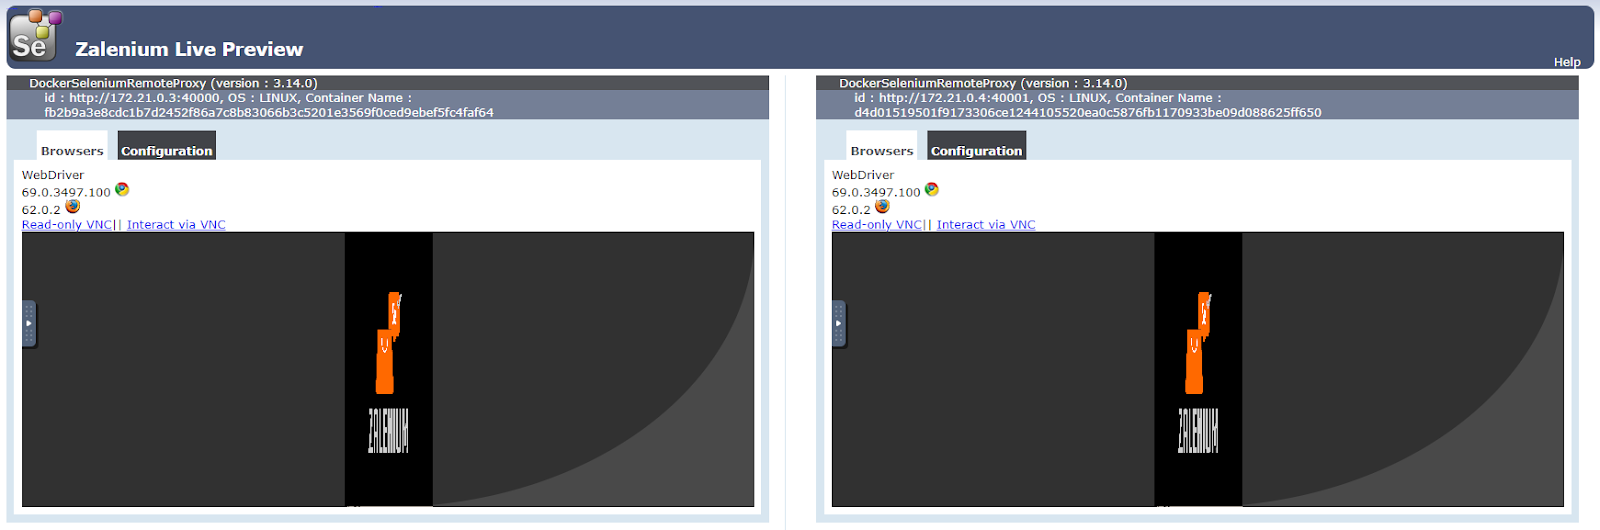
Two browsers with screen sizes 1920x6000
Selenium-grid: tests in IE started very easily.
Of the minuses: there is no possibility to set the size of the browser window of any size.
Total: Zalenium + Selenium-grid
We stopped at a bunch of Zalenium + Selenium-grid: through Zalenium, it was decided to drive tests in Chrome and FF, and through Selenium-grid to check the minimum efficiency of the application in IE.
1. Using formControlName as a locator of elements
Using a search on formControlName, you can easily search for the required fields on the form and fill them with test data. The formControlName locator is not built-in, but can be easily added:
2. Differences in operation globally and locally installed by webdriver-manager in Protractor.
When installing Protractor in the system (official documentation advises to install Protractor globally), in addition to the testing framework itself, we also get an installed webdriver-manager that provides drivers for browsers for running tests with which they caught one of the problems.
After moving to the project folder and performing webdriver-manager update, drivers for Chrome, FF, IE are downloaded. After that, when running the tests
, they grabbed the error: We realized that the error disappears if we pack the webdriver-manager update into the npm script:
and run through
3. Running Zalenium through the docker-compose
The Zalenium documentation is accompanied by examples of the
4. Visibility of elements by Protractor.
In the course of our experiments, at one point we faced the task of poking some menu on the page, i.e. go to each menu page and take a screenshot.
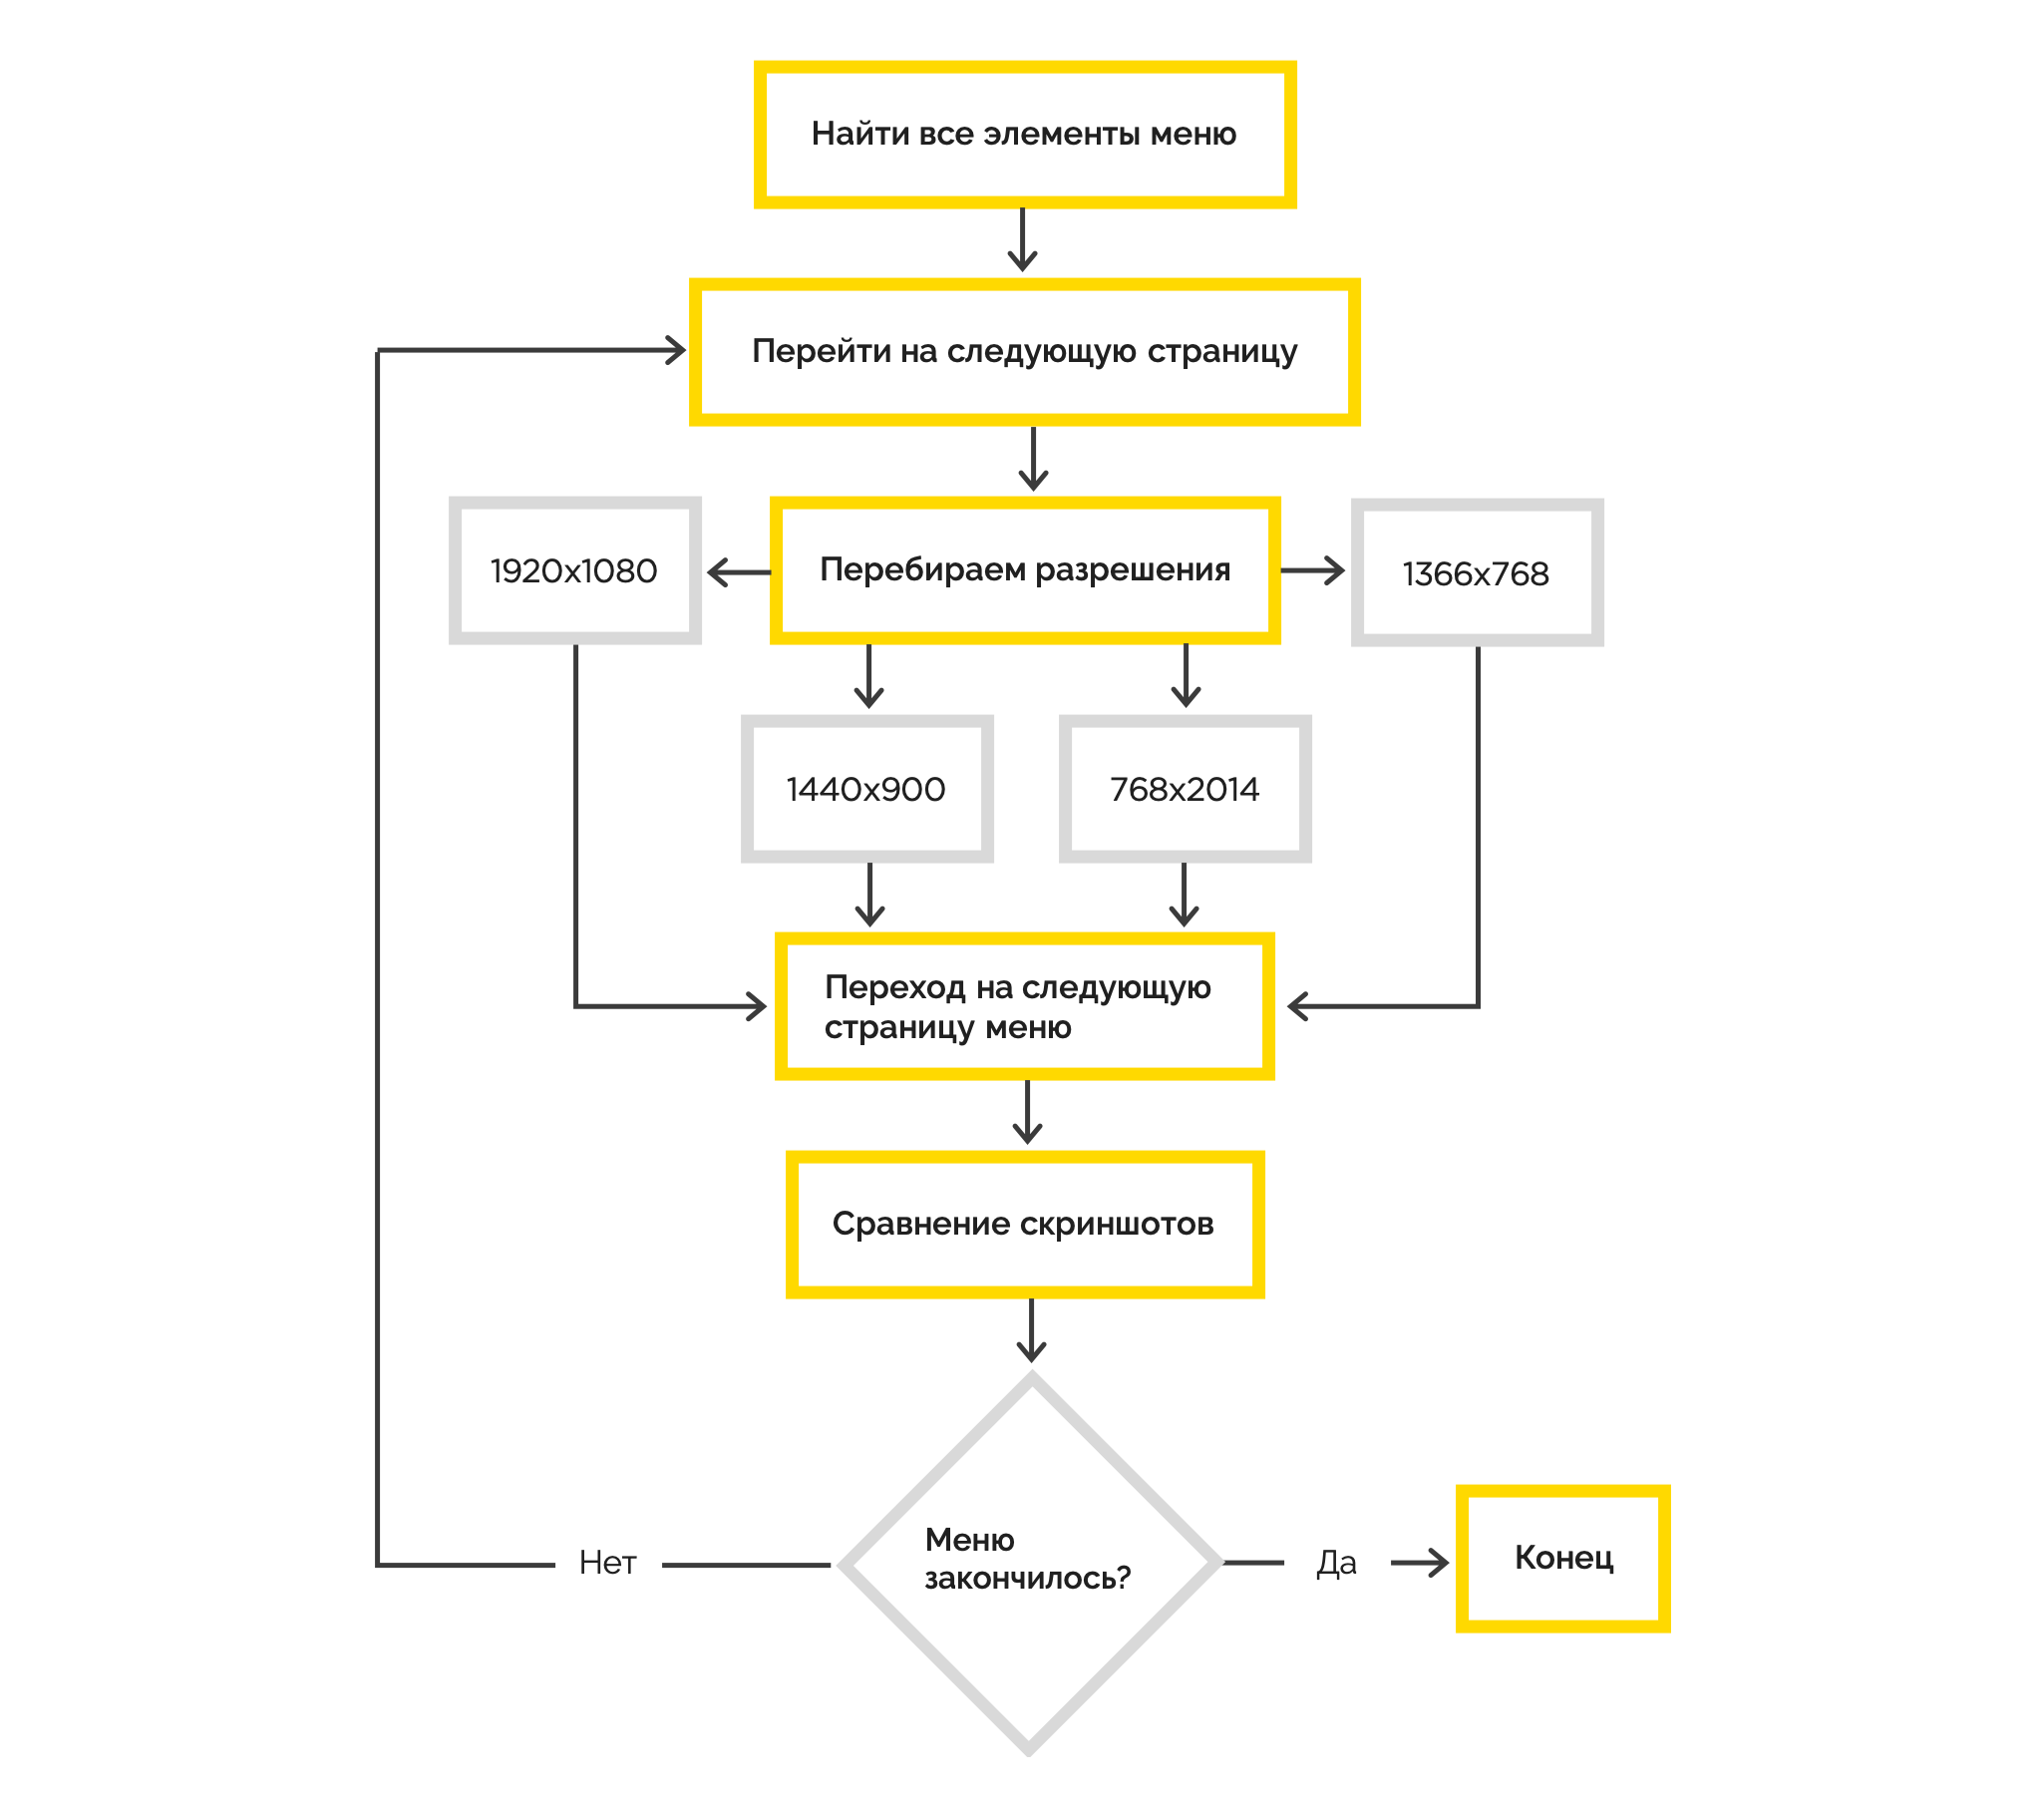
After processing the first element of the list, tests began to fall, throwing the error that there was nothing to click on in some coordinates. As it turned out, regardless of the fact that all the elements of the list were initially selected, after they became really invisible to our eyes, they also disappeared for Protractor’s eyes.
We solved the problem by setting the screen wide enough for the menu to appear back before clicking on its next element.
5. Changing the resolution in IE (Selenium-grid)
As you remember, in Chrome and FF, we perfectly configured to change the screen resolution. When it came to this in IE, we just caught the mistake
By long debug managed to find out that the error is flying at exactly the moment when it tries to execute the code:
6. Zalenium and WebSocket
Having collected all the bumps locally, it was decided to carry out Zalenium into the corporate infrastructure. The container is running, the DNS is registered, now everyone can drive tests to Zalenium, just by pointing the way to it in their Protractor config. Beauty, yes? But it was not there.
In this case, everything was already deployed on a Linux machine; Nginx was used as a server. The container with Zalenium was raised without any problems, followed by more N containers to launch browsers, but ... I could not make contact with them. It was easy to find that the parent container was trying to communicate with browser containers via the WebSocket protocol, and Nginx could not do this by default. The treatment is very simple.
9. Starting Selenium-Grid
To run Selenium-Grid, we need:
server startup:
IE driver launch:
Note the use of identical ports when starting the server and in the hub URL'e driver. We use as seleniumAddress in the protractor'a config
So we solved our problem and every time after the release of a new version we can test it for operability in these browsers and permissions.
It is important to understand that it is not enough just to raise the entire infrastructure for running tests and write them. You need to think about exactly how you will use them in your daily life.
We did not introduce UI tests in CI, because they are executed long enough to allow themselves to wait for their execution for each build.
To test a local version of an application or a pre-installed one of the test environments (internal or customer), just change the baseUrl in the Protractor configuration file. Therefore, the tests can run and the developer and tester.
Developer - when there is a need to perform tests, for example, for the local version of the application in the process of developing a new feature. QA-specialist - for example, as a smoke-test after deploying to the prod, or as a top check after a heap of refactoring.
In conclusion, we want to emphasize:
We believe that automating UI testing is good when done easily. So share with us your observations and successful tools in the comments.
In this article on Habr we will tell about our experience in testing large screens with Protractor, Zalenium and Selenium-grid tools. How we gradually introduced these automatic UI testing tools and what difficulties we had to go through.
We create and maintain a system in which there are 7 thousand active users. Most often they use these browsers:
And the following screen resolutions:
Every time after the release of a new version, you need to check it for operability in these browsers and resolutions.
To better understand how UI tests usually work in our case, consider a simple case: testing the password recovery request functionality. Accordingly, there are two pages. On one you need to specify the username or e-mail, which will receive a letter with a link to change the password. After sending the application, the user goes to the page confirming that everything went well.
Password recovery form The
page to which the redirect occurs after the successful submission of the application
Testing this mechanism in a simplified form looks like this:
The same script in the form of code:
it('Отправить заявку на смену пароля', asyncfunction(): Promise<boolean | void> {
     await browser.get(browser.baseUrl);
     await element(by.name('EmailOrLogin')).sendKeys(userLogin);
     await element(by.buttonText('Отправить')).click();
     const screenshot = await browser.takeScreenshot();
     const canonicalScreenshotPath  = <путь до эталонного скриншота>;
     await compareScreenshot(screenshot, canonicalScreenshotPath);
});
As you can see, the test code looks quite simple, it literally repeats what was depicted in the flowchart.
Now we will show which tools came in handy to implement this scheme at different screen resolutions, and what difficulties we encountered.
Selected Tools
Started with Chrome
To automate testing, we chose Protractor - this is an e2e framework for testing Angular applications. We have an application just on Angular. With Protractor, we did two types of tests:
- On general functionality: The application form opens, it is filled in with the data and the application is sent, after which we verify that there has been a redirect to the register of all applications.
- Screenshot tests: Protractor allows you to take a screenshot at any time. Using the separate blue-harvest library, we compared two screenshots: reference and real. If they do not match, a screenshot is immediately created, in which all the differences are visible, just like in Git.
For example, if you continue to disassemble the example described above.
Screenshot with an incorrect link message
Differences (text and layout of buttons) are highlighted purple on the reference and actual screenshots.
If the page has dynamically changing data (for example, date or order number), you need to put a mask on them - such functionality is in the blue-harvest library . Otherwise, a comparison of screenshots will give a negative result.
Add FF and different permissions
Over time, our requirements for the existing UI testing system increased:
- run tests not only in Сhrome, but also in FF,
- do screenshots not at one resolution, but at the most popular ones,
- run tests in parallel.
So let's make our tests run in parallel in both Chrome and FF.
To do this, in the Protractor'a configuration config we replace it with the following:
multiCapabilities: [
        {
            shardTestFiles: true,
            maxInstances: 2,
            browserName: 'chrome'
        },
        {
            shardTestFiles: true,
            maxInstances: 2,
            browserName: 'firefox'
        }
    ]
It's all obvious what each setting is responsible for. Attention deserves only
shardTestFiles: true/** * If this is set to be true, specs will be shared by file (i.e. all files to be run by this set of capabilities will run in parallel). * Default is false. */ this flag, we provide a parallel launch of all specs in all browsers that are specified in multiCapabilities.
Under the word specs, there is a config parameter that determines which template to search for files with tests.
exports.config = {
 ...
    specs: ['./e2e/**/*.spec.ts'],
 ...
}
The theory of splitting all tests into several spec files seems logical, since parallelism works on them (for example, to create a separate spec file for each application feature).
In addition, in Protractor'e present the ability to select suites.
exports.config = {
...
   suites: {
        suite01: './e2e/**/suite01.*.spec.ts',
        suite02: './e2e/**/suite02.spec.ts',
        suite03: './e2e/**/suite03.spec.ts'
    },
...
}
As you can understand from this part of the config, when running one suite, tests are performed from only one spec file. This is certainly useful if you want to run tests for only one part of the application.
As for testing the application at different resolutions, we went the following way. Some of the most popular ones were chosen as the experimental resolutions: 1920x1080, 1366x768, 1440x900, 768x1024. At the start of each test, all the necessary actions were initially performed, and then a series of screenshots checks was performed.
We connect IE and full-size screenshots
Screenshot tests that we did, unfortunately, worked only on the basis of the initially visible part of the page. And if there was a scroll on the page, then everything below remained unexplored for the layout.
In addition, we also need to support IE, for which our tests are currently not designed. We began to look for an adequate opportunity to run tests in IE and take full-size screenshots.
We settled on two solutions: Zalenium and Selenium-Grid . We omit the description of which one of them boasts of something, and tell about what they found / did not find in this or that solution.
Zalenium: this solution is launched in the Docker container and, following the main container, N other containers come up — to launch browsers. Allows at execution
docker runto specify screenWidth, screenHeight and get the size of the screen, for example, 1920x6000. There is no IE support. Two browsers with screen sizes 1920x6000
Selenium-grid: tests in IE started very easily.
Of the minuses: there is no possibility to set the size of the browser window of any size.
Total: Zalenium + Selenium-grid
We stopped at a bunch of Zalenium + Selenium-grid: through Zalenium, it was decided to drive tests in Chrome and FF, and through Selenium-grid to check the minimum efficiency of the application in IE.
What is interesting met in the process
1. Using formControlName as a locator of elements
Using a search on formControlName, you can easily search for the required fields on the form and fill them with test data. The formControlName locator is not built-in, but can be easily added:
exports.config = {
...
onPrepare() {
        require('ts-node').register({
            project: 'e2e/tsconfig.e2e.json'
        });
        jasmine.getEnv().addReporter(new specReporter({ spec: { displayStacktrace: true } }));
        addFormControlNameLocator(protractor);
    }
...
}
functionaddFormControlNameLocator(protractor) {
    protractor.by.addLocator('formControlName', function(value, optParentElement) {
        var using = optParentElement || document;
        return using.querySelectorAll('[formControlName="' + value + '"]');
    });
}
2. Differences in operation globally and locally installed by webdriver-manager in Protractor.
When installing Protractor in the system (official documentation advises to install Protractor globally), in addition to the testing framework itself, we also get an installed webdriver-manager that provides drivers for browsers for running tests with which they caught one of the problems.
After moving to the project folder and performing webdriver-manager update, drivers for Chrome, FF, IE are downloaded. After that, when running the tests
No update-config.json found. Run 'webdriver-manager update' to download binaries., they grabbed the error: We realized that the error disappears if we pack the webdriver-manager update into the npm script:
{
...
   scripts:{
	“webdriver-update”: “webdriver-manager update”
   }
...
}
and run through
npm run webdriver-update, then the drivers sources, and the update-config.json mentioned above get into the project folder. 3. Running Zalenium through the docker-compose
The Zalenium documentation is accompanied by examples of the
docker runcommand and the docker-compose file. Everything takes off almost as if by magic. The only problem we encountered arose when running through the docker-compose file /var/run/docker.sock is not a valid windows path. The solution is here . 4. Visibility of elements by Protractor.
In the course of our experiments, at one point we faced the task of poking some menu on the page, i.e. go to each menu page and take a screenshot.
After processing the first element of the list, tests began to fall, throwing the error that there was nothing to click on in some coordinates. As it turned out, regardless of the fact that all the elements of the list were initially selected, after they became really invisible to our eyes, they also disappeared for Protractor’s eyes.
We solved the problem by setting the screen wide enough for the menu to appear back before clicking on its next element.
5. Changing the resolution in IE (Selenium-grid)
As you remember, in Chrome and FF, we perfectly configured to change the screen resolution. When it came to this in IE, we just caught the mistake
Failed: java.io.IOException: Server returned HTTP response code: 405 for URL: http://localhost:21800/session/8d14426d-6483-4bbf-90b3-2a3ed46ebe9b/window/size. By long debug managed to find out that the error is flying at exactly the moment when it tries to execute the code:
browser.driver.manage().window().setSize(x, y). If you trybrowser.driver.manage().window().setPosition(x, y)then catch the same error, only size will change to position. This leads us to the fact that it is impossible to control the screen resolution when tests are running in IE. The solution to the problem is the crutches with which you will have to impose your code in order not to change the resolution \ position when IE is running. 6. Zalenium and WebSocket
Having collected all the bumps locally, it was decided to carry out Zalenium into the corporate infrastructure. The container is running, the DNS is registered, now everyone can drive tests to Zalenium, just by pointing the way to it in their Protractor config. Beauty, yes? But it was not there.
In this case, everything was already deployed on a Linux machine; Nginx was used as a server. The container with Zalenium was raised without any problems, followed by more N containers to launch browsers, but ... I could not make contact with them. It was easy to find that the parent container was trying to communicate with browser containers via the WebSocket protocol, and Nginx could not do this by default. The treatment is very simple.
location / {
   proxy_pass some_url;
   proxy_set_header Upgrade $http_upgrade;
   proxy_set_header Connection “upgrade”;
}
9. Starting Selenium-Grid
To run Selenium-Grid, we need:
- selenium-server ,
- IE driver, which is easy to get through webdriver-manager update --ie32.
server startup:
java -jar selenium-server-standalone.jar -role hub -hubConfig selenium-server-config.json selenium-server-config.json
{
"host": "127.0.0.1",
"maxSessions": 5,
"port": 4445,
"cleanupCycle": 5000,
"timeout": 300000,
"newSessionWaitTimeout": -1,
"servlets": [],
"prioritizer": null,
"capabilityMatcher": "org.openqa.grid.internal.utils.DefaultCapabilityMatcher",
"throwOnCapabilityNotPresent": true,
"nodePolling": 180000,
"platform": "WINDOWS"
}IE driver launch:
java -Dwebdriver.ie.driver=<путь до драйвера> -jar selenium-server-standalone.jar -role node -nodeConfig .\\ie-driver-config.json ie-driver-config.json
{
"capabilities": [
{
"browserName": "internet explorer",
"maxInstances": 1,
"platform": "WINDOWS",
"webdriver.ie.driver": "C:/Program Files (x86)/Internet Explorer/iexplore.exe"
}
],
"cleanUpCycle": 2000,
"timeout": 30000,
"port": -1,
"role": "node",
"hub": "http://127.0.0.1:4445/grid/register/",
"register": true,
"maxSessions": 5
}Note the use of identical ports when starting the server and in the hub URL'e driver. We use as seleniumAddress in the protractor'a config
http://127.0.0.1:4445/wd/hub.findings
So we solved our problem and every time after the release of a new version we can test it for operability in these browsers and permissions.
How to build tests in the workflow
It is important to understand that it is not enough just to raise the entire infrastructure for running tests and write them. You need to think about exactly how you will use them in your daily life.
We did not introduce UI tests in CI, because they are executed long enough to allow themselves to wait for their execution for each build.
To test a local version of an application or a pre-installed one of the test environments (internal or customer), just change the baseUrl in the Protractor configuration file. Therefore, the tests can run and the developer and tester.
Developer - when there is a need to perform tests, for example, for the local version of the application in the process of developing a new feature. QA-specialist - for example, as a smoke-test after deploying to the prod, or as a top check after a heap of refactoring.
In conclusion, we want to emphasize:
- Remember that UI tests will not relieve you of the need to carry out detailed manual testing. Automation only helps to cover the areas.
- Use automation intelligently, primarily for Smoke testing. Covering everything and everyone makes no sense - it's expensive and difficult to keep up to date
- Write easy. if your UI tests look hard, then you are doing something wrong. Beat on simple and use as directed (see point 2)
We believe that automating UI testing is good when done easily. So share with us your observations and successful tools in the comments.