On Soyuz to the ISS and back

There are adventures in Orbiter that make you feel elusive at home. In fact, what could be more familiar than flying on Soyuz to the ISS if this event occurs in reality four times a year? The excellent quality of the add-ons made by enthusiasts promises a lot of positive emotions, and the MCC archives with information about real flight allow you to plunge deeper into the atmosphere of modern astronautics.
Warning
This flight is difficult for beginners. If you do not have flight experience in Orbiter and an understanding of terminology, I recommend that you first practice at the PTK NP:
And if you are too lazy to fly in a simulator, watch a movie. Better than there, it's hard to tell.
Flight plan
- Start from Earth.
- Maneuvers for rendezvous with the ISS.
- Rapprochement and docking.
- Return to Earth.
Flight preparation
For the flight we need:
- Orbiter .
- Addon Soyuz FG / U v1.2 .
- Addon International Space Station v.3.2 .
- Addon Aerobrake MFD .
- Addon Baikonur Surface Tiles v1.1 (optional).
Installation and setup
Add-ons are installed in the following order: the first Soyuz FG / U, the second ISS. Archives just unzip to the Orbiter folder.
If you want to install Baikonur textures and make the start more beautiful:
- Unpack the textures into the Orbiter texture folder.
- Rows of readme file Add baikonur.cfg not ORBITER \ the CONFIG \ EARTH's \ the BASE , and Orbiter \ the Config \ Earth \ M . The fact is that ISS scenarios use a “different” Solar system with other configuration files.
Make sure that the Limited fuel option is set in the Parameters tab.
Orbiter will display a program error window after exiting the script. If this is annoying, in the Extra tab - Debugging options - Orbiter shutdown options, select the Respawn Orbiter process mode.
To prevent the Soyuz from breaking when landing on a ballistic descent, open in the Orbiter \ Scenarios \ International Space Station \ 2006 \ 052 folder . Soyuz TMA - 8 is the only file there in any text editor and delete the line ALLOW_BALLISTIC . Otherwise, due to a bug, the Soyuz will always go on a ballistic descent when landing instead of a controlled one.
Stage 1. Start from the Earth
I chose the Soyuz TMA-8 flight scenario, mainly because it is one of the last in the collection of scenarios (the ISS is already quite large), and the start takes place in the afternoon. In principle, no one bothers you to choose any other scenario of the “Union”.
Soyuz TMA-8 started on March 30, 2006 with a crew of cosmonaut Roscosmos Pavel Vinogradov, NASA astronaut Jeffrey Williams and the first Brazilian cosmonaut Marcos Pontes ( page with brief biographies ):

Start in the early morning, so this night is still off
Start and launch completely automatically. The only remark is that in order to avoid glitches, I do not advise setting the acceleration of time to more than x10 on the withdrawal , and in all the subsequent flight more than x100 .
Real start

And Orbiter

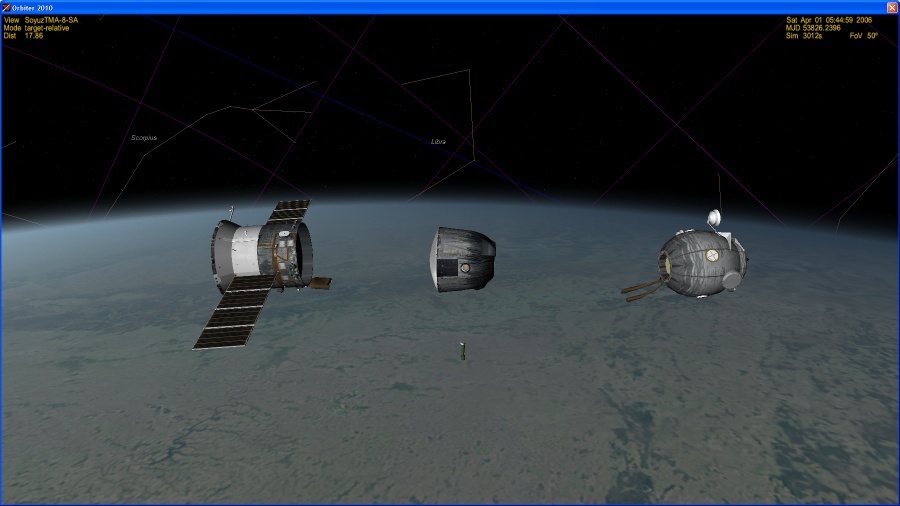
And such shots are so far only in the simulator. The third stage, after separation, drains the tanks, moving away from the newly launched Soyuz. I
recommend saving the script using Ctrl-S . Well, you can turn on some cosmic ambient, for greater atmospheric conditions:
Stage 2. Maneuvers for rendezvous with the ISS
So, we are in orbit, solar panels and antennas are open, we begin the path to the ISS. First of all, it is necessary to note the features of the Soyuz ship in the simulator:
The ship has four additional information screens that are switched by the U button :
Movement screen:

This screen displays:
- The operating mode of shunting engines (RCS, they are DPO). Engines can operate with 0.05 pulses; 0.1; 0.25 seconds and in continuous mode. Switch between modes by the M button
- Mode of operation of the marching engine (KTDU). Possible modes: 300 Newton thrust, 700 N, 6197 N. Switch between Ctrl-E modes .
- March cover status. It must be opened before turning on the CTDU. Opening and closing the lid - button E .
- Fuel supply in kilograms and percent.
Electrical and control

screen This screen displays:
- Status of antennas and solar panels.
- Management mode status.
- Headlight mode. Turn on / off Alt-L , turn on / off the automatic operation of the Ctlr-L headlights .
- Battery remaining and solar panel operation. If the batteries run out, the ship will lose control!
Docking screen

Contains useful data on the orientation and speed of rotation of the ship, as well as the status of the docking pin.
Blank screen
In this mode, additional information is not displayed and cannot interfere with other MFDs.
The general rule of flights on the Soyuz is that we don’t rush anywhere, we don’t abuse automatic modes of maintaining orientation, we save fuel .
It is better to turn around in two or three minutes with a pair of pulses than to spend a few pounds of fuel in an automatic turn.
The pulse mode is very unusual for Orbiter, it is almost never found in other ships, so you need to get used to it.
Also, the control keys have a very non-ergonomic key that interferes with the role component - depressurization of the household compartment (normally done before separating the compartments at the landing stage) - button A without any modifiers. Careless pressing (and MFD orbit matching is called up via Shift-A) - and depressurization of the household compartment makes normal role-based continuation of further flight impossible.
Alignment of the planes of the orbits
Let's see the parameters of the orbit of a real flight :
| Parameter | Real value | Value in the simulator |
|---|---|---|
| Apocenter | 242 (± 42) km | 245 km |
| Pericenter | 200 km (+ 7 / -22) km | 195 km |
| Orbital inclination | 51.67 ° ± 0.058 ° | 51.60 ° |
If it were not for the inclination error, the derivation would be almost ideal. And so we first have to combine the planes of the orbits of the Soyuz and the ISS:

As much as half a degree. Too much, but nowhere to go. I propose to perform the correction at the first turn (in reality, the first maneuver was carried out four hours after the start). The next node is ascending, which means that it will be necessary to deploy the ship “down” from the plane of the orbit. Do not forget to open the KTDU cover a few minutes before the assembly - firstly, it blocks the engine starting, and secondly, the MFD with the cover closed cannot calculate the pulse duration. Recall the rule of thumb - the engine starts at the moment when half the estimated engine operating time remains before the assembly:

Start of the maneuver

Result
At the end of the maneuver, it is worth earning money with shunting engines for maximum alignment of the orbits. Please note that we spent as much as 20% of the fuel.
After the maneuver, I recommend that you switch the DPO to the minimum pulse mode, turn on the automatic system for maintaining solar orientation (it is quite economical) with the K button and save the script.
ISS orbit synchronization
We look at the parameters of the orbit of Soyuz and the ISS according to the Orbit MFD:

Between us and the ISS, almost half of the revolution (the so-called phase angle). This was done on purpose, so that for two days of flight (I will remind you, in the courtyard of 2006, there is no talk of a six-hour docking and speech scheme yet), Soyuz could rush to catch up with the ISS.
How will we synchronize the orbit? I propose to divide this into the following stages:
- Wait until the phase angle decreases.
- Raise the apocenter to the intersection with the ISS orbit. I recommend a maneuver in the apocenter of the current orbit in order to minimize the speed difference between us and the ISS. If you raise the apocenter from the pericenter of the current orbit, then in the apocenter our speed will be noticeably lower, and the difference between the almost constant speed of the ISS in a circular orbit is greater.
- Synchronize orbits by raising the pericenter.
- Perform a braking maneuver with respect to the ISS in the near field.
We are waiting for a decrease in the phase angle .
Patience is one of the necessary qualities of real astronauts. You wait for a flight into space and prepare for several years (especially unlucky astronauts have been waiting for their flight for 19 years!), To wait a couple of days in orbit is nonsense. We plan a maneuver at MFD Transition:

March 30, 03:52 UTC, the first turn ends

March 30, 19:40 UTC, it's time to prepare for a maneuver
A little tip: getting ready for a maneuver will be easier if you are not in a hurry to orient the ship on the opposite side of the orbit against orbital velocity vector (for braking). After half a turn of Soyuz, “itself” will occupy an almost correct position, which will only be slightly corrected.
The result of the maneuver on the MFD “Transition” is clearly not visible - the lines merge. We switch to the MFD “

Orbit Synchronization”: Not bad, we have four more orbits to prepare for synchronization of orbits. We turn on the Sun orientation mode again and wait:

Our task is to raise the pericenter to reduce the DTmin parameter to zero:

Rapprochement and docking - through the coil. Funny, the time counter shows that instead of the real two-day scheme, it turned out to be a one-day one - so once the Unions flew to the Salyut orbital stations. The scheme is not very successful - by the end of the first day the period of adaptation to zero gravity passes most clearly, and 40-60% of the crew (according to statistics) suffer from nausea. But this does not threaten us in a virtual flight, so we boldly go to the dock.
Necessary operations for the preparation of the docking:
Find out which node we are connecting to . Historically, Soyuz TMA-8 docked to the nadir node of the Zarya module, in scenario numbering it is node number 1.
Set up the Docking MFD . We turn on the MFD “Docking”, select the first docking station as the target, and display the data on the ILS.
Turn off the ISS orientation system. Press F3 to open the ships menu and select ISS. By pressing the End button above the block of cursor keys we turn off the orientation system. Switching the screens in the same way as “Union” along U makes sure that the system is turned off:

Now the ISS has stopped turning slowly around its axis, and we can easily dock.
Calculate braking start distance. On the one hand, we do not want to crash into the ISS. But, on the other hand, we do not want to brake too far so that we do not have to spend fuel on acceleration, braking and orientation again. Using only school formulas of acceleration, speed and distance traveled, not taking into account fuel consumption and reducing the mass of the ship, we get the following simple plate that tells us at what distance braking should start for a given approach speed:

Note that with a difference in speed of 100 m / s only 6 km is enough, and with a speed difference of 200 m / s you need 23 km! Therefore, we did our best to reduce the speed difference earlier in the scenario.
Stage 3: Rapprochement and Docking
Here is a diagram of the real rapprochement and docking of the Soyuz TMA-8 from here :
We, of course, have different flight parameters, because we performed other maneuvers. But from this picture there is one useful tip - it’s more convenient to dock in the afternoon.
And we are also approaching the ISS:

Range of 30 km, it is time to turn against the speed vector relative to the ISS.

Range 3 km, approach speed 20 m / s. If you look again at the actual docking scheme, we are moving at the same speed, the MCC will not fine us for speeding and dangerous maneuvers.

Range 1.2 km. The ISS is clearly distinguishable and is approaching simply with alarming speed. The only thing that calms us down is that we are missing a bit and flying a bit to the side, rather than crashing into the station.

I started to brake from 400 m, let there be a small margin. Distance 200 m, relative speed 0. If you have a night, it is better to wait for the way out of the shadow of the Earth - it will be more convenient to dock.
Docking
And where, in fact, is the nadir docking unit of the Zarya module? Here is the ISS photo of July 2006 from the STS-121 Space Shuttle mission:

This photo was taken from the opposite side of the ISS relative to the previous image. Thus, we now need to shift back and down ( where the ISS has top, bottom, right and left ), turn the ship with the docking unit up, and proceed with the docking. I remind you that we have not so much fuel, so it’s worth maneuvering carefully and not in a hurry.

The ISS is much smaller than today, but still impressive.
We turn off the MFD with the PWR button on the screen, put the additional information screen in docking mode, select Ctrl + O, select the docking target (ISS), press the O buttonwe select port 0 (obviously IT specialists did the script, since they start numbering from scratch :)) and release the docking pin with the Y button .

The nadir node of the Zarya module is indicated by the arrow. But our task is not to aim directly at him, but at the target for manual docking . The fact is that the point from which we look is located at the periscope, and we see the picture as if we were looking at the VSC (special space sight). The “point of view” of the periscope is slightly away from the node, so we must aim at a special target. The main trouble is that the target may not be visible, and even the included headlight does not light it. If you don’t understand how and where to aim, turn on the “Docking” MFD again, with it everything becomes clearer. Here is the correct position:


Appearance
There is a dock! What is especially nice - another 513 kg of fuel, as much as 58%!
Stage 4. Return to Earth
For a successful and comfortable return to Earth, we need the following parameters to match:
- The landing site of the "Unions" is on the trajectory of movement.
- At the landing site, day, or, even better, evening. Not that it was necessary, just so convenient.
On the MFD “Map” it looks something like this:

Docking from the ISS by Ctrl-D .

We look at the landing scheme of the real “Union TMA-8” and the coordinates of the landing stages :
It is important for us that the longitude of the start of braking is 324 °, i.e. 36 ° West. The longitude of the landing site is 67 °, so the Soyuz begins to slow down ~ 100 ° degrees to the landing site.
Getting ready for landing. We turn on the MFD “Aerodynamic Braking”, select the “Soyuz Landing Site” as the target and switch it to map mode. We orient the ship against the orbital velocity vector (stern forward). We are waiting for 36 ° west longitude and begin braking. We brake until the estimated shortage is about 100 km.

At an altitude of about 150 km, we depressurize the household compartment (button A ) and press J two times to separate the compartments:
After separating the compartments, we select the landing site again as the target. The lander in reality is controlled only by roll and pitch, in the simulator there is also yaw. We take the stern forward position and at first do not interfere with control - the ship in the atmosphere will orient itself:

If necessary, you can perform small roll maneuvers, controlling the lifting force. It should be noted that the space for maneuver is very limited, only small errors can be corrected:

Parachutes and soft landing engines are introduced automatically:

Error of 15 km, maximum overload of 4.7 g - for a manual landing an excellent result!


Marcos Pontes returned to Earth on Soyuz TMA-7, the third on Soyuz TMA-8 landed Anush Ansari - a native of Iran, a US citizen and fourth space tourist.
Conclusion
Manual translated into Russian .
The entire series of publications on Orbiter .
For real manned launches and landings almost always there is a broadcast on NASA TV , text and video broadcasts can also be expected, for example, in the Roskosmos VK group or look for links to broadcasts on the Cosmonautics News forum .