Gamma, ColorMapping and LinearWorkflow
A brief overview and practical application of Gamma and Color Mapping in a combination of 3D max, V-ray and Nuke.

This story began with the fact that the imperfect technology for displaying a video signal with a beam tube suffered from severe dips in the dark direction and the matter is not about cookies at all. It was impossible to compensate for this drawback programmatically, but it was very expensive in hardware and therefore decided to make adjustments to the video itself at the stage of content production. Years passed, mountains of exclusively gamma-corrected pictures were developed, and when the era of computers arrived, no one began to transplant the industry to new standards, but adopted the existing ones. Since then, the computer and we see the image in different ways. If everything is “ok” for us, then for a computer the picture looks much brighter, just before you show us the image, the signal undergoes a “natural” inverse gamma correction on the side of the monitor. Modern monitors can display a picture linearly,
All-nothing, but for some reason, computer graphics were built on mathematical principles and all color manipulations converge on banal arithmetic operations. And imagine now that you need to increase the average gray color in two. In linear space, the “average gray” is 0.5 * so we get 0.5x2 = 1.0, that is, you get a pure white color, which is quite logical, but not in linear space the “average gray” is somewhere offhand 0.72, we multiply by 2 and it turns out ... nonsense it turns out guys.
So Rendering is a bunch of different arithmetic perversions and all sorts of multiplayer, overlayers and colororburns make a bit of a difference what is required of them if the color space is not linear. Therefore, those whose eyes are able to distinguish between blue and blue have decided to work in the "line" so as not to create problems for themselves at all stages of image processing.
Rule: We bring the incoming material into linear space. We work in linear space. Gamma correction is applied only to the final picture (and in most cases this happens automatically).
An example of the translation of the gamma is in the description of Blender:
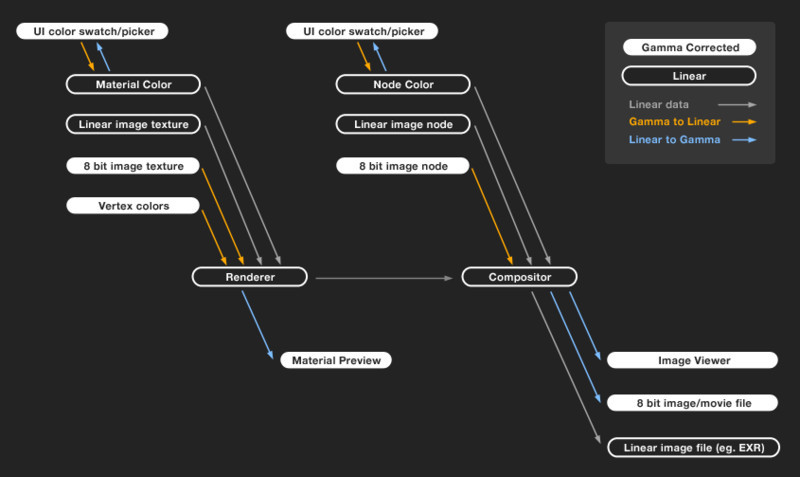
By the way, you should not bring Normal Bump into linear space, since such cards are already in the "line", when connecting such textures, you need to exclude them from the correction.
In addition to the complexity with the gamut, we have a technological problem, which rests on the ability to display. We have 2 main ways of displaying pictures - on paper and on the screen. Both methods differ fundamentally in that one reflects light, and the second emits, but both have a very limited range of transmission of light intensity, in comparison with the one that we can see, so the image must be “compressed” to the desired range. Moreover, it is not enough just to compress the brightness, it must be done so that in places of weak sensitivity it is necessary to compress a lot, and where we have a lot of sensitivity, it is necessary to compress ... well, you understand. This is done because of the peculiarities of our perception. Now I will explain a little more in detail.
We perceive the world around us not linearly. To increase the feeling of something by 2 times, it’s not enough for us to double a portion ... we need to triple or quadruple it, that is, if we twist the brightness of the light source 2 times, then we feel that the brightness increased by 30% ... these are we “clear guys” . All sense organs work in a logarithmic proportion. The inverse natural logarithm is called the Exponent ... which looms in the Color Mapping settings. The logarithm is the main function in the conversion of intensity, regardless of whether it is an image, a portion of salt or the joy of the amount of money in the bank.
For this reason, we can clearly distinguish between semitones in dark areas and are more indifferent to differences in bright ones. That is why when we compress, we neglect high color values.
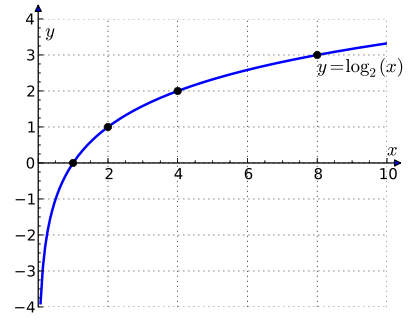
Imagine that in the world we see, the difference in brightness can go far beyond a million, and the monitor is able to show a difference of about 10,000. ColorMapping “compresses” a wide range of brightness into that small area that the monitor or image printed on a sheet of paper can display, it makes it is instead of our eyes, and the brain interprets the picture as a finished image. Pay attention to the schedule of the Binary Logarithm, it becomes clear from it - mostly the light areas are compressed while the “shadows” remain unchanged, so we get rid of the unpleasant “highlights” that beginners work with.
Logarithm and gamma are almost the same thing, but they have special differences in construction: for a gamma, you need to have two extreme points - zero and one corresponding to black and white, a curve is constructed between these points with a bending force equal to gamma. But for the exponent, one starting point is enough and the curve can be built to infinity. Therefore, in a linear space with a high dynamic range (HDR) of color, where there is no limitation on brightness, an exponent is used, and in ready-made gamma is used. Of course there are programs where you can apply the gamma to the HDR image too, but such a perversion can lead to unpredictable values initially above one.
ColorMapping and gamma correction are two similar things, but deal with different tasks. The gamma is designed to compensate for the “old legacy”, while ColorMapping compresses the “ruler”.
That is, in the work we take into account two separate color transformations and do not confuse them.
There are two main ways of making pictures. One way leads to a ready-made file at once: with a gamma trimmed by HDR, with a minimum number of bits per channel, with all that implies the absence of serious edits. The second prepares a "raw semi-finished product" which wakes up "cooked" until ready in the post-processing program. If we are preparing a file for the post, then we need to maintain linear space + high dynamic range of colors. We will consider in practice both methods.
In the latest version of 3D Max, Input and Output were removed from the Gamma settings, so you need to set the overall gamma value to 2.2. 3D Mach will itself bring incoming textures into linear space.
We do the ColorMapping settings in 3D Max as follows:
Type - Linear multiply. - We work in the line
Dark - 1.
Bright - 1. - we will leave these values by default, if necessary, we will change them at the post.
Gamma - 2.2. - The fact is that this gamma will not be applied to the final image and in fact it will remain - 1 ... because we will check the box:
Don’t affect colors - put a daw. We do this in order to stay in linear space, but knowing that Vraevsky Sampler does not always report in dark places, we apply the gamma only to it. Thus, in dark areas, our details will not disappear and we will remain in the “
Clamp ” line - Disable, since we need the entire range of brightness.
Such images must be saved in Float point formats (32 bits), such as openEXR. Now, at the output, we will have a relatively accurate representation of the color model, almost like in reality.
I admit, I like the post with its creative flexibility. When all the basic, rough work is done and it remains to “twist” the buttons for taste.
We omit the details specific to specific projects and immediately move on to ColorMapping for Nuke.
So we have a “linear” picture with scorched light areas. Recalling my story about the characteristics of perception, we repeat a similar trick. Moreover, the mechanics of work will be similar to the Reinhard type in ColorMapping V-ray.
We will need 2 nodes: Grade and Log2Lin.
Grade will act as a multiplier for the whole picture or ISO camera value if you prefer.
Log2Lin will compress the picture, but first you need to configure it:
Operation - lin2log.
Black - 0
White - 255
Gamma - 1
Mix - 0.95
"Compressing" the brightness, we make the picture darker so you can immediately set the Gain value to 5 in the settings of the Grade node. The Mix Log2Lin nodes will perform the same function that the Burn value in ColorMapping 3D Max is only in the other direction, that is, if the Burn value is 0.3 then Mix set to about 0.7
If you avoid Post, then you can do all color conversions in ColorMapping, but for this you have to do test renders. We select the type of transformation - Rinhard, since it is engaged in averaging between the ruler and the exponent via the Burn value parameter. If you have “burned” colors, then just lower the Burn value.
Gamma - 1
Clamp - 1
Don't affect colors - remove the daw.
Since Sampler will now scatter samples based on the visible picture, you need to lower the noise threshold in DMC Sampler from 0.01 for the “line” to about 0.003.
Some guys, instead of lowering the noise level, simply increase the gamma by 2.2, and in the Gamma settings of the program they put a unit in the Output field. I think this is ideologically wrong, although it also works.
_______________________________________________________________________________
* Hereinafter, we are talking about color values in the Float Point where 0 = black color, and 1 = white.
Part one. Gamma Start
This story began with the fact that the imperfect technology for displaying a video signal with a beam tube suffered from severe dips in the dark direction and the matter is not about cookies at all. It was impossible to compensate for this drawback programmatically, but it was very expensive in hardware and therefore decided to make adjustments to the video itself at the stage of content production. Years passed, mountains of exclusively gamma-corrected pictures were developed, and when the era of computers arrived, no one began to transplant the industry to new standards, but adopted the existing ones. Since then, the computer and we see the image in different ways. If everything is “ok” for us, then for a computer the picture looks much brighter, just before you show us the image, the signal undergoes a “natural” inverse gamma correction on the side of the monitor. Modern monitors can display a picture linearly,
All-nothing, but for some reason, computer graphics were built on mathematical principles and all color manipulations converge on banal arithmetic operations. And imagine now that you need to increase the average gray color in two. In linear space, the “average gray” is 0.5 * so we get 0.5x2 = 1.0, that is, you get a pure white color, which is quite logical, but not in linear space the “average gray” is somewhere offhand 0.72, we multiply by 2 and it turns out ... nonsense it turns out guys.
So Rendering is a bunch of different arithmetic perversions and all sorts of multiplayer, overlayers and colororburns make a bit of a difference what is required of them if the color space is not linear. Therefore, those whose eyes are able to distinguish between blue and blue have decided to work in the "line" so as not to create problems for themselves at all stages of image processing.
Rule: We bring the incoming material into linear space. We work in linear space. Gamma correction is applied only to the final picture (and in most cases this happens automatically).
An example of the translation of the gamma is in the description of Blender:
By the way, you should not bring Normal Bump into linear space, since such cards are already in the "line", when connecting such textures, you need to exclude them from the correction.
Part two. Color mapping
In addition to the complexity with the gamut, we have a technological problem, which rests on the ability to display. We have 2 main ways of displaying pictures - on paper and on the screen. Both methods differ fundamentally in that one reflects light, and the second emits, but both have a very limited range of transmission of light intensity, in comparison with the one that we can see, so the image must be “compressed” to the desired range. Moreover, it is not enough just to compress the brightness, it must be done so that in places of weak sensitivity it is necessary to compress a lot, and where we have a lot of sensitivity, it is necessary to compress ... well, you understand. This is done because of the peculiarities of our perception. Now I will explain a little more in detail.
Our feelings lie to us.
We perceive the world around us not linearly. To increase the feeling of something by 2 times, it’s not enough for us to double a portion ... we need to triple or quadruple it, that is, if we twist the brightness of the light source 2 times, then we feel that the brightness increased by 30% ... these are we “clear guys” . All sense organs work in a logarithmic proportion. The inverse natural logarithm is called the Exponent ... which looms in the Color Mapping settings. The logarithm is the main function in the conversion of intensity, regardless of whether it is an image, a portion of salt or the joy of the amount of money in the bank.
For this reason, we can clearly distinguish between semitones in dark areas and are more indifferent to differences in bright ones. That is why when we compress, we neglect high color values.
Imagine that in the world we see, the difference in brightness can go far beyond a million, and the monitor is able to show a difference of about 10,000. ColorMapping “compresses” a wide range of brightness into that small area that the monitor or image printed on a sheet of paper can display, it makes it is instead of our eyes, and the brain interprets the picture as a finished image. Pay attention to the schedule of the Binary Logarithm, it becomes clear from it - mostly the light areas are compressed while the “shadows” remain unchanged, so we get rid of the unpleasant “highlights” that beginners work with.
Logarithm and gamma are almost the same thing, but they have special differences in construction: for a gamma, you need to have two extreme points - zero and one corresponding to black and white, a curve is constructed between these points with a bending force equal to gamma. But for the exponent, one starting point is enough and the curve can be built to infinity. Therefore, in a linear space with a high dynamic range (HDR) of color, where there is no limitation on brightness, an exponent is used, and in ready-made gamma is used. Of course there are programs where you can apply the gamma to the HDR image too, but such a perversion can lead to unpredictable values initially above one.
ColorMapping and gamma correction are two similar things, but deal with different tasks. The gamma is designed to compensate for the “old legacy”, while ColorMapping compresses the “ruler”.
That is, in the work we take into account two separate color transformations and do not confuse them.
Part Three. Practical work
There are two main ways of making pictures. One way leads to a ready-made file at once: with a gamma trimmed by HDR, with a minimum number of bits per channel, with all that implies the absence of serious edits. The second prepares a "raw semi-finished product" which wakes up "cooked" until ready in the post-processing program. If we are preparing a file for the post, then we need to maintain linear space + high dynamic range of colors. We will consider in practice both methods.
Way number 2. Longer means skillfully!
In the latest version of 3D Max, Input and Output were removed from the Gamma settings, so you need to set the overall gamma value to 2.2. 3D Mach will itself bring incoming textures into linear space.
We do the ColorMapping settings in 3D Max as follows:
Type - Linear multiply. - We work in the line
Dark - 1.
Bright - 1. - we will leave these values by default, if necessary, we will change them at the post.
Gamma - 2.2. - The fact is that this gamma will not be applied to the final image and in fact it will remain - 1 ... because we will check the box:
Don’t affect colors - put a daw. We do this in order to stay in linear space, but knowing that Vraevsky Sampler does not always report in dark places, we apply the gamma only to it. Thus, in dark areas, our details will not disappear and we will remain in the “
Clamp ” line - Disable, since we need the entire range of brightness.
Such images must be saved in Float point formats (32 bits), such as openEXR. Now, at the output, we will have a relatively accurate representation of the color model, almost like in reality.
Cooking Prefabricated at Nuke
I admit, I like the post with its creative flexibility. When all the basic, rough work is done and it remains to “twist” the buttons for taste.
We omit the details specific to specific projects and immediately move on to ColorMapping for Nuke.
So we have a “linear” picture with scorched light areas. Recalling my story about the characteristics of perception, we repeat a similar trick. Moreover, the mechanics of work will be similar to the Reinhard type in ColorMapping V-ray.
We will need 2 nodes: Grade and Log2Lin.
Grade will act as a multiplier for the whole picture or ISO camera value if you prefer.
Log2Lin will compress the picture, but first you need to configure it:
Operation - lin2log.
Black - 0
White - 255
Gamma - 1
Mix - 0.95
"Compressing" the brightness, we make the picture darker so you can immediately set the Gain value to 5 in the settings of the Grade node. The Mix Log2Lin nodes will perform the same function that the Burn value in ColorMapping 3D Max is only in the other direction, that is, if the Burn value is 0.3 then Mix set to about 0.7
Way number 1. Without dancing.
If you avoid Post, then you can do all color conversions in ColorMapping, but for this you have to do test renders. We select the type of transformation - Rinhard, since it is engaged in averaging between the ruler and the exponent via the Burn value parameter. If you have “burned” colors, then just lower the Burn value.
Gamma - 1
Clamp - 1
Don't affect colors - remove the daw.
Since Sampler will now scatter samples based on the visible picture, you need to lower the noise threshold in DMC Sampler from 0.01 for the “line” to about 0.003.
Some guys, instead of lowering the noise level, simply increase the gamma by 2.2, and in the Gamma settings of the program they put a unit in the Output field. I think this is ideologically wrong, although it also works.
_______________________________________________________________________________
* Hereinafter, we are talking about color values in the Float Point where 0 = black color, and 1 = white.