Convenient basket (and DAS) for HDD / SSD 3.5 "/2.5" from the designer yourself
1) Introduction
2) A brief background
2) Materials and accessories
2) Basket option “A”
3) Basket option “B”, do DAS
4) Results
5) Further plans
5) Conclusion (from the author)
Introduction
Good time, Habr!
This article focuses on two interesting topics. Namely, the use of a metal constructor for organizing a computer desk (with more or less rational use of the volume / area of your favorite workplace), and assembling your own DAS. For those who do not know what it is, Wikipedia will prompt scientifically ( http://ru.wikipedia.org/wiki/DAS): DAS (Eng. Direct-attached storage - storage system with direct connection) - a storage device directly connected to a server or workstation without the help of a storage network. This is a retronym used primarily to distinguish non-network storage devices from SAN and NAS. DAS is often called "information islands." I hope that these topics will inspire someone to a more beautiful and practical application of this, say, “technology” in everyday life, because from the point of view of potential, the possibilities of the constructor under consideration are actually at least quite large. Themes are chewed as much as possible, and in fact are assembly instructions. Implementation can be carried out by anyone, if only there were hands / desire / fantasy. For clarity, I am enclosing photographs of almost the entire assembly process.
Brief History
(item on the topic of little use and little information, you can skip)
It just so happened, I started collecting films, music and games from about 1995 onwards. Over time, it all went smoothly into the creation of a “home archive”. A kind of data bank, where programs, Linux distributions, and downloaded repositories for some of them have already got. Naturally, there was an urgent need for external storage devices for this very data. First, the coolest (at one time) external storage device of 160 GB appeared, where everything was piled into a heap ... Then, hard disks were bought separately only for toys, only for video, only for software, etc. At the moment, I have already accumulated 8 of them, with a total volume of just over 7 TB. Of course, a certain disorganization in the work with these carriers began to emerge predictably. The search for the necessary information began to take a certain amount of time.
Well, then, either need or laziness forced us to implement the basket / rack for the existing hard drives. And after the work done, I wanted to somehow improve and upgrade my brainchild. I admit, there was no clear plan at the beginning of the journey, only an idea and intuition, which is why I paid for the repeated reassembly of some structural elements. Only in the middle of the road did it become clear what I want, and this made it possible to roughly estimate the “road map” of general actions and directions. Assemble the basket, turn it into a DAS, and then, with a trained hand, rebuild the DAS into a NAS (NAS). As always - we are not looking for easy ways ...
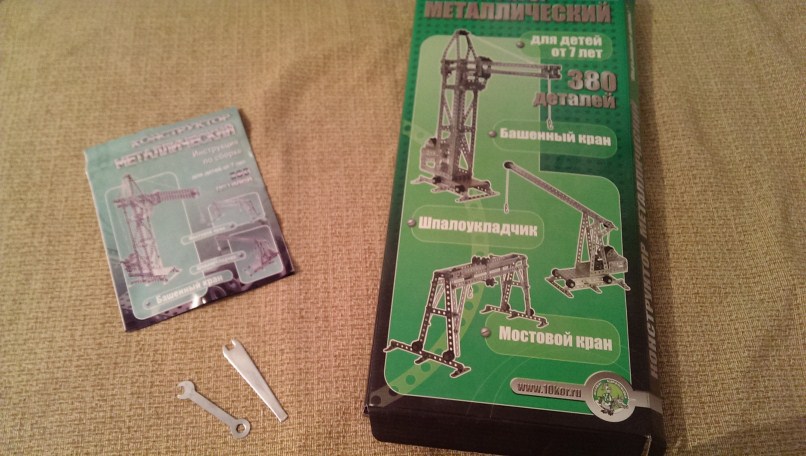
Materials and components
Listed below is everything that I used to build my basket.
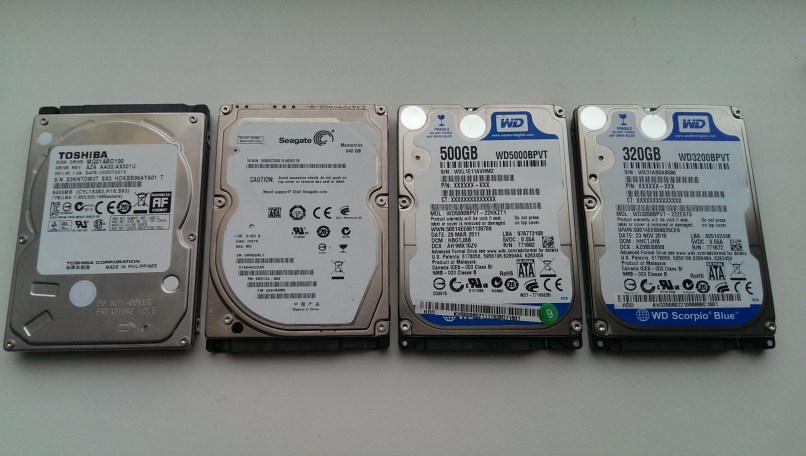
- HDD 2.5 "(4 pieces):
1) Toshiba 1.5 TB
2) Seagate 640 GB
3) WD 500 GB
4) WD 320 GB
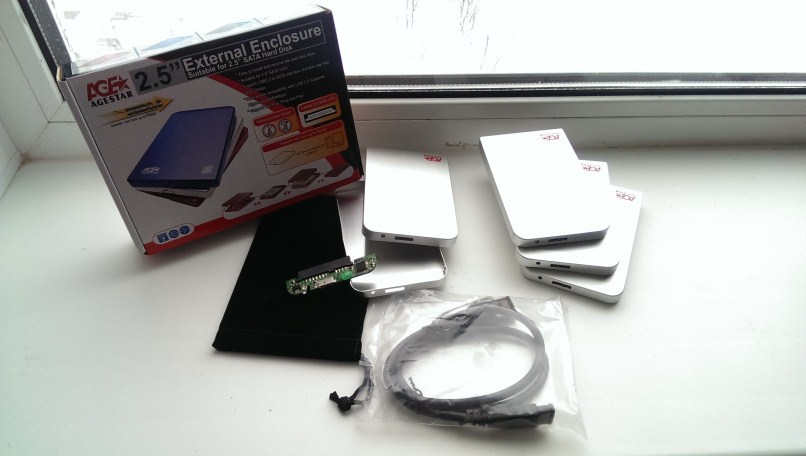
- enclosures for external HDD / SSD 2.5" with support for usb 3.0 from AGEstar, silver colors (4 pieces):
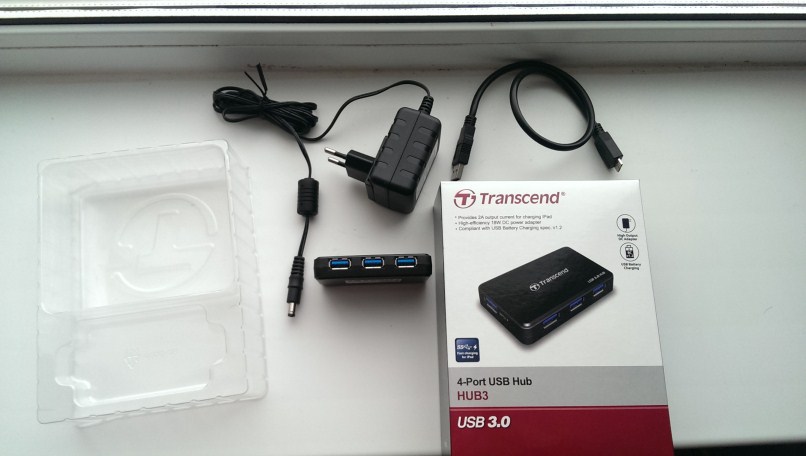
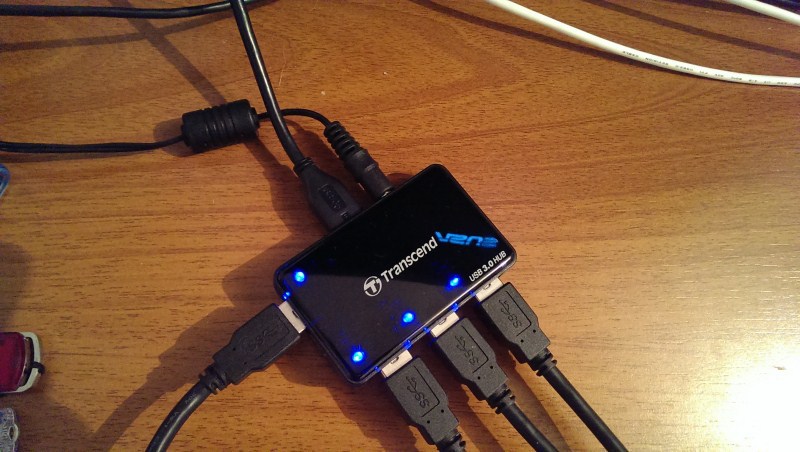
- Transcend HUB3:
- metal hole designer (2 pieces):
- old Chinese, cooling pad for G4 Magic Pad Titan laptops (for analysis, photos were not preserved in their original form)
- USB extension cable (optional and necessary)
- 4 toothpicks
Most of the above was actually bought for a long time and not with the goal of creating this basket, so we can assume that everything was assembled from what was at hand. The only thing I purposefully bought was a hub and four silver cases for disks, so that outwardly it all looked monotonous and organized.
I will focus on two points. Constructor. The most common children's designer, with features that are not childish in my opinion. I somehow bought it to create a home-made radio reflector - a great thing, if necessary, you can screw anything you want on your own antenna.
And a Chinese laptop stand with active cooling G4 Magic Pad Titan. My insistent advice, never use this thing. It seems that she drives the air only inside herself, while she creates a very good thermal insulation with her plastic case. So I burned a rather expensive laptop from Packard Bell (I know they burn themselves anyway). As a result, the stand was a donor for some details (about them below).
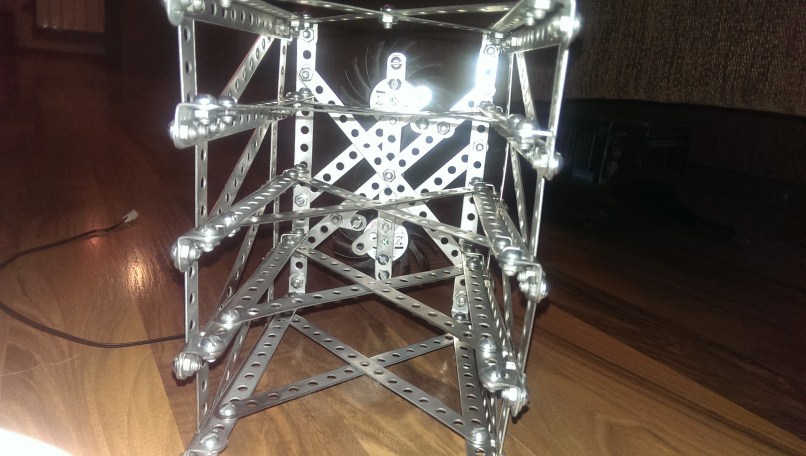
Basket (option "a")
I think it’s not worth writing a lot of details here, because in photographs, in principle, everything is visible and understandable. There are also no strictly fixed forms and parameters, however, I tried to follow the principle of “do not complicate”. Make everything so that the basket can be quickly disassembled into several components, and if necessary, just as quickly assemble without brain strain. And also, without reducing the cooling efficiency, expand the basket by one / two sections on demand.
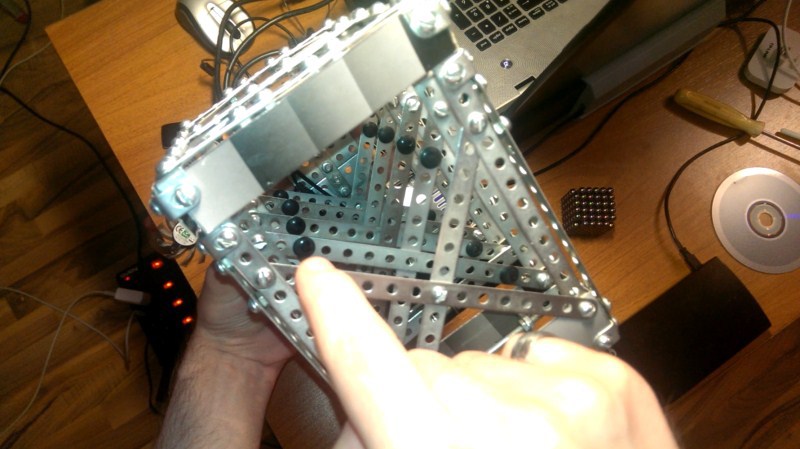
The assembly of the designer in the engineering sense is probably classic - two parallel metal detailed strips fastened together for rigidity by two intersecting. Actually this is the basis for the entire structure. A bolt in the middle is a temporary measure necessary to stiffen a structure during assembly.

Further, these bases are fastened together, thereby forming a kind of shelves. The width and their height were selected taking into account that removable 3.5 ”standard carriers were placed in them. The
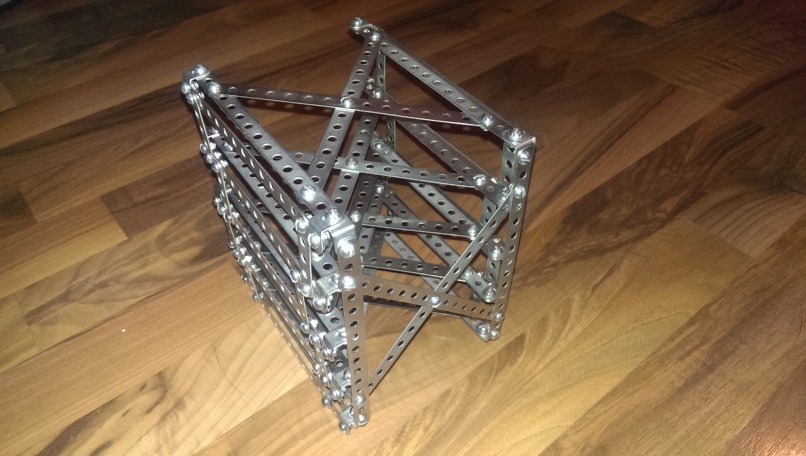
side part should be strengthened diagonally, after which the bolts located in the middle of the shelves should be removed, since they will interfere with the placement of external media and scratch If their sidewall is not strengthened, then in the future the whole structure without rigid fixation will “float” and bend in almost all directions, which we do not need at all.
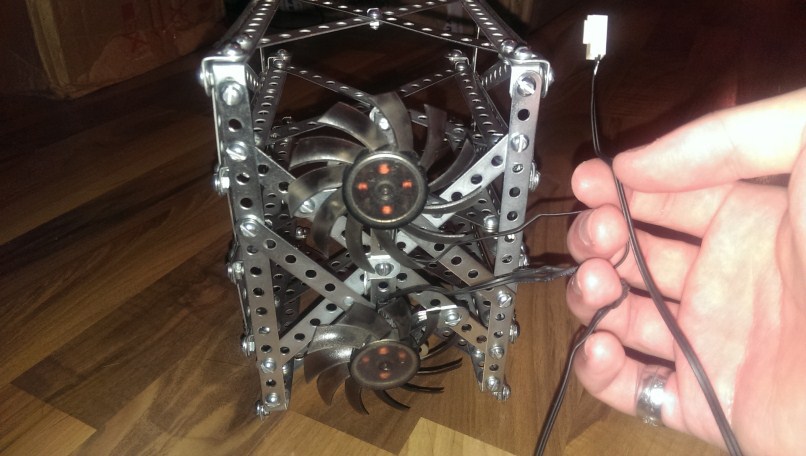
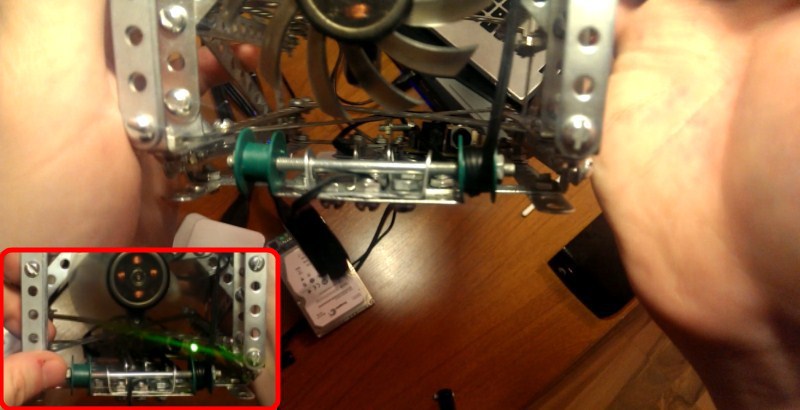
With regards to the Chinese stand (photo of the original form was not preserved). From it I extracted a circuit with connectors for 4 coolers, actually 4 coolers themselves (with the calculation of 1 cooler in 2 sections), rubberized legs and gaskets to combat vibrations. By the way, I had to isolate the board with an ordinary cut out piece of paper placed on its lower part, since the close proximity to the metal case led to short circuits and static phenomena. Everything is done exclusively by improvised means.
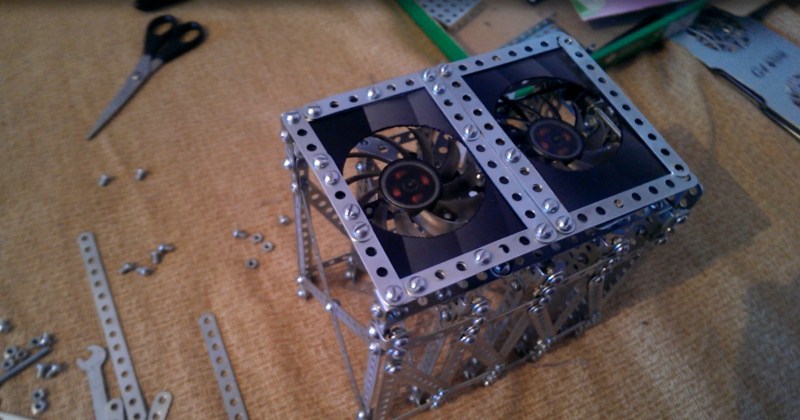
Further on installation I needed only 2 coolers. Larger / smaller quantities depend on the design and cooling needs. A lot of torrents and constant work with large volumes of data will make the drives get pretty hot, especially on a hot summer day. First, the plans were to complete the assembly of the basket, and only then install coolers. Did not fit. At 60% readiness of the device, the installation of internal parts began to become much more complicated, so it was decided to install coolers directly during assembly.
The next step was to assemble the lower “technical” shelf (hereinafter the compartment), with the power board for the cooling system. In the later stages of assembly, its appearance will be ennobled by a partition. Front view:
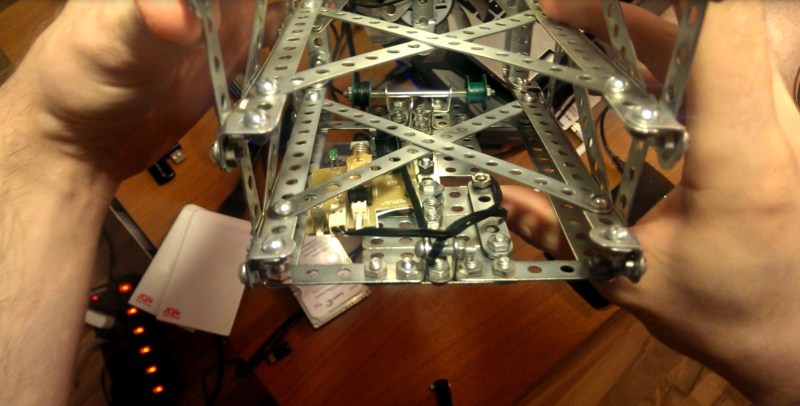
I put the green coils in the back of the compartment in order to wind excess wires onto them. I didn’t want to cut and solder, and in the end, all the details will be more intact - which means they can be removed and used in any other device. Moreover, in the future, these coils will still be hidden under the outer parts of the basket, i.e. will not spoil the appearance as a whole. The rule of assembly "do not complicate." By the way, an LED signals the supply of current to the circuit. Rear view:
A USB standard power cord was also integrated into the lower compartment. Although it is non-removable, but in the spring-roulette form factor. In case of unnecessary cooling, it is easily shortened to a minimum length and refilled without problems in the lower compartment.

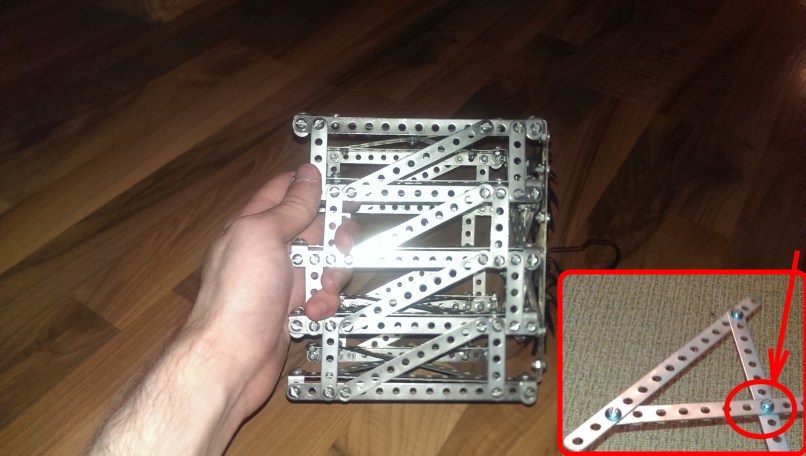
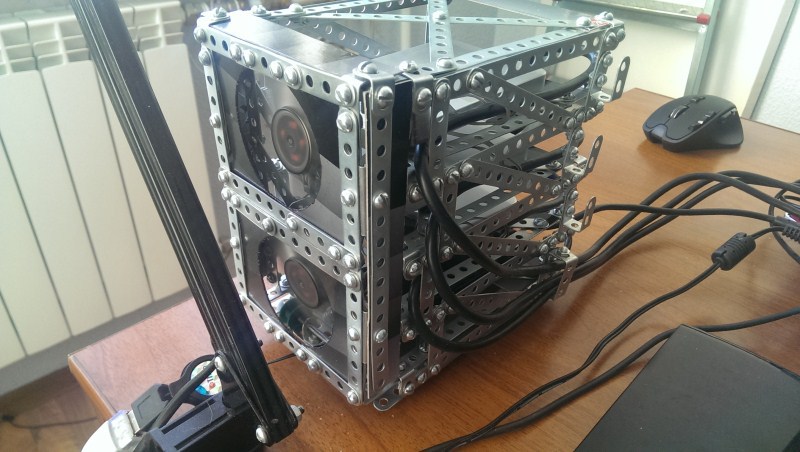
The assembly of the rear cooling wall of the basket follows. More precisely, its external side. Nothing complicated, first simple assembly of the frame, then searching and adjusting the dimensions of the material for future walls, and subsequent mounting. I will not focus on the frame, to be honest, there is nothing to describe. Just a frame! The only feature (in my assembly) is the seemingly large number of bolts. The explanation is also simple - I have run out of designer parts of the required length, and so I had to assemble everything from small / short parts.
According to the materials. Ideally, of course, I wanted to use metal panels and sheets. But, in the absence of such, it was decided to resort to a temporary option, namely plastic. Donors were plastic covers from folders. The material is cut and bent without any problems. Something like this…
After measuring and giving the plastic the desired shape, it was installed in the structure. The decision to hide it under the frame is dictated by the general style of the device, because placing the material on top of the frame would create an untidy and strange look of the entire basket as a whole. But for everyone this is a matter of taste ...

In addition to the back wall, I decided to sheathe the sidewall and the upper part of the cooling compartment. This kills two birds with one stone: the same appearance, and the effective direction of the air flow.
Before assembling / mounting the casing plastic of the rear of the rack, I also prepared the shelves in parallel. The option of pure water is design, because shelf functions perfectly performed assembled X-shaped metal strips of the designer. In fact, future removable media will have only four reference points (but more on that below). For each section, except the bottom, a short strip of plastic was cut. For the lower shelf, this strip was increased for reasons of concealing the wiring of the lower compartment.

It is worth noting that in the photo there are extra details, the so-called screeds (in unfinished form). This is part of the devices that were supposed to fix the wiring of removable media. However, in the assembly process, it was decided to abandon them.
The final stage of the basket assembly was the installation of rubber legs. The donor was the same Chinese cooling pad for laptops G4 Magic Pad Titan. The inner legs were glued at the top of each shelf, four pieces per section. They have three functions, this is general vibration isolation, protection of removable media from scratches (traces appeared during the first extraction without them), and the fight against static.
External legs play almost the same role as internal ones - vibration isolation of the entire basket, its stable position on a flat surface and protection of the surfaces on which the basket stands from possible scratches. The dimensions and height of the basket in my case have a balance of capacity / stability.

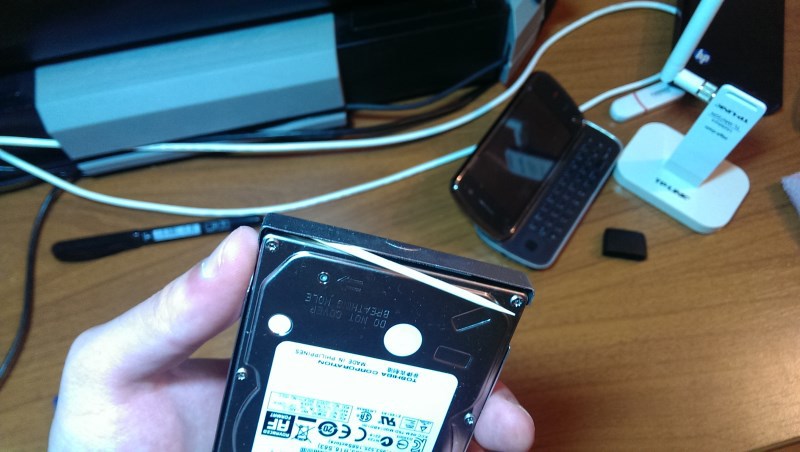
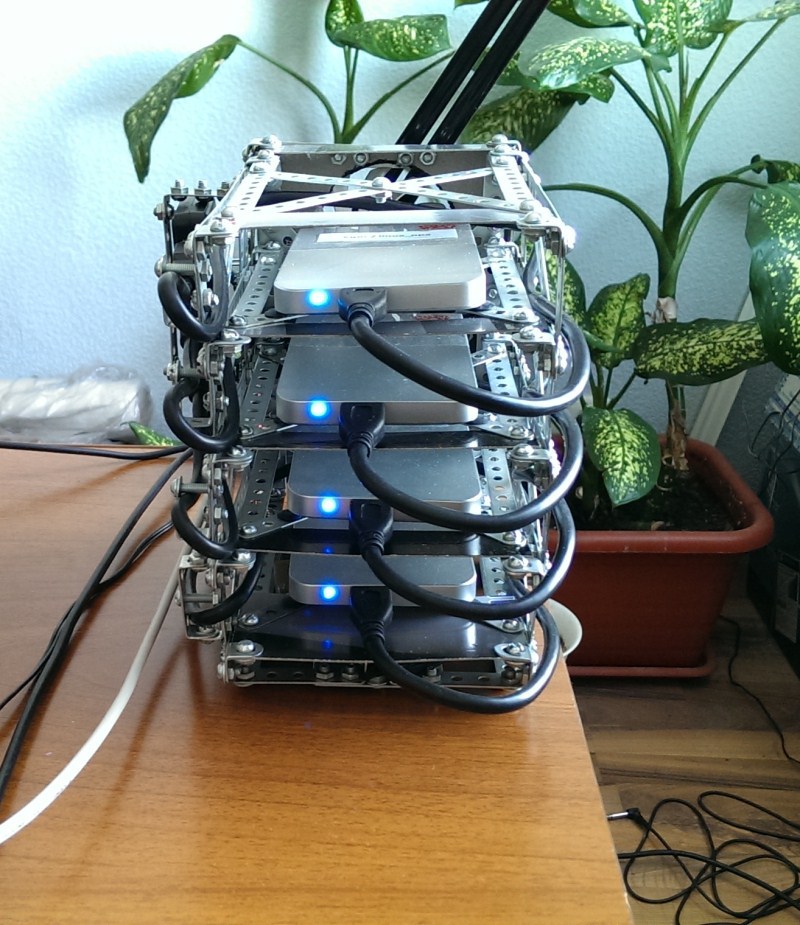
So. The basket is ready! Now nothing interferes with its practical use. For completeness, the device can be ennobled, brought to a complete look along with removable media of standard 2.5 ". For this, I purchased the appropriate enclosures for HDD / SSD.
But, again, an unexpected problem arose that was not directly related to our basket. The Chinese manufacturer is again dismissive He reacted to his products. A 2.5 "drive placed in such a case was not very tightly located there, and from time to time an unpleasant vibrating crack was heard. In addition to unpleasant noise, this is also a direct harm to the HDD, because vibration is fatal to them. Here four toothpicks were useful to me, which I listed as a part of materials and components! The secret of their application is revealed ...
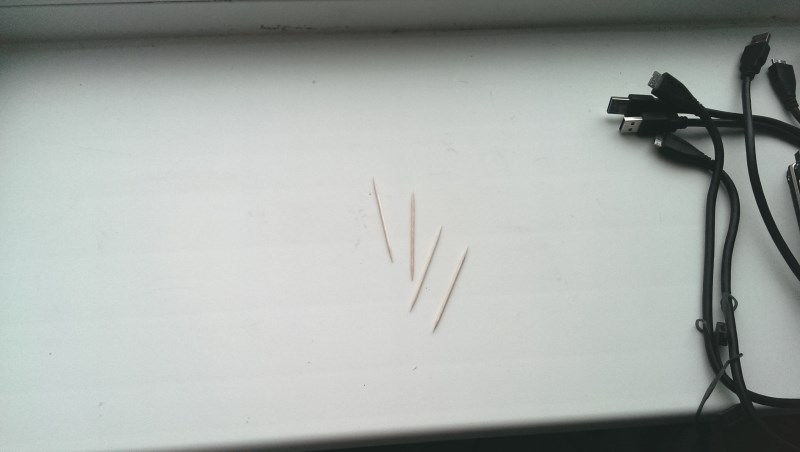
I simply put toothpicks in the empty spaces between the carrier and the body. Everything turned out at the "top to bottom" level.
Removable disks, but all on one face. Suddenly it will be necessary to remove one of them? How to do it? I did not think for a long time, but simply printed the signed labels (according to the volume label), carefully cut them out and glued them to the cases with the help of folk tape!
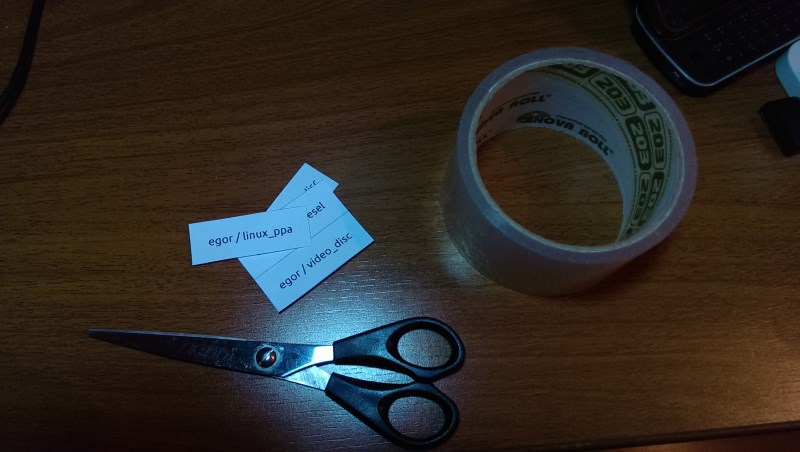
On the back of the cases, I left the bent corners of the tape, which will allow you to remove it very quickly. Their surface itself is matte / rough, so glue (and indeed traces) do not remain on them, even after strong heating of the surfaces. It turned out quite neat and, in my opinion, pretty.

Yes, this degrades heat transfer, and at medium load, the discs constantly emit a small amount of heat.
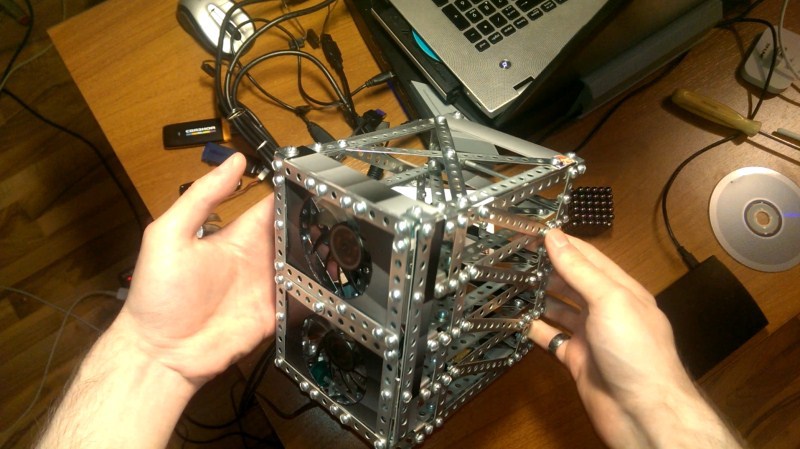
Now the basket is in full working version !!!
I put it on the table. It looks impressive. Indication of disks is always before your eyes, which allows you to visually track their work. Friends were also impressed.

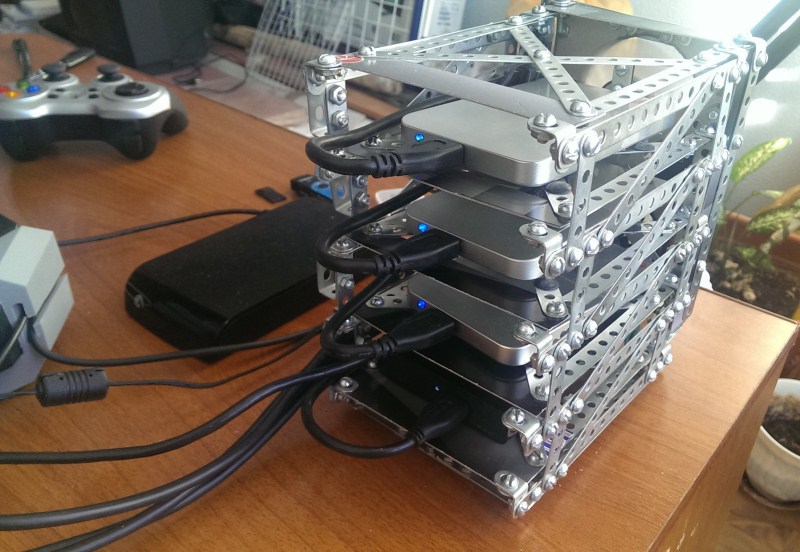


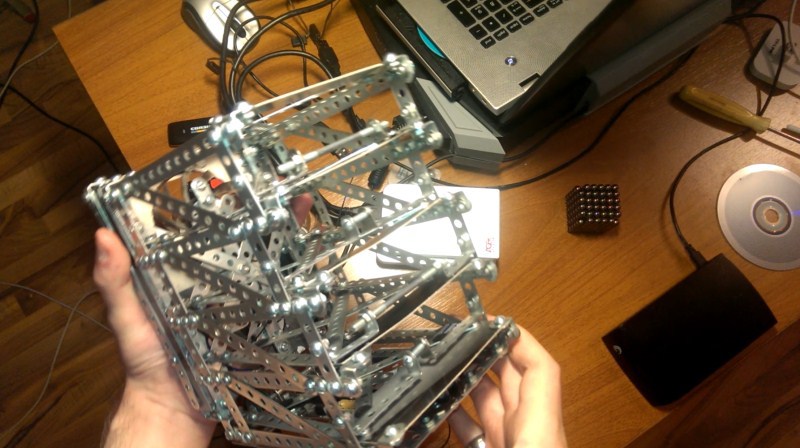
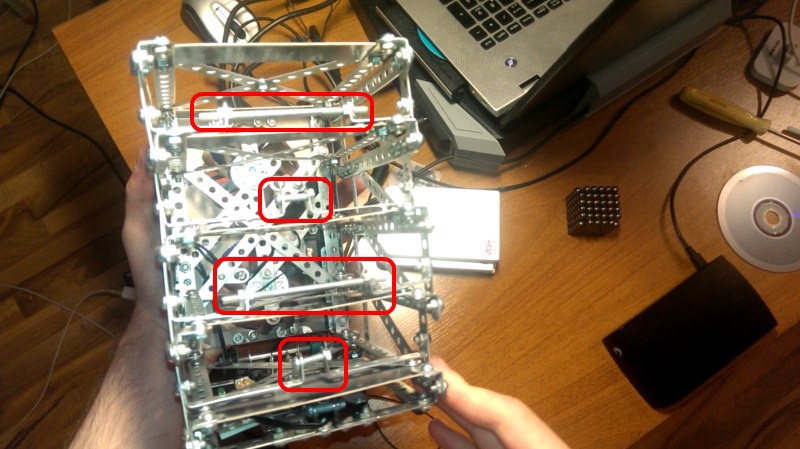
As you can see, for the convenience of wiring, I attached the brackets on the outside of the basket. Honestly, only one was really needed - the bottom one. The rest came in handy in the next modification of the basket, as described below.
Basket (option "b", do DAS)
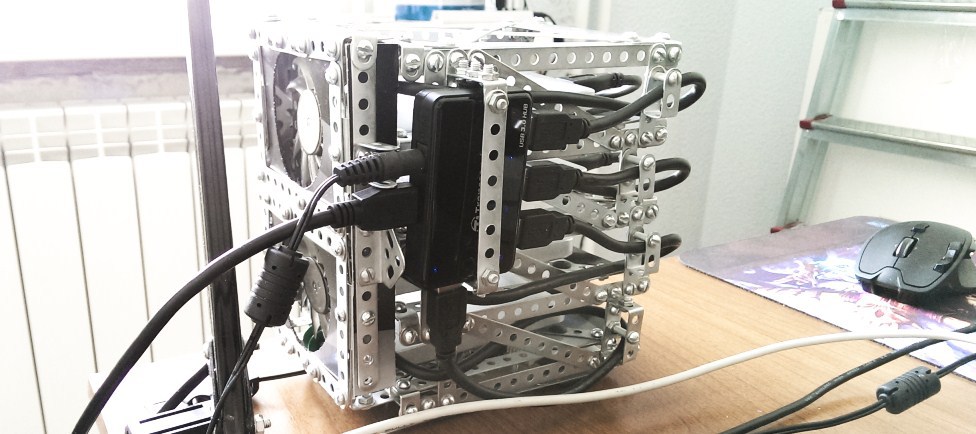
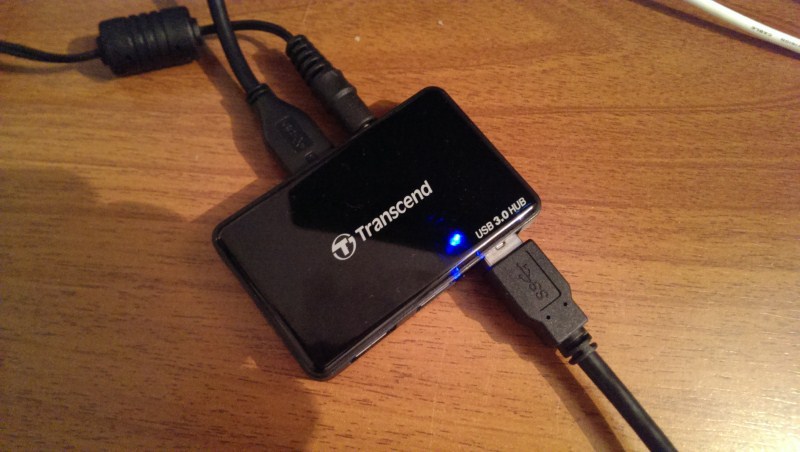
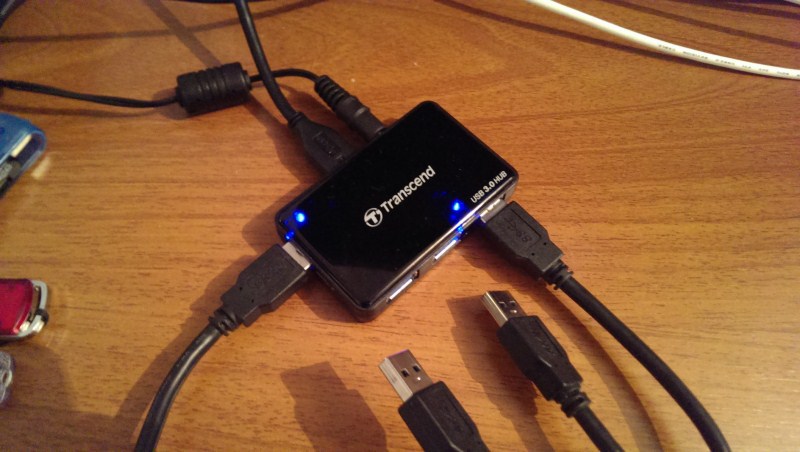
Everything is great, of course, but many controversial and impractical moments have come to light. Among them, the main one - the number of occupied USB ports still lies beyond the reasonable, and the small length of the cords ... Therefore, it was decided to tie all this mess to a USB hub. The choice fell on the Transcend HUB3 device with four USB 3.0 connectors.

The hub itself is not very expensive, and has a very convenient port arrangement. The dimensions of the device are also pleasing. Regarding its power consumption - additional power is attached to it, but it was experimentally found that the hub can effortlessly digest 2 disks without additional recharge. I was also pleased with the indication of access to connected devices with blue LEDs. It also signals with intermittent flashing at the moment of reading / writing information to any type of medium, almost duplicating a similar indicator on the devices themselves.
The optimal location for the hub was the left side of the basket. This decision was dictated by the length and location of all the wires of the system, because you won’t especially turn around on the case. In fact, I did not make any changes to the case itself, and just brought in an addition in the form of a side bracket for the hub, two stops on the side of the rear wall of the case, and four brackets for wiring HDD / SSD (mentioned above). The hub itself is reliably and tightly fixed by rather rigid wires connecting to it. Surprisingly reliable and without the side chattering of its ports. Those. If desired, the device can be easily pulled out by just disconnecting all the wires, which also corresponds to the general spirit of easy analysis on the components of the device.
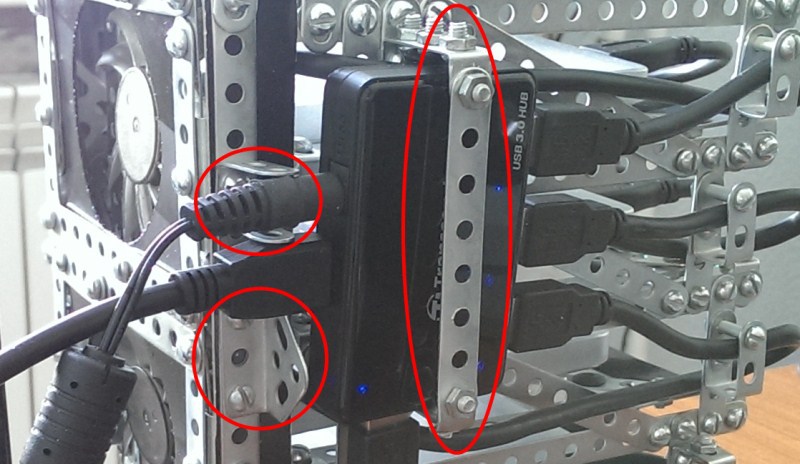
As a result, the hub does not “fidget”, does not turn over, sits tight, and thanks to the dull / rough sidewall, when removed from the basket, it does not scratch its metal parts.
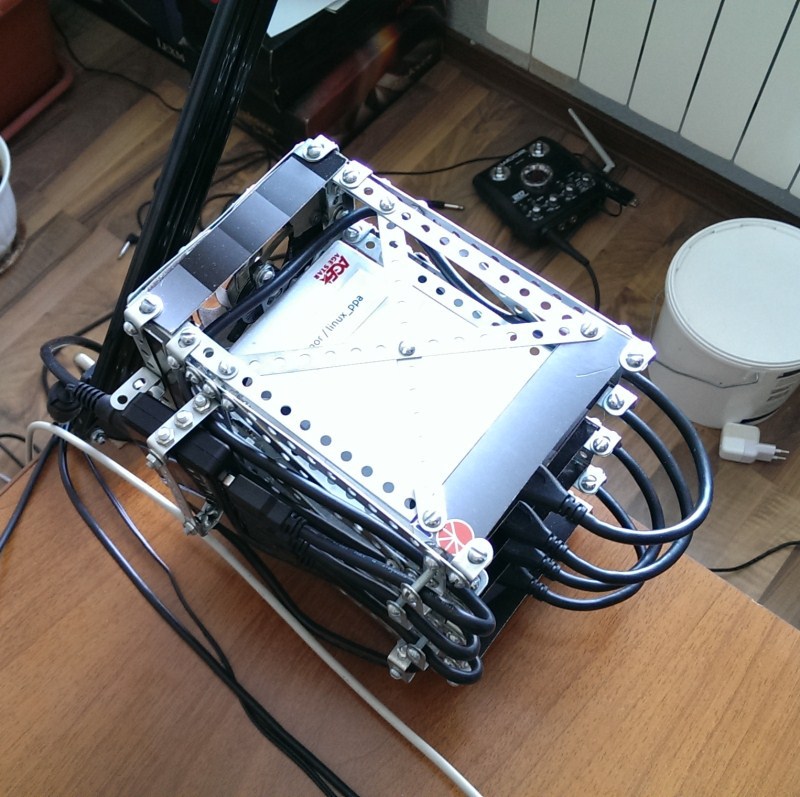
The second version of the basket is ready! Now it is a variation of such a family of repositories as DAS. What is it - see the beginning of this article, or Google.


By experience and quite unexpectedly, one “BUT” was discovered. My improvised storage did not want to run on 3 PCs out of 6! The disks seemed to “stutter”, i.e. momentarily de-energized and immediately turned on. The funny thing is that even with additional power, the 2/4, 3/4, 4/4-loaded basket refused to work as expected, showing such strange symptoms. Those. on my relatively new gaming laptop ASUS N-series, model n76vb with USB 3.0 it smelled just as well as on the antediluvian iRU Stilo laptop of 2004 with USB 2.0. While on another very good laptop from MSI with ports 3.0, it stuttered as from a lack of voltage. Inpatients generally surprised, because the disks started up only on one average PC, while the relative “beast” and “old man” also failed. Tested under Windows 8 and Xubuntu 12. 04.2 (at the final stage it’s already 14.04 LTS version) ... It's strange, to be honest. I will look for the reason for this behavior a bit later.
Summary
As a result, we have the following advantages:
- saving usable USB ports (from 4 to 1)
- an approximate reduction in usable area by 75%
- the ability to store 2.5 "and 3.5" standard disks
- an adjustable number of sections of the basket
- the principle of easy access and removal / removal devices without the use of additional tools and / or tools
- the ability to store external disks at some distance from the PC via a conventional USB extension cable
- a large potential for improvements and basket transformations
- a relatively severe and unusual appearance (probably , for an amateur)
At the same time, there are also disadvantages:
- a appeared dependency in an additional power outlet for a USB hub
- when using basket cooling, an additional USB port
is involved - increased requirements for the voltage of USB ports in the computer motherboard
- this is not a full NAS
And one more indirect minus. This is the response time of the entire system as a whole. My laptop has two internal 500 gigabyte SSDs. With the device connected, all the advantages of the speed of the systems as a whole (especially in the Windows OS) are nullified. While the system will check all the disks, loosen the screws, read them (which is what Windows tries to create a shortcut on the desktop through the context menu, or empty the trash) ... in general, the essence of the meaning of SSD disappears. On Linux, with its ability to mount media and automate certain actions using scripts, the situation is much smoother. As an option for Windows - when you turn on / off / restart the PC, constantly pull out the USB cable of the device. Agree, this is something to say the least. However, the owners of the usual HDD will be easier.
The total costs for the assembly / installation time of everything and everything, in general, were not very large. About five days to the building, taking into account the fact that initially there was no plan at all, and the construction was reassembled from three to four times. One third of the day for endless transfer of wires in search of optimal styling, and the same amount when upgrading the basket with a hub. All this, taking into account my frequent delays, being late at work and writing a diploma in parallel. Those. work on the basket went at night. I think for two free days off without haste, this whole thing can be put together.
Future plans
So, in connection with the plans for the acquisition of two full-fledged NAS (I am currently expecting the delivery of QNAP TS-420), and the creation of a “serious” home digital infrastructure, the development of my device is moving from necessity to the plane of sports interest. Although initially I wanted to build another such basket for the 4 remaining disks ... Therefore, most likely modifications in the form of:
- equipping the basket with a battery compartment to ensure uninterrupted operation for some time after turning off the light
- improving the USB hub cable for parallel power supply for coolers cooling the basket, which finally removes the need for a USB cable cooler board
- organization of a separate button to close the power circuit, in order to be able to forcibly turn on and off the coolers manually (available for quick pressing)
- the change of plastic material to a more durable and presentable metal
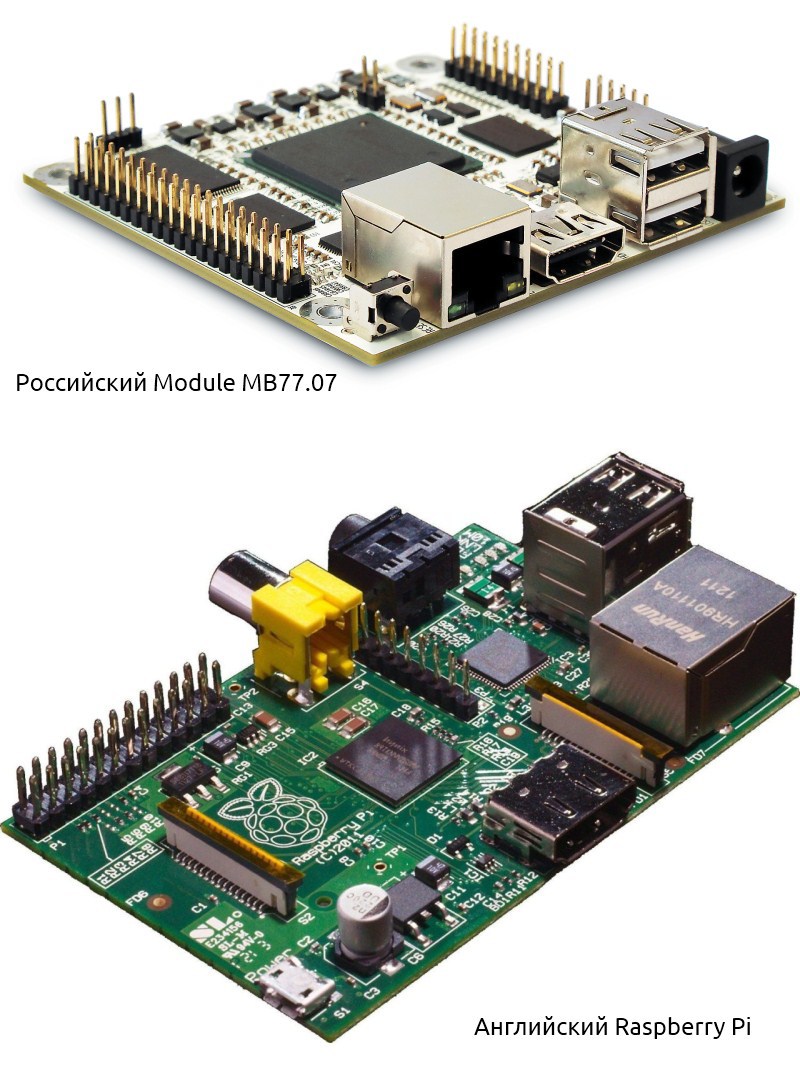
... will be final. For there are other "home" projects, both software and technical. In the end, the device for serious use needs to be processed in hardware and technically, planted in a good way on something like the Raspberry Pi. By the way, there was an idea to try to pick up a Russian analogue in the face of Module Raspberry Pi instead of Raspberry Pi. It is clear that the chip itself is specific with an emphasis on the possibility of temperature conditions (from -40 to +50, it seems). Nevertheless, to create full-fledged management of disks and NAS functions - this is quite an option. As they say, who does not like it - do not buy, the choice is still up to the end user.
PS
By the way, while writing this article, I still matured and ordered this Module MB77.07. Price without delivery 3280.61 rub. + 812.76 rub. VAT. Who cares, payment via bank transfer, and before payment there was a small preliminary correspondence with representatives of Scientific and Technical Center "Module". Their chips have an indirect pedigree with our defense electronics ... So there are relatively no bookmarks, backdoors, undocumented features, and other anb-google-cry hardware crap, a kind of paradise for dumb paranoid data security. If something does not work out with our "module" - I will take "raspberries". I still want to fully assemble my NAS. But, this is another story ...
Thank you for your attention.