Add Motion Blur Effect to WPF Applications

Hello, Habr!
We all heard the phrase many times that 24 frames per second is the maximum possible value that human vision can perceive. Therefore, if you accelerate the video sequence by just one extra frame, you can introduce any information into the subconscious mind of the viewer. And we all, of course, know that this is not true. Just like the photodiodes of the matrix of digital cameras, retina neurons do not record instantaneous illumination at a given point, but the total luminous flux for a short time interval, as a result of which fast-moving objects seem to us to be “blurred”. Moreover, our brain is accustomed to such a feature of vision, so the video, composed of individual photographs of the object, seems unnatural to us. The same goes for computer animation. Animation artists have long learned to paint blurry trains behind their characters - this technique is called "Motion blur" and is available in all modern packages of 2d- and 3d-animation. But what about ordinary desktop programmers? In this article I will try to talk about how I screwed Motion Blur to a WPF application to give a responsive effect when pop-ups appear.
To begin with, I propose to look at two pictures. The number of frames in them is the same.
| Regular animation | Motion blur |
 |  |
If you don’t see the difference, you can assume that I wasted several evenings. But I want to believe that the difference is still noticeable :)
But here's how it looks in a frame-by-frame scan:
| Regular animation | |||
 |  |  |  |
| Motion blur | |||
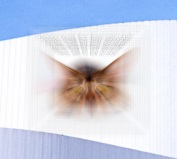 |  |  |  |
An attentive reader probably noticed that each frame from the bottom row consists of fifteen translucent images superimposed on each other, therefore, with a slight stretch, we can say that we increased the FPS by 15 times. Joke.
Take a look under the hood?
Pixel Shaders
It is hardly possible to realize a non-braking Motion Blur effect even on the most powerful modern central processors, therefore the GPU plays a key role in rendering a blurry “trace” in my example. Thanks to the support of pixel shaders in WPF, we can apply various effects to visual elements, including shadows, distortion effects (magnifying glass, twisting, ripples), changing the color balance, blurring, etc.
If it seems to you that shaders are something terrible and complicated, I completely agree with you. Until recently, I was sure that I would never encounter them in my life, unless I went to game-dev. But it turned out that they can also be useful in applied programming. It’s not necessary to know specialized languages for writing shaders, such as GLSL ,HLSL and etc. On the Internet for a long time there are many ready-made examples of shaders, one of which I used. It is called ZoomBlurEffect and is included in the supply of demo shaders for the free Shazzam Shader Editor. Here is his code:
ZoomBlurEffect.fx
/// ZoomBlurEffect
/// An effect that applies a radial blur to the input.
sampler2D  inputSource : register(S0);
/// The center of the blur.
float2 Center : register(C0);
/// The amount of blur.
float BlurAmount : register(C1);
float4 main(float2 uv : TEXCOORD) : COLOR
{
	float4 c = 0;
	uv -= Center;
	for (int i = 0; i < 15; i++)  {
		float scale = 1.0 + BlurAmount * (i / 14.0);
		c += tex2D(inputSource, uv * scale + Center);
	}
	c /= 15;
	return c;
}
Even without knowing the HLSL language that this shader is written in, you can easily understand the algorithm of its operation: for each point in the final image, the average color value of 15 points located on the line between this point and the blur center stored in the C0 register is calculated. The distance of the averaged points from this point is controlled by the BlurAmount parameter stored in the C1 register. In our example, the blur occurs from the center of the image, so C0 is (0.5; 0.5), and the value of the BlurAmount parameter depends on how much the current frame differs from the previous one, but more on that later.
Of course, you cannot use the shader in this form - you need to compile it using the fxc.exe utility, which is part of the DirectX SDK. The result of compiling the pixel shader is a file with the extension ".ps", which can be used in our WPF application. To do this, add it to our project as a resource and create the ZoomBlurEffect class:
ZoomBlurEffect.cs
(In fact, the Shazzam Shader Editor itself is able to generate such wrapper classes for shaders, which I used.) /// An effect that applies a radial blur to the input.
public class ZoomBlurEffect : ShaderEffect
{
public static readonly DependencyProperty InputProperty =
RegisterPixelShaderSamplerProperty("Input", typeof (ZoomBlurEffect), 0);
public static readonly DependencyProperty CenterProperty =
DependencyProperty.Register("Center", typeof (Point), typeof (ZoomBlurEffect),
new UIPropertyMetadata(new Point(0.9D, 0.6D), PixelShaderConstantCallback(0)));
public static readonly DependencyProperty BlurAmountProperty =
DependencyProperty.Register("BlurAmount", typeof (double), typeof (ZoomBlurEffect),
new UIPropertyMetadata(0.1D, PixelShaderConstantCallback(1)));
public ZoomBlurEffect()
{
PixelShader = new PixelShader
{
UriSource = new Uri(@"pack://application:,,,/ZoomBlurEffect.ps", UriKind.Absolute)
};
UpdateShaderValue(InputProperty);
UpdateShaderValue(CenterProperty);
UpdateShaderValue(BlurAmountProperty);
}
public Brush Input
{
get { return ((Brush) (GetValue(InputProperty))); }
set { SetValue(InputProperty, value); }
}
/// The center of the blur.
public Point Center
{
get { return ((Point) (GetValue(CenterProperty))); }
set { SetValue(CenterProperty, value); }
}
/// The amount of blur.
public double BlurAmount
{
get { return ((double) (GetValue(BlurAmountProperty))); }
set { SetValue(BlurAmountProperty, value); }
}
}
Window animation
Any visual element has a RenderTransform property, which is used by the graphics subsystem to transform the element during its rendering. Such transformations include scaling, rotation, and tilt. In our example, we will change the scale of the window content from zero (the content is “minimized” to a point) to one (the content is stretched to the entire window). In this case, the window itself has a transparent background, and the rendering of chrome (a frame with a title) is disabled for it.
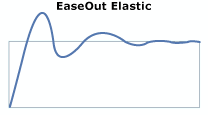
For animation, WPF traditionally uses the so-called "smoothness functions." We can use predefined functions or write our own, inheriting from the EasingFunctionBase class .
In the example from this article, I used the ElasticEase function, which gives the window the “released spring” effect - at first it expands sharply to a size slightly exceeding the established ones, and then gradually decreases.
Pseudocode for animating window appearance without Motion Blur effect
double t = 0.0;
int ВремяНачалаАнимации = ТекущееСистемноеВремя;
while (t < 1.0)
{
  УстановитьМасштабКонтента(ElasticEase(t));
  t = (ТекущееСистемноеВремя - ВремяНачалаАнимации) / ПродолжительностьАнимации;
}
УстановитьМасштабКонтента(1.0);
Here t varies from 0 to 1, where 0 is the moment the animation starts, and 1 is the moment it ends. The value of the ElasticEase (t) function changes approximately according to this law:
Add motion-blur to our animation. To do this, use the Effect property of the child control of the window:
content.Effect = new ZoomBlurEffect { Center = new Point(0.5, 0.5) };
Motion Blur Animation Pseudocode
double t = 0.0;
double prevEase = 0.0;
int ВремяНачалаАнимации = ТекущееСистемноеВремя;
УстановитьЭффектКонтента(new ZoomBlurEffect { Center = new Point(0.5, 0.5) });
while (t < 1.0)
{
  var ease = ElasticEase(t);
  УстановитьМасштабКонтента(ease);
  content.Effect.BlurAmount = ease - prevEase;
  prevEase = ease;
  t = (ТекущееСистемноеВремя - ВремяНачалаАнимации) / ПродолжительностьАнимации;
}
УстановитьМасштабКонтента(1.0);
УстановитьЭффектКонтента(null);
The difference between this code and the previous one is that at each step we change the BlurAmount value depending on how much the current value of the ElasticEase function differs from the value at the previous step. At the beginning of the animation, the function grows quickly, BlurAmount is quite significant, therefore, the “blur” of the window is big. In the end - BlurAmount is practically zero, which means that the “blur” is almost not noticeable.
About the disadvantages
Unfortunately, applying the Motion Blur effect in WPF applications causes some problems. Here is some of them:
- Performance. As practice has shown, even the GPU is not omnipotent. According to the test results, adding a zoom effect to the window slows down the rendering by about 1.5-2 times (on my video card). However, since it seems visually that FPS has increased significantly, this does not seem to me a big problem.
- It is not clear why this is necessary at all :) I conducted a survey among friends whether they see the difference between behavior with and without the effect. And everyone said at first that there was no difference. After indicating exactly what to look at, most of them expressed the wow effect, but another part said that without the effect it is much better and clearer. Their opinion also needs to be taken into account.
Conclusion
Unfortunately, I never brought the idea of using the Motion Blur effect to the state of production code, since it is hardly applicable in those applications that I have to deal with. Did, so to speak, for the soul. I hope that this material will be useful to someone in his work.
Download the demo project from here: github.com/misupov/motion-blur