We share our experience in integrating SSO with SAML 2.0
1. Background
Despite the fact that the function of a centralized input (Single Sign On, SSO) exists, is discussed and applied for a long time, in practice its implementation is often accompanied by overcoming a wide variety of problems. The purpose of this article is to show how to implement the simplest native Service Provider 1 (SP) for SAML 2.0 identity provider (idP) and use it to integrate SSO into a Java Web application.
One of our recent projects was the preparation and clustering of a portal solution for a large university. In the framework of the project, we faced the task of implementing (as well as clustering) the single authentication function for the following systems:
Liferay version 6.1.20-ee-ga2.
Simple java web application.
Google apps.
On the customer side, the main requirements for building SSO were put forward:
To build SSO, the SAML 2.0 protocol must be used.
Integration with Jasig CAS is required to keep existing systems running.
LDAP is used to verify user authentication.
We decided to use Shibboleth ( http://shibboleth.net/about/index.html ) as an idP as an open source system that implements SAML 1.0 && SAML 2.0 protocols in full.
The difficult moments that we encountered in solving this problem:
Lack of expertise in working with the SAML 2.0 protocol and the Shibboleth product.
Raw and not yet well-structured Shibboleth documentation from the manufacturer.
The lack of high-quality examples of the implementation of the Service Provider for integrating SSO into your Java Web application.
Overcoming these barriers has become the motivation for the publication of this article. We want to share the acquired knowledge, help developers solve such problems, and also facilitate familiarity with the SAML 2.0 protocol.
2. Who is the article for?
This article is aimed at the following audience:
Developers who integrate the SSO function in their projects using SAML 2.0.
Java-developers who need a practical example of integrating SSO functions into their application using SAML 2.0.
Java developers who want to try out the Shibboleth component as an SSO Identity Provider (idP).
To understand the article, it is recommended that you have minimal knowledge of the SAML 2.0 protocol.
3. The main components of SSO
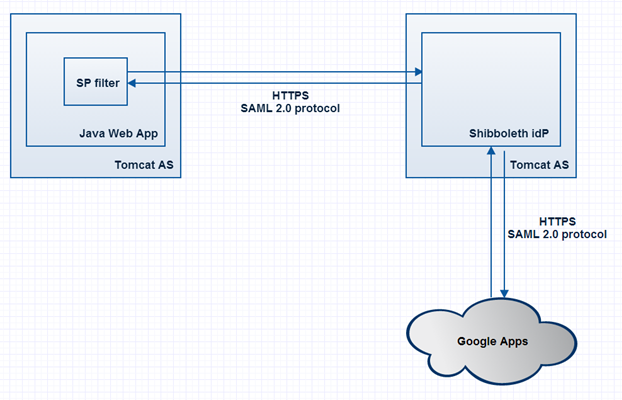
The diagram below shows the general functioning of our centralized entrance.
The main components and points marked on the diagram:
The SSO system involves 2 applications:
a. Java Web App - Normal Java Web Application
b. Google Apps is an application from Google Cloud Services. We will use it only to verify the operation of SSO.
SP Filter - implementation of the Service Provider, the function of which will be interaction with Shibboleth idP by means of sending and parsing SAML 2.0 messages
Shibboleth idP is an application for authentication and authorization using SAML 1.0 and SAML 2.0.
Tomcat AS - Java Application Server.
The interaction between the SP filter and the Shibboleth idP occurs over the secure HTTPS protocol.
Note: In the Shibboleth diagram, idP and Java Web applications are physically spaced apart from different Tomcat servers. However, you can deploy your environment to a single network node using just one Tomcat instance.
4. Set up the environment for Shibboleth idP
Installation and configuration of shibboleth idP:
1. Download the latest version of idP here shibboleth.net/downloads/identity-provider/latest 2 and unzip to any place $ shDistr .
2. Check that the JAVA_HOME variable is set correctly 3 .
We start $ shDistr / install.sh (we will consider that the UNIX-like operating system is used). 4 The
installer will ask you for the following information to keep in mind:
installation path (ex: / opt / shib)
server idP name (for example: idp.local.ru).
Add the idP server to the list of aliases for the localhost in the / etc / hosts file:
127.0.0.1 localhost idp.local.ru
The password for the java key store, which is generated during the installation process (for example: 12345).
Next, we verify that the installation process has been completed successfully.
We introduce the following notation:
$ shHome - the directory where Shibboleth was installed;
$ shHost - idP server name;
$ shPassword - password for java key store (JKS).
3. We determine which attributes and from which sources idP will be extracted. In our case, we will pass the user login. Add the attribute description to the file $ shHome / conf / attribute-resolver.xml after the element.
4. In order for idP to return this SAML SP attribute to the filter, we describe it in the file $ shHome / conf / attribute-filter.xml .
Note: Here you can set a more complex and correct rule. For example, you can specify that this attribute is passed only to a specific SAML SP.
5. Our Shibboleth idP should know about those nodes with which it can interact - the so-called relying party ( https://wiki.shibboleth.net/confluence/display/SHIB2/IdPUnderstandingRP ). This information is stored in the file $ shHome / conf / relying-party.xml .
Open the file and add the following element to it:
Add SP to the list of aliases for the localhost in the / etc / hosts file:
127.0.0.1 localhost sp.local.ru
We also instruct shibboleth idP not to sign SAML 2.0 responses and a set of assertions. Until now, our shibboleth idP had no idea what a component with id = "sp.local.ru" was. Time to fix this moment. We go to the next step.
6. Add a description of our SAML 2.0 SP filter. To do this, in the $ shHome / conf / relying-party.xml file, we define the meta-information for our SP, next to the element
We instructed shibboleth idP to look for an SP definition in the file /opt/shib/metadata/saml-sp-metadata.xml. Create this file with the following contents:
Here you need to understand the following:
our SAML 2.0 SP has the identifier "sp.local.ru"
the address where shibboleth idP will return SAML 2.0 messages Location = " https://sp.local.ru:8443/sso/acs " is specified in the md: AssertionConsumerService element.
Finally, the Binding = "urn: oasis: names: tc: SAML: 2.0: bindings: HTTP-POST" parameter indicates that the SP response will be sent from shibboleth idP through a browser redirect.
7. It remains to choose the way with which shibboleth idP will authenticate users. In the production environment, there can be a variety of configurations, including authentication via LDAP, DBMS, and even CAS. Here, as they say, the taste and color. We will use the already enabled Remote User Authentication mechanism ( https://wiki.shibboleth.net/confluence/display/SHIB2/IdPAuthRemoteUser ). Upon receipt of an authentication request, shibboleth idP will look in the context of the REMOTE_USER variable. If there is such a variable, then shibboleth idP will assume that the user has already authenticated through an external system (for example, through a Web Apache server). In order not to complicate this article, we decided to go to the trick and set the REMOTE_USER variable artificially for each request.
This will be done in the next section when configuring Tomcat AS (step 7).
Shibboleth setup is completed, congratulations :)
Installing and configuring Tomcat for shibboleth idP:
It is important to note that at the moment Tomcat 7. * cannot be used in the case when communication between SP and idP occurs directly via SOAP. Although in the examples of this article we will use direct browser redirects to implement these communications, we still recommend using Tomcat version 6.
Copy the $ shDistr / endorsed folder to the $ tomcatHome folder .
Change the file $ tomcatHome / bin directory / setenv.s h, use the settings for the dynamic and permanent memory of the JVM:
the JAVA_OPTS = "$ -Xmx512m the JAVA_OPTS -XX: MaxPermSize = 128m"
Remember to replace the variables $ shHome and $ shPassword with real values .
Deploying the shibboleth idP app on Tomcat. To do this, create the file $ tomcatHome / conf / Catalina / localhost / idp.xml with the contents:
Remember to replace the $ shHome variables with a real value
Compile 5 the following class into the tomcat-valve.jar arbitrary library:
  public class RemoteUserValve extends ValveBase{
    public RemoteUserValve() {
        }
        @Override
        public void invoke(final Request request, final Response response)
         throws IOException, ServletException {
           final String username = "idpuser";
        final String credentials = "idppass";
        final List roles = new ArrayList();
        final Principal principal = new GenericPrincipal(null, username, credentials,
                                                              roles);
        request.setUserPrincipal(principal);
        getNext().invoke(request, response);
      }
    }
Put the library in the $ {tomcatHome} / lib folder. And add a line to the server.xml file inside element . After the server starts, when accessing any Tomcat server application, the REMOTE_USER parameter with the idpuser value in the request context will be automatically set.
5. Implementation of SP Filter for SAML 2.0 protocol
To implement this solution, create a SAML 2.0 Service Provider filter, the tasks of which will be:
The filter skips requests for public resources for which authentication is not needed.
The filter stores information about the authenticated user in order to reduce the number of calls to Shibboleth idP.
The filter creates a SAML 2.0 authentication request in the form of a SAML 2.0 message ( AuthN ) and redirects the browser to redirect the user to Shibboleth idP.
The filter processes the response from the Shibboleth idP, and if the user authentication process is successful, the system displays the originally requested resource.
The filter deletes the local session when the user is logged out of the Java Web application.
At the same time, the session on shibboleth idP continues to remain active.
From a technical point of view, the filter will be an implementation of the standard javax.filter.Filter interface. The scope of the filter will be set in a particular web application.
Now that the filter’s functionality is clear, let's proceed with the implementation:
1. Create the maven project skeleton.
You can do it via the mvn plugin: archetype:
mvn archetype: generate -DgroupId = ru.eastbanctech.java.web -DartifactId = saml-sp-filter-DarchetypeArtifactId = maven-archetype-quickstart -DinteractiveMode = false
The parameters groupId and artefactId can indicate your taste and color.
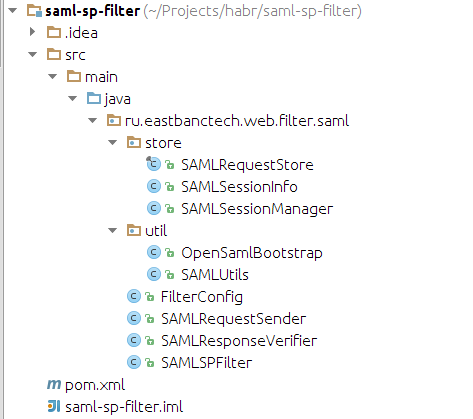
The structure of our project in Intellij Idea will look like this:
3. The heart of our filter will be the SAMLSPFilter class:
public class SAMLSPFilter implements Filter {
   public static final String SAML_AUTHN_RESPONSE_PARAMETER_NAME = "SAMLResponse";
   private static Logger log = LoggerFactory.getLogger(SAMLSPFilter.class);
   private FilterConfig filterConfig;
   private SAMLResponseVerifier checkSAMLResponse;
   private SAMLRequestSender samlRequestSender;
   @Override
   public void init(javax.servlet.FilterConfig config) throws ServletException {
     OpenSamlBootstrap.init();
     filterConfig = new FilterConfig(config);
     checkSAMLResponse = new SAMLResponseVerifier();
     samlRequestSender = new SAMLRequestSender();
   }
   @Override
   public void doFilter(ServletRequest servletRequest, ServletResponse servletResponse,
                          FilterChain chain) throws IOException, ServletException {
     HttpServletRequest request = (HttpServletRequest) servletRequest;
     HttpServletResponse response = (HttpServletResponse) servletResponse;
  /*
  ШАГ 1: Игнорируем запросы, предназначенные не для фильтра
  ШАГ 2: Если пришел ответ от Shibboleth idP, обрабатываем его
  ШАГ 3: Если получен запрос на logout, удаляем локальную сессию
  ШАГ 4: Если пользователь уже аутентифицирован, даем доступ к ресурсу
  ШАГ 5: Создаем SAML запрос на аутентификацию и отправляем пользователя к
         Shibboleth idP
  */
}
}
In the FilterConfig class, we define the main filter variables (filter scope, idP name, path to idP metadata, SP name, etc.). The values of these parameters will be set in the web.xml configuration file of the Java Web application. The checkSAMLResponse and samlRequestSender objects are needed to verify the validity of SAML 2.0 messages and send an authentication request. We will return to them a little later.
The code
public class FilterConfig {
  /**
  * The parameters below should be defined in web.xml file of Java Web Application
  */
  public static final String EXCLUDED_URL_PATTERN_PARAMETER = "excludedUrlPattern";
  public static final String SP_ACS_URL_PARAMETER           = "acsUrl";
  public static final String SP_ID_PARAMETER                = "spProviderId";
  public static final String SP_LOGOUT_URL_PARAMETER        = "logoutUrl";
  public static final String IDP_SSO_URL_PARAMETER          = "idProviderSSOUrl";
  private String excludedUrlPattern;
  private String acsUrl;
  private String spProviderId;
  private String logoutUrl;
  private String idpSSOUrl;
  public FilterConfig(javax.servlet.FilterConfig config) {
    excludedUrlPattern = config.getInitParameter(EXCLUDED_URL_PATTERN_PARAMETER);
    acsUrl = config.getInitParameter(SP_ACS_URL_PARAMETER);
    spProviderId = config.getInitParameter(SP_ID_PARAMETER);
    idpSSOUrl = config.getInitParameter(IDP_SSO_URL_PARAMETER);
    logoutUrl = config.getInitParameter(SP_LOGOUT_URL_PARAMETER);
  }
  // getters and should be defined below
}
Класс OpenSamlBootstrap инициализирует библиотеки для работы с SAML 2.0 сообщениями:
public class OpenSamlBootstrap extends DefaultBootstrap {
  private static Logger log = LoggerFactory.getLogger(OpenSamlBootstrap.class);
  private static boolean initialized;
  private static String[] xmlToolingConfigs = {
    "/default-config.xml",
    "/encryption-validation-config.xml",
    "/saml2-assertion-config.xml",
    "/saml2-assertion-delegation-restriction-config.xml",
    "/saml2-core-validation-config.xml",
    "/saml2-metadata-config.xml",
    "/saml2-metadata-idp-discovery-config.xml",
    "/saml2-metadata-query-config.xml",
    "/saml2-metadata-validation-config.xml",
    "/saml2-protocol-config.xml",
    "/saml2-protocol-thirdparty-config.xml",
    "/schema-config.xml",
    "/signature-config.xml",
    "/signature-validation-config.xml"
  };
  public static synchronized void init() {
    if (!initialized) {
      try {
        initializeXMLTooling(xmlToolingConfigs);
      } catch (ConfigurationException e) {
        log.error("Unable to initialize opensaml DefaultBootstrap", e);
      }
      initializeGlobalSecurityConfiguration();
      initialized = true;
    }
  }
}
The set of XML files contains instructions on how to parse elements of SAML 2.0 messages and is contained in the opensaml - *. Jar library, which will be connected when building the project through maven.
STEP 1: Ignore requests that are not intended for the filter
The excludedUrlPattern parameter , which encloses a regular expression. If the requested resource falls into the excludedUrlPattern template , then the filter does not process it:
if (!isFilteredRequest(request)) {
  log.debug("According to {} configuration parameter request is ignored + {}",
      new Object[]{FilterConfig.EXCLUDED_URL_PATTERN, request.getRequestURI()});
  chain.doFilter(servletRequest, servletResponse);
  return;
}
// В класс фильтра добавляем метод, проверяющий нужно ли обрабатывать данный запрос
private boolean isFilteredRequest(HttpServletRequest request) {
  return !(filterConfig.getExcludedUrlPattern() != null &&
            getCorrectURL(request).matches(filterConfig.getExcludedUrlPattern()));
   }
   // Также добавляем вспомогательный метод получения корректного URL
private String getCorrectURL(HttpServletRequest request) {
  String contextPath = request.getContextPath();
  String requestUri = request.getRequestURI();
  int contextBeg = requestUri.indexOf(contextPath);
  int contextEnd = contextBeg + contextPath.length();
  String slash = "/";
  String url = (contextBeg < 0 || contextEnd == (requestUri.length() - 1))
                    ? requestUri : requestUri.substring(contextEnd);
  if (!url.startsWith(slash)) {
      url = slash + url;
  }
  return url;
}
Step 2: If the response came from Shibboleth idP, we process it.
We look for the “SAMLResponse” parameter in the request and if it is found, then we received a response from shibboleth idP to the authentication request. Getting started processing SAML 2.0 messages.
The code
log.debug("Attempt to secure resource  is intercepted : {}", ((HttpServletRequest) servletRequest).getRequestURL().toString());
/*
  Check if response message is received from identity provider;
  In case of successful response system redirects user to relayState (initial) request
*/
String responseMessage = servletRequest.getParameter(SAML_AUTHN_RESPONSE_PARAMETER_NAME);
if (responseMessage != null) {
  log.debug("Response from Identity Provider is received");
  try {
    log.debug("Decoding of SAML message");
    SAMLMessageContext samlMessageContext =
                    SAMLUtils.decodeSamlMessage((HttpServletRequest) servletRequest,
                                                (HttpServletResponse) servletResponse);
    log.debug("SAML message has been decoded successfully");
    samlMessageContext.setLocalEntityId(filterConfig.getSpProviderId());
    String relayState = getInitialRequestedResource(samlMessageContext);
    checkSAMLResponse.verify(samlMessageContext);
    log.debug("Starting and store SAML session..");
    SAMLSessionManager.getInstance().createSAMLSession(request.getSession(),
                                                                   samlMessageContext);
    log.debug("User has been successfully authenticated in idP. Redirect to initial
                                                   requested resource {}", relayState);
    response.sendRedirect(relayState);
    return;
  } catch (Exception e) {
       throw new ServletException(e);
  }
}
To do this, we decode the SAML message in the SAMLUtils.decodeSamlMessage (..) method , and verify the SAML statements are executable - checkSAMLResponse.verify (..) . If all checks are completed, then create an internal SAML session SAMLSessionManager.getInstance (). CreateSAMLSession (..) and redirect the user to the originally requested resource response.sendRedirect (..).
In the SAMLUtils class, we will post useful intermediate methods when working with SAML 2.0 messages. One such method would be the decodeSamlMessage method, which decodes messages received through HTTPS SAML 2.0.
The code
public class SAMLUtils {
  public static SAMLMessageContext decodeSamlMessage(HttpServletRequest request,  				HttpServletResponse response) throws Exception {
    SAMLMessageContext samlMessageContext =
                 new BasicSAMLMessageContext();
    HttpServletRequestAdapter httpServletRequestAdapter =
                                          new HttpServletRequestAdapter(request);
    samlMessageContext.setInboundMessageTransport(httpServletRequestAdapter);
    samlMessageContext.setInboundSAMLProtocol(SAMLConstants.SAML20P_NS);
    HttpServletResponseAdapter httpServletResponseAdapter =
                     new HttpServletResponseAdapter(response, request.isSecure());
    samlMessageContext.setOutboundMessageTransport(httpServletResponseAdapter);
    samlMessageContext.setPeerEntityRole(IDPSSODescriptor.DEFAULT_ELEMENT_NAME);
    SecurityPolicyResolver securityPolicyResolver =
                                    getSecurityPolicyResolver(request.isSecure());
    samlMessageContext.setSecurityPolicyResolver(securityPolicyResolver);
    HTTPPostDecoder samlMessageDecoder = new HTTPPostDecoder();
    samlMessageDecoder.decode(samlMessageContext);
    return samlMessageContext;
  }
  private static SecurityPolicyResolver getSecurityPolicyResolver(boolean isSecured) {
    SecurityPolicy securityPolicy = new BasicSecurityPolicy();
    HTTPRule httpRule = new HTTPRule(null, null, isSecured);
    MandatoryIssuerRule mandatoryIssuerRule = new MandatoryIssuerRule();
    List securityPolicyRules = securityPolicy.getPolicyRules();
    securityPolicyRules.add(httpRule);
    securityPolicyRules.add(mandatoryIssuerRule);
    return new StaticSecurityPolicyResolver(securityPolicy);
  }
}
In the same class, we will place a helper method for converting SAML objects to String. This will be useful when logging SAML messages.
Let's create the SAMLResponseVerifier class, into which we put the functionality for checking SAML 2.0 messages received from shibboleth idP. In the main verify (..) method, we implement the following checks:
This SAML 2.0 response from idP was preceded by a SAML 2.0 request sent by our filter.
The message contains a positive user authentication result via shibboleth idP.
The main statements in the SAML 2.0 response are fulfilled (the message has not expired, this message is intended for our SP, etc.).
The code
public class SAMLResponseVerifier {
  private static Logger log = LoggerFactory.getLogger(SAMLResponseVerifier.class);
  private SAMLRequestStore samlRequestStore = SAMLRequestStore.getInstance();
  public void verify(SAMLMessageContext samlMessageContext)
    throws SAMLException {
    Response samlResponse = samlMessageContext.getInboundSAMLMessage();
    log.debug("SAML Response message : {}", SAMLUtils.SAMLObjectToString(samlResponse));
    verifyInResponseTo(samlResponse);
    Status status = samlResponse.getStatus();
    StatusCode statusCode = status.getStatusCode();
    String statusCodeURI = statusCode.getValue();
    if (!statusCodeURI.equals(StatusCode.SUCCESS_URI)) {
      log.warn("Incorrect SAML message code : {} ",
                   statusCode.getStatusCode().getValue());
      throw new SAMLException("Incorrect SAML message code : " + statusCode.getValue());
    }
    if (samlResponse.getAssertions().size() == 0) {
      log.error("Response does not contain any acceptable assertions");
      throw new SAMLException("Response does not contain any acceptable assertions");
    }
    Assertion assertion = samlResponse.getAssertions().get(0);
    NameID nameId = assertion.getSubject().getNameID();
    if (nameId == null) {
      log.error("Name ID not present in subject");
      throw new SAMLException("Name ID not present in subject");
    }
    log.debug("SAML authenticated user " + nameId.getValue());
    verifyConditions(assertion.getConditions(), samlMessageContext);
}
private void verifyInResponseTo(Response samlResponse) {
  String key = samlResponse.getInResponseTo();
  if (!samlRequestStore.exists(key)) { {
    log.error("Response does not match an authentication request");
    throw new RuntimeException("Response does not match an authentication request");
  }
  samlRequestStore.removeRequest(samlResponse.getInResponseTo());
}
private void verifyConditions(Conditions conditions, SAMLMessageContext samlMessageContext) throws SAMLException{
    verifyExpirationConditions(conditions);
    verifyAudienceRestrictions(conditions.getAudienceRestrictions(), samlMessageContext);
}
private void verifyExpirationConditions(Conditions conditions) throws SAMLException {
  log.debug("Verifying conditions");
  DateTime currentTime = new DateTime(DateTimeZone.UTC);
  log.debug("Current time in UTC : " + currentTime);
  DateTime notBefore = conditions.getNotBefore();
  log.debug("Not before condition : " + notBefore);
  if ((notBefore != null) && currentTime.isBefore(notBefore))
    throw new SAMLException("Assertion is not conformed with notBefore condition");
  DateTime notOnOrAfter = conditions.getNotOnOrAfter();
  log.debug("Not on or after condition : " + notOnOrAfter);
  if ((notOnOrAfter != null) && currentTime.isAfter(notOnOrAfter))
    throw new SAMLException("Assertion is not conformed with notOnOrAfter condition");
}
 private void verifyAudienceRestrictions(
 List audienceRestrictions,
            SAMLMessageContext samlMessageContext)
            throws SAMLException{
// TODO: Audience restrictions should be defined below7
}
}
The verifyInResponseTo method verifies that the SAML 2.0 response was preceded by a request from our filter. For implementation, an object of the SAMLRequestStore class is used, which stores the requests sent to SAML 2.0 to shibboleth idP.
The code
final public class SAMLRequestStore {
  private Set samlRequestStorage = new HashSet();
  private IdentifierGenerator identifierGenerator = new RandomIdentifierGenerator();
  private static SAMLRequestStore instance = new SAMLRequestStore();
  private SAMLRequestStore() {
  }
  public static SAMLRequestStore getInstance() {
    return instance;
  }
  public synchronized void storeRequest(String key) {
    if (samlRequestStorage.contains(key))
     throw new RuntimeException("SAML request storage has already contains key " + key);
    samlRequestStorage.add(key);
  }
  public synchronized String storeRequest(){
     String key = null;
     while (true) {
       key = identifierGenerator.generateIdentifier(20);
       if (!samlRequestStorage.contains(key)){
         storeRequest(key);
         break;
       }
     }
    return key;
  }
  public synchronized boolean exists(String key) {
    return samlRequestStorage.contains(key);
  }
  public synchronized void removeRequest(String key) {
    samlRequestStorage.remove(key);
  }
}
To create a local session, we will use our SAMLSessionManager class. His task will be to create / destroy local sessions, which is an object of the following SAMLSessionInfo class.
public class SAMLSessionInfo {
  private String nameId;
  private Map attributes;
  private Date validTo;
  public SAMLSessionInfo(String nameId, Map attributes, Date validTo) {
    this.nameId = nameId;
    this.attributes = attributes;
    this.validTo = validTo;
  }
   // getters should be defined below
}
Actually, the SAMLSessionManager class itself, which creates and destroys local SAML sessions in the Session context of the server, using SAMLContext.
The code
public class SAMLSessionManager {
  public static String SAML_SESSION_INFO = "SAML_SESSION_INFO";
  private static SAMLSessionManager instance = new SAMLSessionManager();
  private SAMLSessionManager() {
  }
  public static SAMLSessionManager getInstance() {
    return instance;
  }
  public void createSAMLSession(HttpSession session, SAMLMessageContext samlMessageContext) {
    List assertions =
                       samlMessageContext.getInboundSAMLMessage().getAssertions();
    NameID nameId = (assertions.size() != 0 && assertions.get(0).getSubject() != null) ?
                     assertions.get(0).getSubject().getNameID() : null;
    String nameValue = nameId == null ? null : nameId.getValue();
    SAMLSessionInfo samlSessionInfo = new SAMLSessionInfo(nameValue,
                                      getAttributesMap(getSAMLAttributes(assertions)),
                                      getSAMLSessionValidTo(assertions));
    session.setAttribute(SAML_SESSION_INFO, samlSessionInfo);
  }
  public boolean isSAMLSessionValid(HttpSession session) {
        SAMLSessionInfo samlSessionInfo = (SAMLSessionInfo)
                              session.getAttribute(SAML_SESSION_INFO);
        if (samlSessionInfo == null)
            return false;
        return samlSessionInfo.getValidTo() == null || new
                 Date().before(samlSessionInfo.getValidTo());
  }
  public void destroySAMLSession(HttpSession session) {
    session.removeAttribute(SAML_SESSION_INFO);
  }
  public List getSAMLAttributes(List assertions) {
    List attributes = new ArrayList();
    if (assertions != null) {
      for (Assertion assertion : assertions) {
        for (AttributeStatement attributeStatement :
                                 assertion.getAttributeStatements()) {
          for (Attribute attribute : attributeStatement.getAttributes()) {
             attributes.add(attribute);
          }
        }
     }
   }
   return attributes;
 }
 public Date getSAMLSessionValidTo(List assertions) {
   org.joda.time.DateTime sessionNotOnOrAfter = null;
   if (assertions != null) {
     for (Assertion assertion : assertions) {
       for (AuthnStatement statement : assertion.getAuthnStatements()) {
         sessionNotOnOrAfter = statement.getSessionNotOnOrAfter();
       }
     }
   }
   return sessionNotOnOrAfter != null ?
           sessionNotOnOrAfter.toCalendar(Locale.getDefault()).getTime() : null;
 }
 public Map getAttributesMap(List attributes) {
   Map result = new HashMap();
   for (Attribute attribute : attributes) {
     result.put(attribute.getName(), attribute.getDOM().getTextContent());
   }
   return result;
 }
      }
Step 3: If a logout request is received, delete the local session
Note: it is worth noting that the session remains active on shibboleth idP and on the next authentication request, shibboleth idP will simply return the active session to us. The implementation of the global logout requires additional settings, and prior to version 2.4.0 shibboleth idP was not supported. More details can be found here https://wiki.shibboleth.net/confluence/display/SHIB2/SLOIssues
Step 4: If the user is already authenticated, give access to the resource
If the user has an active SAML session in our filter, then give the user this resource.
if (SAMLSessionManager.getInstance().isSAMLSessionValid(request.getSession())) {
     log.debug("SAML session exists and valid: grant access to secure resource");
     chain.doFilter(request, response);
     return;
}
Step 5: We create SAML authentication request and send the user to
Shibboleth idP
A SAML 2.0 message with instructions for user authentication is created in the buildRequest method and is an XML object:
sp.local.ru
The AssertionConsumerServiceURL parameter specifies the URL at which shibboleth idP will return a response, and the ProtocolBinding parameter specifies how to return a response to our filter (POST HTTP protocol method)
The ID parameter determines the message identifier that we save when sending the message String key = SAMLRequestStore.getInstance (). storeRequest ();
and check when parsing messages in a method verifyInResponseTo class SAMLResponseVerifier .
The saml2p: Issuer element defines the name of our SP. Using the value of saml2p: Issuer shibboleth idP determines from which SP an authentication request was sent, and how it should be processed (via the SP metadata).
In response to the above SAML 2.0 message, we will receive a response from idP as a SAML 2.0 message in XML format:
The message will be processed in the already implemented SAMLResponseVerifier.verify (..) method.
That's all, our filter is implemented!
The structure of our project looks like this:
We collect the implemented filter in the jar library in the local repository.
To do this, run the command in the directory with pom.xml: mvn clean install
6. Create a Java Web application with SSO support
Create a Java Web Application
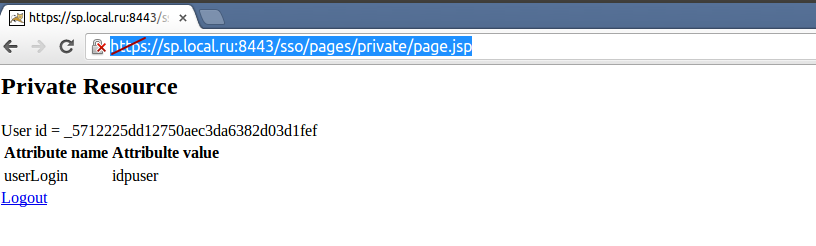
For an illustrative example, we will create a simple Java Web application with private and public resources. Access to private resources requires user authentication through the Shibboleth idP web application. We’ll make one of the private resources a page that displays information on the current user of the system.
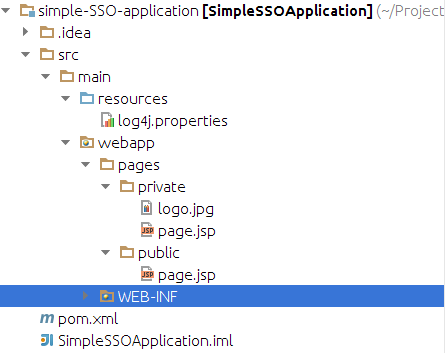
The structure of our application is as follows:
Here you need to turn to the properties section , where the main parameters of our filter are set sp.local.ru - name of SAML 2.0 filter SP https://sp.local.ru:8443/sso/acs- URL of the filter by which it
will process SAML 2.0 messages from shibboleth idP https://idp.local.ru:8443/idp/profile/SAML2/Redirect/SSO- URL
where our filter will send shibboleth idP messages / logout- logout URL
web.xml
In the web.xml file we determine the parameters of our filter and its scope. Let's make the resources in the ".jpg" format open through the excludedUrlPattern parameter .
The code
Simple SSO Java Web Application7.
  SSOFilter ru.eastbanctech.java.web.filter.saml.SAMLSPFilterexcludedUrlPattern.*\.jpgidProviderSSOUrl ${idp.sso.url}spProviderId${sp.id}acsUrl${acs.url}logoutUrl${logout.url}SSOFilter/pages/private/*SSOFilter${logout.url}SSOFilter/acs
private / page.jsp The
page is simply the output of the id and attributes of the authenticated user.
We assemble the application with the command: mvn clean package.
Testing Java Web Application Performance
We deploy the application in Tomcat AS and check the operation of SSO:
We describe the application context in the file $ {tomcatHome} /conf/Catalina/localhost/sso.xml
or just copy our sso.war application to $ {tomcatHome} / webapps
Для того, чтобы приложения томката могли устанавливать соединение с shibboleth idP по протоколу HTTPS нужно добавить сертификат shibboleth idP в java keystore.
Для этого нужно воспользоваться Java утилитой keytool:
Register yourself a domain name and super-administrator using a free trial. After everything is completed, go to admin.google.com under the created user (using the fully qualified domain name).
Using the administrative panel to create the idpuser user, give him Super Administrator privilege.
Select “Add controls” at the bottom of the screen and click
on the “Security” item in the drop-down list .
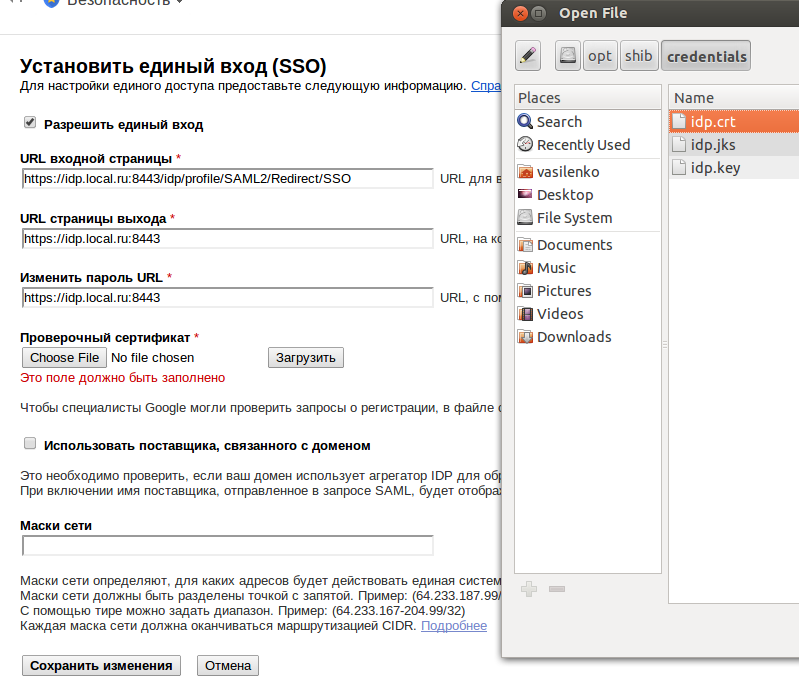
Then select Advanced settings -> Set up single sign-on.
Замечание: указывайте имя схемы для добавляемых элементов, иначе получите ошибку при старте shibboleth idP. Например, вместо RelyingParty нужно указывать rp:RelyingParty.
Для logger’а с именем edu.internet2.middleware.shibboleth устанавливаем уровень DEBUG
Перезапускаем shibboleth idP и идем на страницу https://admin.google.com в новой сессии броузера (возможно потребуется удаление куков, в Google Chrome можно использовать режим Инкогнито).
Вводим idpuser@domain_name, где domain_name – имя вашего зарегистрированного домена и пароль. Нажимаем «Войти».
Принимаем не подписанные сертификаты и удостоверяемся, что вы вошли в google apps под пользователем idpuser.
В логе ${shHome}/logs/idp-process.log шибболета вы должны увидеть, как shibboleth idP обрабатывает ваш запрос. Там будет видно, что проходит процесс аутентификации через RemoteUserLoginHandler
Вообще логи в shibboleth idP достаточно простые и в то же время информативные. Рекомендуем потратить немного времени, чтобы разобраться в них.
Далее открываем наше приложение по урлу sp.local.ru:8443/sso/pages/private/page.jsp
и смотрим в логах, что shibboleth idP находит имеющуюся сессию для пользователя idpuser.
Ну вот и все. Наша простейшая система SSO функционирует. Надеемся, что вы нашли что-то полезное для себя.
Примечания
1 — Можно также использовать Service Provider от производителя. В случае с Shibboleth это приводит к усложнению инфраструктуры приложения, поскольку требуется ставить дополнительный Apache-сервер перед Application Server’ом. 2 — На момент написания данной статьи последняя версия Shibboleth idP 2.4.0 3 — Мы использовали Java 7 в своем окружении. 4 — Мы использовали CentOS 6.3 в качестве OS. Также проверялась на Ubuntu 12.04. 5 — Для компиляции потребуются библиотека servlet-api 2.5 и ${tomcatHome}/lib/catalina.jar 6 — ru.eastbanctech.java.web.RemoteUserValve – полный путь до класса RemoteUserValve. В вашем случае требуется исправить исходя из иерархии пакетов. 7- We offer to implement it yourself as an exercise. 8 - Change the parameters highlighted in red depending on your environment.