Cross-platform development using .NET, reactive programming, MVVM pattern and code generation
Today, the .NET platform is a truly universal tool - it can be used to solve a wide range of tasks, including the development of application applications for popular operating systems, such as Windows, Linux, MacOS, Android and iOS.
In this article, we consider the architecture of cross-platform .NET applications using the MVVM design pattern and reactive programming . Let's get acquainted with the ReactiveUI and Fody libraries , learn how to implement the INotifyPropertyChanged interface using attributes, touch on the basics of AvaloniaUI , Xamarin Forms , Universal Windows Platform , Windows Presentation Foundationand .NET Standard , we study effective tools for unit testing of model layers and application presentation models.
The material is an adaptation of the articles " Reactive MVVM For The .NET Platform " and " Cross-Platform .NET Apps Via Reactive MVVM Approach ", published by the author earlier on the Medium resource. Code samples are available on GitHub .
When developing cross-platform applications on the .NET platform, it is necessary to write portable and supported code. If you work with frameworks that use XAML dialects, such as UWP, WPF, Xamarin Forms, and AvaloniaUI, this can be achieved using the MVVM design pattern, reactive programming, and the .NET Standard code separation strategy. This approach improves application portability by allowing developers to use a common code base and common software libraries on various operating systems.
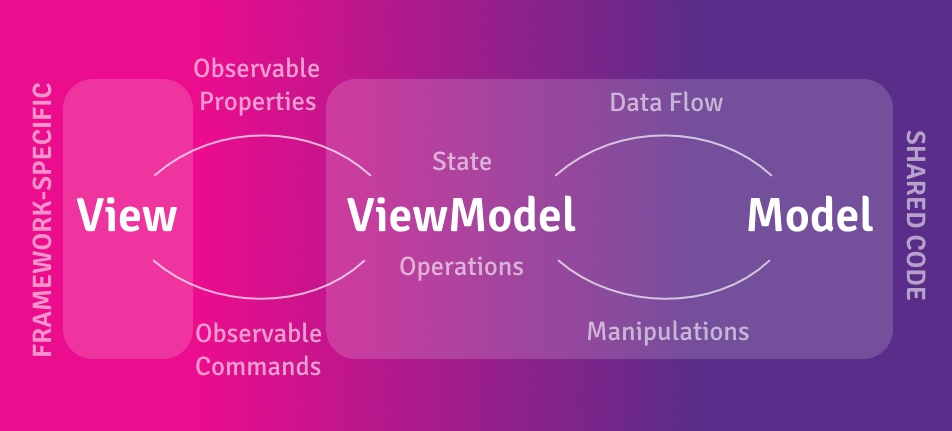
In more detail we will consider each of the layers of an application built on the basis of the MVVM architecture - a model (Model), a view (View) and a view model (ViewModel). The model layer consists of domain services, data transfer objects, database entities, repositories — all of the business logic of our program. The view is responsible for displaying user interface elements on the screen and depends on the specific operating system, and the view model allows the two layers described above to interact, adapting the model layer for user interaction.
The MVVM architecture assumes a division of responsibility between the three software layers of the application, so these layers can be moved to separate assemblies aimed at the .NET Standard. The formal .NET Standard specification allows developers to create portable libraries that can be used in different implementations of .NET using one unified set of API interfaces. Strictly following the MVVM architecture and the separation of the .NET Standard code, we will be able to use ready-made model layers and presentation models when developing user interfaces for various platforms and operating systems.
If we have written an application for the Windows operating system using the Windows Presentation Foundation, we can easily port it to other frameworks, such as, for example, Avalonia UI or Xamarin Forms - and our application will work on platforms such as iOS, Android, Linux, OSX, and the user interface will be the only thing you need to write from scratch.
View models typically include properties and commands to which XAML markup elements can be bound. In order for the data bindings to work, the view model must implement the INotifyPropertyChanged interface and publish the PropertyChanged event whenever any properties of the view model change. The simplest implementation might look like this:
XAML describing the application UI:
And it works! When the user enters his name in the text field, the text below instantly changes, welcoming the user.
But wait! Our UI needs only two synchronized properties and one command, why do we need to write more than twenty lines of code for our application to work correctly? What happens if we decide to add more properties that reflect the state of our view model? Code will be more, the code will be more complicated and more complicated. And we still support him!
In fact, the problem of verbose and confusing implementation of the INotifyPropertyChanged interface is not new, and there are several solutions. First of all, you should pay attention to ReactiveUI . This is a cross-platform, functional, reactive MVVM framework that allows .NET developers to use reactive extensions when developing presentation models.
Reactive extensions are an implementation of the “Observer” design pattern defined by the interfaces of the .NET standard library - “IObserver” and “IObservable”. The library also includes more than fifty statements that allow you to transform event streams — filter, merge, group them — with a syntax similar to LINQ structured query language.. Read more about reactive extensions here .
ReactiveUI also provides a base class that implements INotifyPropertyChanged - ReactiveObject. Let's rewrite our sample code using the possibilities provided by the framework.
This view model does exactly the same thing as the previous one, but the code in it is smaller, it is more predictable, and all the links between the properties of the view model are described in one place, using the LINQ to Observable syntax . Of course, we could stop at this, but the code is still quite a lot - we have to explicitly implement getters, setters and fields.
An alternative solution could be to use the ReactiveProperty library , which provides wrapper classes responsible for sending notifications to the user interface. With ReactiveProperty, the view model should not implement any interfaces; instead, each property implements INotifyPropertyChanged itself. Such reactive properties also implement IObservable, which means that we can subscribe to their changes, as if we were using ReactiveUI . Change our view model using ReactiveProperty.
We just need to declare and initialize the reactive properties and describe the connections between them. You do not need to write any template code, apart from property initializers. But this approach has a flaw - we have to change our XAML to make the data bindings work. Reactive properties are wrappers, so the UI must be tied to its own property for each such wrapper!
In a typical presentation model, each public property should be able to send notifications to the user interface when its value changes. With package PropertyChanged.Fody worry about that do not have to. The only thing that is required of the developer is to mark the class of the view model with the AddINotifyPropertyChangedInterface attribute - and the code responsible for publishing the PropertyChanged event will be written to the setters automatically after building the project, together with the implementation of the INotifyPropertyChanged interface, if it is not present. If necessary, turn our properties into streams of varying values, we can always use the WhenAnyValue extension method from the ReactiveUI library. Let's rewrite our sample for the third time, and see how much more concise our model of presentation will be!
Fody changes the project's IL at compile time. The PropertyChanged.Fody add-on looks for all classes marked with the AddINotifyPropertyChangedInterface attribute or that implement the INotifyPropertyChanged interface and edits the setters of such classes. You can find out more about how code generation works and what other tasks it can solve, from Andrei Kurosh’s report “ Reflection.Emit. Practice of Use ”.
Although PropertyChanged.Fody allows us to write clean and expressive code, outdated versions of the .NET Framework, including 4.5.1 and laterno longer supported. This means that you can actually try to use ReactiveUI and Fody in your project, but at your own peril and risk, and considering that all errors found will never be fixed! Versions for .NET Core are supported according to the Microsoft Support Policy .
Now we are ready to write our first reactive presentation model. Let's imagine that we are developing a complex multi-user system, while thinking about UX and want to collect feedback from our customers. When a user sends us a message, we need to know whether it is a bug report or a suggestion for improving the system, and we also want to group reviews into categories. Users should not send emails until they have filled out all the necessary information correctly. A presentation model that satisfies the above conditions may look like this:
We label our view model with the AddINotifyPropertyChangedInterface attribute — in this way, all properties will notify the UI of changes in their values. Using the WhenAnyValue method , we will subscribe to changes to these properties and will update other properties. The team responsible for submitting the form will remain off until the user completes the form correctly. Let's save our code to the class library, aimed at .NET Standard, and move on to testing.
Testing is an important part of the software development process. With tests, we will be able to trust our code and stop being afraid of refactoring it - after all, to check the correctness of the program's work, it will be enough to run the tests and make sure they are successfully completed. An application that uses the MVVM architecture consists of three layers, two of which contain platform-independent logic — and we can test it using .NET Core and the XUnit framework .
To create mocks and stubs , the NSubstitute library is useful to us , providing a convenient API for describing reactions to system actions and values returned by “fake objects”.
To improve the readability of both the code and error messages in our tests, we use the FluentAssertions library . With it, we will not only not have to remember which argument in Assert. Equal goes with the actual value, and with what the expected, but our IDE will write the code for us!
Let's write a test for our presentation model.
Well, now our presentation model has been tested and we are sure that everything works as expected. The process of developing the presentation layer of our application is quite simple - we need to create a new platform-specific Universal Windows Platform project and add a link to the .NET Standard library containing the platform-independent logic of our application. Then it’s easy to declare controls in XAML, bind their properties to the properties of the view model and remember to specify the data context in any convenient way. Let's do it!
Finally, our form is ready.

For the application to work on mobile devices running Android and iOS, you need to create a new Xamarin.Forms project and describe the UI using Xamarin controls adapted for mobile devices.
Avalonia is a cross-platform framework for .NET that uses the XAML dialect common for WPF, UWP or Xamarin.Forms developers. Avalonia supports Windows, Linux and OSX and is developed by a community of enthusiasts on GitHub . To work with ReactiveUI, you need to install the Avalonia.ReactiveUI package . Write the presentation layer on Avalonia XAML!
As we see, .NET in 2018 allows us to write truly cross-platform software - using UWP, Xamarin.Forms, WPF and AvaloniaUI, we can provide support for our application operating systems Android, iOS, Windows, Linux, OSX. The MVVM design pattern and libraries such as ReactiveUI and Fody can simplify and speed up the development process, allowing you to write understandable, supported, and portable code. Developed infrastructure, detailed documentation and good support in code editors make the .NET platform more and more attractive for software developers.
If you are writing desktop or mobile applications on .NET and are not yet familiar with ReactiveUI, be sure to pay attention to it - the framework usesone of the most popular GitHub clients for iOS , the Visual Studio extension for GitHub , Atlassian SourceTree and Slack git client for Windows 10 Mobile . The series of articles on ReactiveUI on Habré can be an excellent starting point. Developers on Xamarin will certainly come in handy with the course " Building an iOS app with C # " from one of the authors of ReactiveUI. You can learn more about the experience of developing on AvaloniaUI from the article about Egram , an alternative client for Telegram on .NET Core.
The sources of the cross-platform application described in the article and demonstrating the possibilities of validating forms with ReactiveUI and Fody can be found on GitHub. An example of a cross-platform application running on Windows, Linux, macOS and Android, and demonstrating the use of ReactiveUI, ReactiveUI.Fody and Akavache is also available on GitHub .
In this article, we consider the architecture of cross-platform .NET applications using the MVVM design pattern and reactive programming . Let's get acquainted with the ReactiveUI and Fody libraries , learn how to implement the INotifyPropertyChanged interface using attributes, touch on the basics of AvaloniaUI , Xamarin Forms , Universal Windows Platform , Windows Presentation Foundationand .NET Standard , we study effective tools for unit testing of model layers and application presentation models.
The material is an adaptation of the articles " Reactive MVVM For The .NET Platform " and " Cross-Platform .NET Apps Via Reactive MVVM Approach ", published by the author earlier on the Medium resource. Code samples are available on GitHub .
Introduction MVVM architecture and cross-platform .NET
When developing cross-platform applications on the .NET platform, it is necessary to write portable and supported code. If you work with frameworks that use XAML dialects, such as UWP, WPF, Xamarin Forms, and AvaloniaUI, this can be achieved using the MVVM design pattern, reactive programming, and the .NET Standard code separation strategy. This approach improves application portability by allowing developers to use a common code base and common software libraries on various operating systems.
In more detail we will consider each of the layers of an application built on the basis of the MVVM architecture - a model (Model), a view (View) and a view model (ViewModel). The model layer consists of domain services, data transfer objects, database entities, repositories — all of the business logic of our program. The view is responsible for displaying user interface elements on the screen and depends on the specific operating system, and the view model allows the two layers described above to interact, adapting the model layer for user interaction.
The MVVM architecture assumes a division of responsibility between the three software layers of the application, so these layers can be moved to separate assemblies aimed at the .NET Standard. The formal .NET Standard specification allows developers to create portable libraries that can be used in different implementations of .NET using one unified set of API interfaces. Strictly following the MVVM architecture and the separation of the .NET Standard code, we will be able to use ready-made model layers and presentation models when developing user interfaces for various platforms and operating systems.
If we have written an application for the Windows operating system using the Windows Presentation Foundation, we can easily port it to other frameworks, such as, for example, Avalonia UI or Xamarin Forms - and our application will work on platforms such as iOS, Android, Linux, OSX, and the user interface will be the only thing you need to write from scratch.
Traditional MVVM implementation
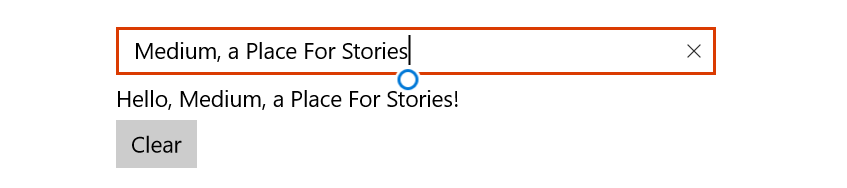
View models typically include properties and commands to which XAML markup elements can be bound. In order for the data bindings to work, the view model must implement the INotifyPropertyChanged interface and publish the PropertyChanged event whenever any properties of the view model change. The simplest implementation might look like this:
publicclassViewModel : INotifyPropertyChanged
{
    publicViewModel() => Clear = new Command(() => Name = string.Empty);
    public ICommand Clear { get; }
    publicstring Greeting => $"Hello, {Name}!";
    privatestring name = string.Empty;
    publicstring Name
    {
        get => name;
        set
        {
            if (name == value) return;
            name = value;
            OnPropertyChanged(nameof(Name));
            OnPropertyChanged(nameof(Greeting));
        }
    }
    publicevent PropertyChangedEventHandler PropertyChanged;
    protectedvirtualvoidOnPropertyChanged(string name)
    {
        PropertyChanged?.Invoke(this, new PropertyChangedEventArgs(name));
    }
}
XAML describing the application UI:
<StackPanel><TextBoxText="{Binding Name, Mode=TwoWay,
                    UpdateSourceTrigger=PropertyChanged}"/><TextBlockText="{Binding Greeting, Mode=OneWay}"/><ButtonContent="Clear"Command="{Binding Clear}"/></StackPanel>
And it works! When the user enters his name in the text field, the text below instantly changes, welcoming the user.
But wait! Our UI needs only two synchronized properties and one command, why do we need to write more than twenty lines of code for our application to work correctly? What happens if we decide to add more properties that reflect the state of our view model? Code will be more, the code will be more complicated and more complicated. And we still support him!
Recipe # 1. Template "Observer". Short getters and setters. ReactiveUI
In fact, the problem of verbose and confusing implementation of the INotifyPropertyChanged interface is not new, and there are several solutions. First of all, you should pay attention to ReactiveUI . This is a cross-platform, functional, reactive MVVM framework that allows .NET developers to use reactive extensions when developing presentation models.
Reactive extensions are an implementation of the “Observer” design pattern defined by the interfaces of the .NET standard library - “IObserver” and “IObservable”. The library also includes more than fifty statements that allow you to transform event streams — filter, merge, group them — with a syntax similar to LINQ structured query language.. Read more about reactive extensions here .
ReactiveUI also provides a base class that implements INotifyPropertyChanged - ReactiveObject. Let's rewrite our sample code using the possibilities provided by the framework.
publicclassReactiveViewModel : ReactiveObject
{
    publicReactiveViewModel()
    {
        Clear = ReactiveCommand.Create(() => Name = string.Empty);
        this.WhenAnyValue(x => x.Name)
            .Select(name => $"Hello, {name}!")
            .ToProperty(this, x => x.Greeting, out greeting);
    }
    public ReactiveCommand Clear { get; }
    private ObservableAsPropertyHelper<string> greeting;
    publicstring Greeting => greeting.Value;
    privatestring name = string.Empty;
    publicstring Name
    {
        get => name;
        set => this.RaiseAndSetIfChanged(ref name, value);
    }
}
This view model does exactly the same thing as the previous one, but the code in it is smaller, it is more predictable, and all the links between the properties of the view model are described in one place, using the LINQ to Observable syntax . Of course, we could stop at this, but the code is still quite a lot - we have to explicitly implement getters, setters and fields.
Recipe # 2. INotifyPropertyChanged Encapsulation. ReactiveProperty
An alternative solution could be to use the ReactiveProperty library , which provides wrapper classes responsible for sending notifications to the user interface. With ReactiveProperty, the view model should not implement any interfaces; instead, each property implements INotifyPropertyChanged itself. Such reactive properties also implement IObservable, which means that we can subscribe to their changes, as if we were using ReactiveUI . Change our view model using ReactiveProperty.
publicclassReactivePropertyViewModel
{
    public ReadOnlyReactiveProperty<string> Greeting { get; }
    public ReactiveProperty<string> Name { get; }
    public ReactiveCommand Clear { get; }
    publicReactivePropertyViewModel()
    {
        Clear = new ReactiveCommand();
        Name = new ReactiveProperty<string>(string.Empty);
        Clear.Subscribe(() => Name.Value = string.Empty);
        Greeting = Name
            .Select(name => $"Hello, {name}!")
            .ToReadOnlyReactiveProperty();
    }
}
We just need to declare and initialize the reactive properties and describe the connections between them. You do not need to write any template code, apart from property initializers. But this approach has a flaw - we have to change our XAML to make the data bindings work. Reactive properties are wrappers, so the UI must be tied to its own property for each such wrapper!
<StackPanel><TextBoxText="{Binding Name.Value, Mode=TwoWay,
                    UpdateSourceTrigger=PropertyChanged}"/><TextBlockText="{Binding Greeting.Value, Mode=OneWay}"/><ButtonContent="Clear"Command="{Binding Clear}"/></StackPanel>
Recipe # 3. Modify build at compile time. PropertyChanged.Fody + ReactiveUI
In a typical presentation model, each public property should be able to send notifications to the user interface when its value changes. With package PropertyChanged.Fody worry about that do not have to. The only thing that is required of the developer is to mark the class of the view model with the AddINotifyPropertyChangedInterface attribute - and the code responsible for publishing the PropertyChanged event will be written to the setters automatically after building the project, together with the implementation of the INotifyPropertyChanged interface, if it is not present. If necessary, turn our properties into streams of varying values, we can always use the WhenAnyValue extension method from the ReactiveUI library. Let's rewrite our sample for the third time, and see how much more concise our model of presentation will be!
[AddINotifyPropertyChangedInterface]
publicclassFodyReactiveViewModel
{
    public ReactiveCommand Clear { get; }
    publicstring Greeting { get; privateset; }
    publicstring Name { get; set; } = string.Empty;
    publicFodyReactiveViewModel()
    {
        Clear = ReactiveCommand.Create(() => Name = string.Empty);
        this.WhenAnyValue(x => x.Name)
            .Select(name => $"Hello, {name}!")
            .Subscribe(x => Greeting = x);
    }
}
Fody changes the project's IL at compile time. The PropertyChanged.Fody add-on looks for all classes marked with the AddINotifyPropertyChangedInterface attribute or that implement the INotifyPropertyChanged interface and edits the setters of such classes. You can find out more about how code generation works and what other tasks it can solve, from Andrei Kurosh’s report “ Reflection.Emit. Practice of Use ”.
Although PropertyChanged.Fody allows us to write clean and expressive code, outdated versions of the .NET Framework, including 4.5.1 and laterno longer supported. This means that you can actually try to use ReactiveUI and Fody in your project, but at your own peril and risk, and considering that all errors found will never be fixed! Versions for .NET Core are supported according to the Microsoft Support Policy .
From theory to practice. Validating Forms with ReactiveUI and PropertyChanged.Fody
Now we are ready to write our first reactive presentation model. Let's imagine that we are developing a complex multi-user system, while thinking about UX and want to collect feedback from our customers. When a user sends us a message, we need to know whether it is a bug report or a suggestion for improving the system, and we also want to group reviews into categories. Users should not send emails until they have filled out all the necessary information correctly. A presentation model that satisfies the above conditions may look like this:
[AddINotifyPropertyChangedInterface]
publicsealedclassFeedbackViewModel
{
    public ReactiveCommand<Unit, Unit> Submit { get; }
    publicbool HasErrors { get; privateset; }
    publicstring Title { get; set; } = string.Empty;
    publicint TitleLength => Title.Length;
    publicint TitleLengthMax => 15;
    publicstring Message { get; set; } = string.Empty;
    publicint MessageLength => Message.Length;
    publicint MessageLengthMax => 30;
    publicint Section { get; set; }
    publicbool Issue { get; set; }
    publicbool Idea { get; set; }
    publicFeedbackViewModel(IService service)
    {
        this.WhenAnyValue(x => x.Idea)
            .Where(selected => selected)
            .Subscribe(x => Issue = false);
        this.WhenAnyValue(x => x.Issue)
            .Where(selected => selected)
            .Subscribe(x => Idea = false);
        var valid = this.WhenAnyValue(
            x => x.Title, x => x.Message,
            x => x.Issue, x => x.Idea,
            x => x.Section,
            (title, message, issue, idea, section) =>
                !string.IsNullOrWhiteSpace(message) &&
                !string.IsNullOrWhiteSpace(title) &&
                (idea || issue) && section >= 0);
        valid.Subscribe(x => HasErrors = !x);
        Submit = ReactiveCommand.Create(
            () => service.Send(Title, Message), valid
        );
    }
}
We label our view model with the AddINotifyPropertyChangedInterface attribute — in this way, all properties will notify the UI of changes in their values. Using the WhenAnyValue method , we will subscribe to changes to these properties and will update other properties. The team responsible for submitting the form will remain off until the user completes the form correctly. Let's save our code to the class library, aimed at .NET Standard, and move on to testing.
Unit testing of presentation models
Testing is an important part of the software development process. With tests, we will be able to trust our code and stop being afraid of refactoring it - after all, to check the correctness of the program's work, it will be enough to run the tests and make sure they are successfully completed. An application that uses the MVVM architecture consists of three layers, two of which contain platform-independent logic — and we can test it using .NET Core and the XUnit framework .
To create mocks and stubs , the NSubstitute library is useful to us , providing a convenient API for describing reactions to system actions and values returned by “fake objects”.
var sumService = Substitute.For<ISumService>();
sumService.Sum(2, 2).Returns(4);
To improve the readability of both the code and error messages in our tests, we use the FluentAssertions library . With it, we will not only not have to remember which argument in Assert. Equal goes with the actual value, and with what the expected, but our IDE will write the code for us!
var fibs = fibService.GetFibs(10);
fibs.Should().NotBeEmpty("because we've requested ten fibs");
fibs.First().Should().Be(1);
Let's write a test for our presentation model.
[Fact]
publicvoidShouldValidateFormAndSendFeedback()
{
    // Создадим экземпляр модели представления,// предоставим все необходимые зависимости.var service = Substitute.For<IService>();
    var feedback = new FeedbackViewModel(service);
    feedback.HasErrors.Should().BeTrue();
    // Имитируем пользовательский ввод.
    feedback.Message = "Message!";
    feedback.Title = "Title!";
    feedback.Section = 0;
    feedback.Idea = true;
    feedback.HasErrors.Should().BeFalse();
    // После вызова команды удостоверимся, // что метод Send() объекта IService был // вызван ровно один раз.
    feedback.Submit.Execute().Subscribe();
    service.Received(1).Send("Title!", "Message!");
}
UI for Universal Windows Platform
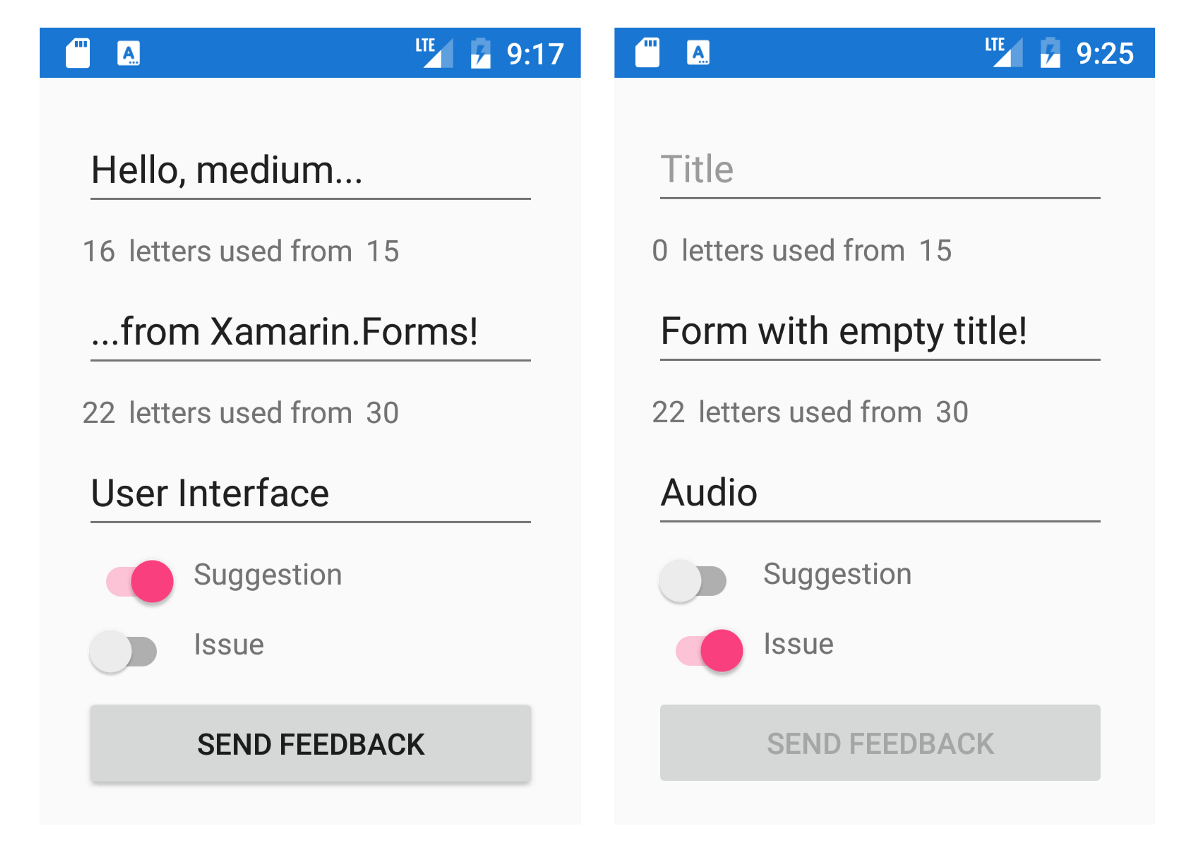
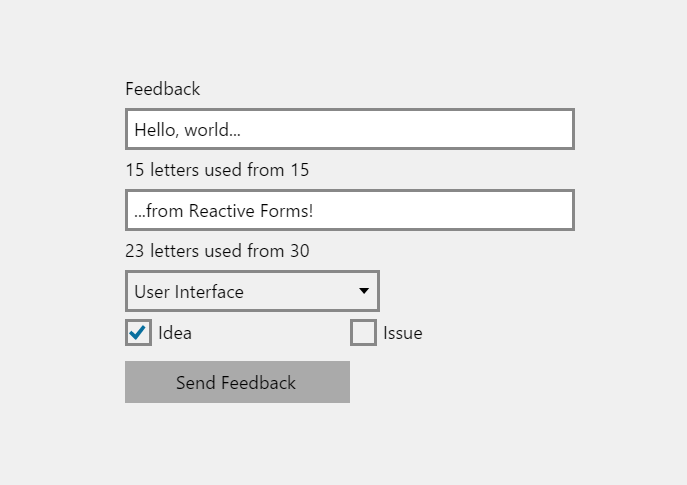
Well, now our presentation model has been tested and we are sure that everything works as expected. The process of developing the presentation layer of our application is quite simple - we need to create a new platform-specific Universal Windows Platform project and add a link to the .NET Standard library containing the platform-independent logic of our application. Then it’s easy to declare controls in XAML, bind their properties to the properties of the view model and remember to specify the data context in any convenient way. Let's do it!
<StackPanelWidth="300"VerticalAlignment="Center"><TextBlockText="Feedback"Style="{StaticResource TitleTextBlockStyle}"/><TextBoxPlaceholderText="Title"MaxLength="{Binding TitleLengthMax}"Text="{Binding Title, Mode=TwoWay,
                  UpdateSourceTrigger=PropertyChanged}"/><TextBlockStyle="{StaticResource CaptionTextBlockStyle}"><RunText="{Binding TitleLength, Mode=OneWay}"/><RunText="letters used from"/><RunText="{Binding TitleLengthMax}"/></TextBlock><TextBoxPlaceholderText="Message"MaxLength="{Binding MessageLengthMax}"Text="{Binding Message, Mode=TwoWay,
                  UpdateSourceTrigger=PropertyChanged}"/><TextBlockStyle="{StaticResource CaptionTextBlockStyle}"><RunText="{Binding MessageLength, Mode=OneWay}"/><RunText="letters used from"/><RunText="{Binding MessageLengthMax}"/></TextBlock><ComboBoxSelectedIndex="{Binding Section, Mode=TwoWay}"><ComboBoxItemContent="User Interface"/><ComboBoxItemContent="Audio"/><ComboBoxItemContent="Video"/><ComboBoxItemContent="Voice"/></ComboBox><Grid><Grid.ColumnDefinitions><ColumnDefinition /><ColumnDefinition /></Grid.ColumnDefinitions><CheckBoxGrid.Column="0"Content="Idea"IsChecked="{Binding Idea, Mode=TwoWay}"/><CheckBoxGrid.Column="1"Content="Issue"IsChecked="{Binding Issue, Mode=TwoWay}"/></Grid><TextBlockVisibility="{Binding HasErrors}"Text="Please, fill in all the form fields."Foreground="{ThemeResource AccentBrush}"/><ButtonContent="Send Feedback"Command="{Binding Submit}"/></StackPanel>
Finally, our form is ready.
UI for Xamarin.Forms
For the application to work on mobile devices running Android and iOS, you need to create a new Xamarin.Forms project and describe the UI using Xamarin controls adapted for mobile devices.
UI for Avalonia
Avalonia is a cross-platform framework for .NET that uses the XAML dialect common for WPF, UWP or Xamarin.Forms developers. Avalonia supports Windows, Linux and OSX and is developed by a community of enthusiasts on GitHub . To work with ReactiveUI, you need to install the Avalonia.ReactiveUI package . Write the presentation layer on Avalonia XAML!
Conclusion
As we see, .NET in 2018 allows us to write truly cross-platform software - using UWP, Xamarin.Forms, WPF and AvaloniaUI, we can provide support for our application operating systems Android, iOS, Windows, Linux, OSX. The MVVM design pattern and libraries such as ReactiveUI and Fody can simplify and speed up the development process, allowing you to write understandable, supported, and portable code. Developed infrastructure, detailed documentation and good support in code editors make the .NET platform more and more attractive for software developers.
If you are writing desktop or mobile applications on .NET and are not yet familiar with ReactiveUI, be sure to pay attention to it - the framework usesone of the most popular GitHub clients for iOS , the Visual Studio extension for GitHub , Atlassian SourceTree and Slack git client for Windows 10 Mobile . The series of articles on ReactiveUI on Habré can be an excellent starting point. Developers on Xamarin will certainly come in handy with the course " Building an iOS app with C # " from one of the authors of ReactiveUI. You can learn more about the experience of developing on AvaloniaUI from the article about Egram , an alternative client for Telegram on .NET Core.
The sources of the cross-platform application described in the article and demonstrating the possibilities of validating forms with ReactiveUI and Fody can be found on GitHub. An example of a cross-platform application running on Windows, Linux, macOS and Android, and demonstrating the use of ReactiveUI, ReactiveUI.Fody and Akavache is also available on GitHub .