Minimal DIY Arduino
Arduino is good when you want to quickly realize an idea without bothering with trifles. But when the idea is tested, excess functionality just starts to get in the way.
Assembling the robot on a caterpillar chassis, I was faced with the fact that a sandwich from Arduino + MotorShield + Sensor Shield, plus the battery and other components, was overgrown with wires and began to fit on a not-so-tiny chassis. To fence a bunch of shields still, I did not want to get rid of extra wires.
There was an idea to get rid of everything that is not required in the Arduino in the finished device. Along the way, I wanted to reduce the cost of the robot.
The cost of Arduino in stores scares away many who are interested in electronics. From ebay and Chinese stores, the package has been going on for a long time, inventive fervor has time to cool down, so the acquisition is postponed “for later”, “when the son grows up”. Therefore, I decided to assemble an Arduino-compatible board from parts that can always be bought in the city.
As a result, I received an Arduino-compatible motherboard, costing 210 rubles on a breadboard and ~ 270 rubles in a ready-to-use form. " Minimalist Arduino " From scratch to full readiness, assembled with a cheap 40W soldering iron for 1 day off without any special skills.

I don’t have a laser printer, I never installed printed circuit boards on my own, so it was decided to use not LUT, but a breadboard with one-side metallization (the cheapest, always available).
At first I wanted to buy an Atmega328P in a DIP package to use the Arduino on a Breadboard article and build an Arduino on a solderless breadboard.

But it turned out that in DIP28 it is extremely difficult to find it in Moscow, and besides, in this case it is much more expensive. But in the presence of bulk Atmega168 in any case. But the price of DIP28 and TQFP-32 is also quite different. Atmega168 has more than enough capabilities for a crawler-mounted robot and home automation, so I dared to save some fear and use 168 in a TQFP-32 package (leg spacing - 0.8mm)

I bought all the components except the epoxy mockup in Moscow, in one store (mockups are sold at any radio store or on the market, I just already had 5 pieces that I bought earlier on ebay).
So, for starters, you need to solder a 9x9 mm microcontroller to the DIP adapter to make it more comfortable to work with.
mkpochtoi did not work, so I couldn’t buy a ready-made breadboard, I bought a breadboard MP-QFP, from which I sawed off a piece for TQFP-32 with a hacksaw.

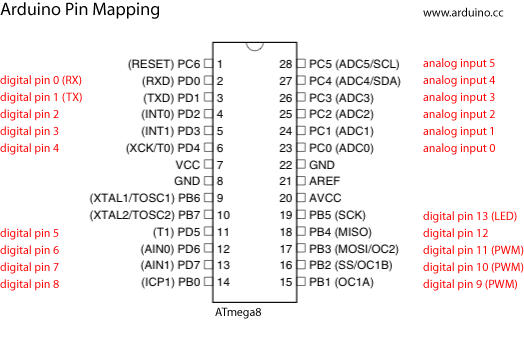
Watching a video tutorial on soldering from DIHALTI put mikruha on a breadboard using a regular 40W soldering iron, spending a little more than 5 minutes on it (I had no experience soldering such small components and generally SMD components). I used a few drops of glycerin as a flux (I asked the girl, she is engaged in soap making). Washed with hot water and dried with a hairdryer. " Atmega 168PA-AU " 40-foot PBS-40 line pliers cut into pieces of 4 legs and soldered from the back. I took the sockets, not the pins, so that the microcontroller board could be connected to the breadboard without wiring. Then everything is as in the article - I assembled a circuit on a breadboard using a datasheet from the Atmega 48/88/168 family (the leg numbers on DIP28 and TQFP-32 differ).

Since I took a clean processor, I had to flash it with an Arduino bootloader. An ambush awaited me here: the
Arduino IDE only knows Atmega168 and knows nothing about Atmega168P (more precisely, Atmega168PA-AU) - a more recent version of the chip. She refused to flash it. And even earlier, I found out that for some reason Freeduino Nano v5.0 for some reason does not want to work as an ISP programmer. I had to disassemble the robot and get Freeduino 2009. Using the ArduinoISP sketch and the Freeduino.ru example, I was able to force avrdude to ignore the difference in signature (-F key) and flash the bootloader, fuse and lock.
This option worked for me: On the official website there is a description of the connection for the firmware:

Alternatively, you can update the avrdude.conf file by registering the correct signature, but there is no particular need for it.
That's it, Arduino is ready for the breadboard. You can connect any USB - serial TTL (or RS-232-TTL) adapter and sew the sketch from the Arduino IDE by choosing Board-> Arduino Diecimila, Duemilanove or Nano w / Atmega168. " Breadboard Arduino " Having convinced of working capacity, I started porting to the breadboard. The most difficult thing was to optimally place the elements. For this, Fritzing turned out to be the easiest free tool. True, a heap of pictures and wires looks scary, but allows you to not get confused in wires during assembly: “ Minimalist Arduino ”


I tried to reduce the number of individual wires, soldering where possible the conclusions of the stuck component to the desired contact simply by bending its legs and cutting off the excess.
Having added about 65 r to the spare parts, I got the following result: “ Minimalist Arduino ” For convenience, I added a power bus and ground (2 combs at the bottom right), a power button, an RX, TX, DTR socket for downloading sketches and an ICSP connector for microcontroller firmware with a programmer right on the board. “ Minimalist Arduino assembly ” Having stuck a microcontroller board with Atmega328P-AU, you can upgrade the device for tasks where 16 kb for a sketch is not enough. I’m going to use the space remaining on the breadboard for sensors, a motor driver, and other necessary things.


Here is a list of components and prices:
I did not count the 20 centimeters of the mounting wire, I did not count the solder and flux :)
It turned out even a little cheaper than the Arduino Pro Mini ($ 9.5), while it’s more convenient to use and you do not need to wait 3 weeks until it arrives from China).
But the best part is that everyone can assemble it and all components are commercially available and easily accessible. You do not need to wait and search. Did you see an interesting project on arduino on a habr? Gather it!
If you are not familiar with the arduino or the programmer, then the seller can flash the bootloader for 50 rubles, and you do not need to buy the USB-Serial TTL adapter if the computer has a COM port.
I assembled such an adapter from MAX232CPE, a DB9F connector and 4 capacitors for one ruble piece: “ Loading Sketch ”

Assembling the robot on a caterpillar chassis, I was faced with the fact that a sandwich from Arduino + MotorShield + Sensor Shield, plus the battery and other components, was overgrown with wires and began to fit on a not-so-tiny chassis. To fence a bunch of shields still, I did not want to get rid of extra wires.
There was an idea to get rid of everything that is not required in the Arduino in the finished device. Along the way, I wanted to reduce the cost of the robot.
The cost of Arduino in stores scares away many who are interested in electronics. From ebay and Chinese stores, the package has been going on for a long time, inventive fervor has time to cool down, so the acquisition is postponed “for later”, “when the son grows up”. Therefore, I decided to assemble an Arduino-compatible board from parts that can always be bought in the city.
As a result, I received an Arduino-compatible motherboard, costing 210 rubles on a breadboard and ~ 270 rubles in a ready-to-use form. " Minimalist Arduino " From scratch to full readiness, assembled with a cheap 40W soldering iron for 1 day off without any special skills.
I don’t have a laser printer, I never installed printed circuit boards on my own, so it was decided to use not LUT, but a breadboard with one-side metallization (the cheapest, always available).
At first I wanted to buy an Atmega328P in a DIP package to use the Arduino on a Breadboard article and build an Arduino on a solderless breadboard.
But it turned out that in DIP28 it is extremely difficult to find it in Moscow, and besides, in this case it is much more expensive. But in the presence of bulk Atmega168 in any case. But the price of DIP28 and TQFP-32 is also quite different. Atmega168 has more than enough capabilities for a crawler-mounted robot and home automation, so I dared to save some fear and use 168 in a TQFP-32 package (leg spacing - 0.8mm)
I bought all the components except the epoxy mockup in Moscow, in one store (mockups are sold at any radio store or on the market, I just already had 5 pieces that I bought earlier on ebay).
So, for starters, you need to solder a 9x9 mm microcontroller to the DIP adapter to make it more comfortable to work with.
mkpochtoi did not work, so I couldn’t buy a ready-made breadboard, I bought a breadboard MP-QFP, from which I sawed off a piece for TQFP-32 with a hacksaw.
Watching a video tutorial on soldering from DIHALTI put mikruha on a breadboard using a regular 40W soldering iron, spending a little more than 5 minutes on it (I had no experience soldering such small components and generally SMD components). I used a few drops of glycerin as a flux (I asked the girl, she is engaged in soap making). Washed with hot water and dried with a hairdryer. " Atmega 168PA-AU " 40-foot PBS-40 line pliers cut into pieces of 4 legs and soldered from the back. I took the sockets, not the pins, so that the microcontroller board could be connected to the breadboard without wiring. Then everything is as in the article - I assembled a circuit on a breadboard using a datasheet from the Atmega 48/88/168 family (the leg numbers on DIP28 and TQFP-32 differ).
Since I took a clean processor, I had to flash it with an Arduino bootloader. An ambush awaited me here: the
Arduino IDE only knows Atmega168 and knows nothing about Atmega168P (more precisely, Atmega168PA-AU) - a more recent version of the chip. She refused to flash it. And even earlier, I found out that for some reason Freeduino Nano v5.0 for some reason does not want to work as an ISP programmer. I had to disassemble the robot and get Freeduino 2009. Using the ArduinoISP sketch and the Freeduino.ru example, I was able to force avrdude to ignore the difference in signature (-F key) and flash the bootloader, fuse and lock.
This option worked for me: On the official website there is a description of the connection for the firmware:
::Прошиваем bootloader (порт COM9 нужно поменять на Ваш)

avrdude -F -C avrdude.conf -p m168p -c avrisp -P COM9 -b 19200 -e -U flash:w:optiboot_diecimila.hex

::Прошиваем fuse и lock биты

avrdude -F -C avrdude.conf -p m168p -c avrisp -P COM9 -b 19200 -Uefuse:w:0x00:m -Uhfuse:w:0xdd:m -Ulfuse:w:0xff:m -Ulock:w:0x0F:m
Alternatively, you can update the avrdude.conf file by registering the correct signature, but there is no particular need for it.
That's it, Arduino is ready for the breadboard. You can connect any USB - serial TTL (or RS-232-TTL) adapter and sew the sketch from the Arduino IDE by choosing Board-> Arduino Diecimila, Duemilanove or Nano w / Atmega168. " Breadboard Arduino " Having convinced of working capacity, I started porting to the breadboard. The most difficult thing was to optimally place the elements. For this, Fritzing turned out to be the easiest free tool. True, a heap of pictures and wires looks scary, but allows you to not get confused in wires during assembly: “ Minimalist Arduino ”
I tried to reduce the number of individual wires, soldering where possible the conclusions of the stuck component to the desired contact simply by bending its legs and cutting off the excess.
Having added about 65 r to the spare parts, I got the following result: “ Minimalist Arduino ” For convenience, I added a power bus and ground (2 combs at the bottom right), a power button, an RX, TX, DTR socket for downloading sketches and an ICSP connector for microcontroller firmware with a programmer right on the board. “ Minimalist Arduino assembly ” Having stuck a microcontroller board with Atmega328P-AU, you can upgrade the device for tasks where 16 kb for a sketch is not enough. I’m going to use the space remaining on the breadboard for sensors, a motor driver, and other necessary things.
Here is a list of components and prices:
| Name | Price | Qty | Cost |
|---|---|---|---|
| Mockup MP-QFP | 64 | 1 | 64 |
| Glass-Epoxy Board Prototyping PCB 9x15 FR4 | 43 | 1 | 43 |
| PBS-4 | 4 | 8 | 32 |
| PBS-6 | 4 | 2 | 8 |
| PLS-40 | 4 | 1 | 4 |
| ATMega168PA-AU | 62 | 1 | 62 |
| LM7805 1A 5V Positive Voltage Regulator | fifteen | 1 | fifteen |
| 16.000MHz Clock Crystal | 10 | 1 | 10 |
| 22pF Capacitor | 1 | 2 | 2 |
| 10uF Capacitor | 5 | 2 | 10 |
| 100nF Capacitor | 1 | 1 | 1 |
| 10kOhm Resistor | 1 | 1 | 1 |
| 150 Ohm Resistor | 1 | 2 | 2 |
| DTS-61 button | 2 | 1 | 2 |
| PS-22E85L | 7 | 1 | 7 |
| WF-02 plug on board | 1 | 1 | 1 |
| Red 3mm LED | 2 | 1 | 2 |
| Green 3mm LED | 2 | 1 | 2 |
| Total | 268 r. |
I did not count the 20 centimeters of the mounting wire, I did not count the solder and flux :)
It turned out even a little cheaper than the Arduino Pro Mini ($ 9.5), while it’s more convenient to use and you do not need to wait 3 weeks until it arrives from China).
But the best part is that everyone can assemble it and all components are commercially available and easily accessible. You do not need to wait and search. Did you see an interesting project on arduino on a habr? Gather it!
If you are not familiar with the arduino or the programmer, then the seller can flash the bootloader for 50 rubles, and you do not need to buy the USB-Serial TTL adapter if the computer has a COM port.
I assembled such an adapter from MAX232CPE, a DB9F connector and 4 capacitors for one ruble piece: “ Loading Sketch ”