Another Canvas Guide [2]: Stylization, Gradients, Shadows
Introduction
In the previous part, we looked at how to work with paths, but drawing only in black is not a joy, which is why in this part we’ll be the first to look at how to color our canvas, then consider how to style lines, then learn how to work with shadows, then learn how to work with gradients and finally, we’ll figure out how to work with the so-called templates.
Let's make our canvas colorful

As you already noticed in canvas, there are two types of fill and rect rendering operations, and each has its own style settings. To change them, you need to change the context properties of fillStyle and strokeStyle; these properties can take not only colors as values, but also other values that we will discuss later. Now we’ll look at how to change the color. To do this, simply set the fillStyle and strokeStyle properties to a new value, in the case of colors, these will be strings, while canvas supports the following color description schemes: orange, # FFA500, rgb (255,165,0), rgba (255,165,0,1).
For example, we will draw a colorful circle, leave in our script only the context, and then add the following code:
for(var i=0;i<6;i++){
    ctx.fillStyle = 'rgb(' + Math.round(Math.random()*255) + ',' + Math.round(Math.random()*255) + ',' + Math.round(Math.random()*255) +')'
    ctx.beginPath()
    ctx.arc(300,300,70,Math.PI/3*i,Math.PI/3*(i+1),false)
    ctx.lineTo(300,300)
    ctx.fill()
}
As an attentive reader guessed, this code will draw a circle consisting of 6 segments with arbitrary colors.
Let's work with the lines
We can also change some parameters of the lines for this there are several properties, let's look at each of them in order.
Change the line width
The line width value is stored in the lineWidth property of the canvas context and one unit corresponds to one pixel. The default value is naturally 1.0.
Line Top Style
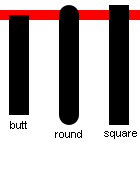
The top style of the line is stored in the lineCap property and there are three possible values for it: butt, round, sqare, the default style is butt.
Line Join Style
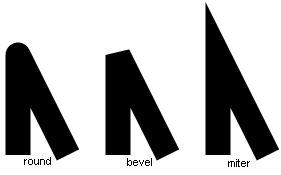
The line join style is stored in the lineJoin property and can take three possible values: miter, round, bevel, the default style is miter.
A little more about miter
We can limit the length of the huge miter tail with the miteLimit property, which defaults to 10.
Cast shadows
To be precise, canvas shadows are always cast, they are simply cast at zero offset and zero blur. It is not worth considering shadows for a long time, because everything is very clear here, there are four properties that control shadows (standard values are indicated through the sign):
shadowOffsetX = 0.0
shadowOffsetY = 0.0
shadowBlur = 0.0
shadowColor = "transparent black"
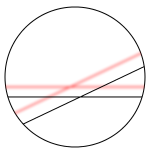
For example, we cast two shadows on each other in a limited drawing area and see what happens:
ctx.beginPath()
ctx.arc(200,300,70,0,Math.PI*2,true)
ctx.stroke()
ctx.clip()
ctx.shadowOffsetX = -10
ctx.shadowOffsetY = -10
ctx.shadowBlur = 2
ctx.shadowColor = 'black'
ctx.beginPath()
ctx.moveTo(100,320)
ctx.lineTo(500,320)
ctx.moveTo(500,180)
ctx.lineTo(100,370)
ctx.stroke()
Use gradients
As in the last part we examined the ways, and in this we will consider the gradients.
Linear gradients

Creating a Gradient Object
createLinearGradient(float x1, float y1, float x2, float y2)var gr = ctx.createLinearGradient(0,0,150,150)Add colors to the gradient.
addColorStop(float offset, string color)Add the lines to our script:
gr.addColorStop(0.0,'blue')
gr.addColorStop(0.5,'red')
gr.addColorStop(1.0,'green')
Apply the gradient as the fill style.
The fillStyle property of the canvas context can take not only color but also gradient as the value, add the line to the script:
ctx.fillStyle = grFinal step, draw a filled rectangle
Add the last line to our script:
ctx.fillRect(0,0,150,150)Radial gradients
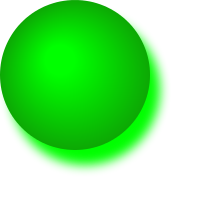
When working with radial gradients, the difference from linear gradients is only in creation.
createRadialGradient(float x1, float y1, float r1, float x2, float y2, float r2)ctx.shadowOffsetX = 10
ctx.shadowOffsetY = 15
ctx.shadowBlur = 10
ctx.shadowColor = '#0F0'
var gr = ctx.createRadialGradient(60,60,15,75,75,75)
gr.addColorStop(0.0,'#0F0')
gr.addColorStop(1.0,'#0DA805')
ctx.fillStyle = gr
ctx.beginPath()
ctx.arc(75,75,75,0,Math.PI*2,false)
ctx.fill()
We use templates
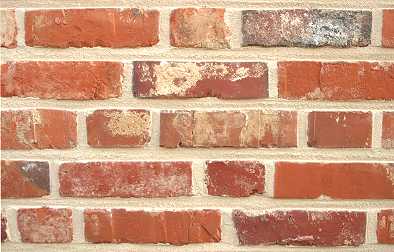
In addition to colors and gradients, fillStyle and strokeStyle can also take so-called patterns as values, patterns can be made from the same canvas element, image or video. For an example we will use the image . The template is created using the createPattern (object any, string repeat) method, repeat can take the following values: "repeat", "repeat-x", "repeat-y", "no-repeat". The default value is “repeat”. For example, run the following script:
var img = new Image()
img.src = 'brick.jpg'
var ptr = ctx.createPattern(img,'repeat')
ctx.fillStyle = ptr;
ctx.fillRect(50,50,100,100)