Mikrotik RoS, useful little things
- Tutorial
The prevalence of Mikrotik equipment is growing every day, more and more devices, and hence RoS, appear not only in the corporate sector, but also among ordinary, home users.
Unfortunately, in spite of the quite normal default settings that can be done through the Quick Set, on the Internet you can find many tips to clear the configuration, and do it somehow “special”, from scratch. In this article I want to share my experience and give recommendations on how to change the configuration from Quick Set to my needs, while maintaining a sufficient level of security.
Quick Set is an automatic configuration wizard that helps you quickly, without diving into the depths of fine-tuning RoS, configure your router and start using it. Depending on the device, several templates may be available to you:
Further we will basically configure HomeAP \ WISP AP, but tips will be useful in other configurations.
The default configuration no longer allows you to connect to the router from an external network, but protection is based only on a packet filter. Do not forget about setting a password for the admin user. Therefore, in addition to filtering and password, I do the following:
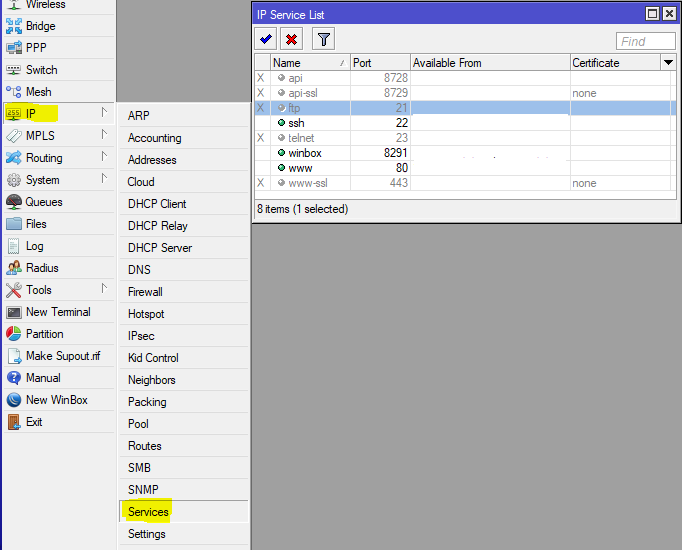
I turn off the services that are not needed in the home network (and not in all non-home networks), and I limit the remaining ones to the scope, indicating the addresses from which I can connect to these services.
The next step is to restrict the discovery of the router using the search for neighbors. To do this, you should have a list of interfaces where this protocol can work, configure it:
Add to the discovery list the interfaces on which we want the Neighbors Discovey protocol to work.
Now we’ll configure the operation of the protocol by specifying the discovery list in its settings:

In a simple, home configuration, the discovery list may contain interfaces on which the access protocol for the MAC address can work, for situations when IP is not available, so we’ll configure this function:
Now , the router will become "invisible" on external interfaces, which will hide information about it (not all of course) from potential scanners, and even deprive the bad guys of the easy opportunity to gain control over the router.
Now, add some simple rules to the packet filter:
And put them after the defcon rule for the icmp protocol.
The result will be a 24-hour ban for those trying to open more than 15 new connections per second. There are many or few 15 connections, the question is debatable, pick the number yourself, I chose 50 for corporate use, and I get such a ban 1-2 per day. The second group of rules is much tougher, it blocks connection attempts to the ssh (22) and winbox (8291) ports, 3 attempts per minute, and rest for a day;). If you need to set the DNS server on the Internet, then a similar rule can cut off DNS Amplification Attacks attempts, but the solution is not perfect, and there are many false positives.
RFC 1918 describes the allocation of address spaces for globally non-routable networks. Therefore, it makes sense to block traffic from \ to such networks, on the interface that looks to the provider, except in situations where the provider gives you a "gray" address.
Put these rules closer to the beginning and do not forget to add to the list the WAN interface that looks towards the provider.
And here is a set of marshouts into the “black hole”
This set of routes will direct all traffic to the RFC 1918 networks to the black hole, however, if there are routes with a lower metric, then such traffic will go through these routes. Useful for ensuring that private traffic does not leak into the external network.
Thanks for the advice achekalin
A rather controversial technology that allows applications to ask the router to forward ports through NAT, however, the protocol works without any authorization and control, this is simply not in the standard, and is often a point of reducing security. Customize as you wish:
Among other things, it is worth disabling the conntrack SIP module, which can cause inadequate VoIP operation, most modern SIP clients and servers do well without its help, and SIP TLS makes it completely useless.

If you don’t use IPv6 or don’t want Windows machines to run IPv6 tunnels without demand, then block the following traffic:
Thanks again for the advice achekalin
This feature has appeared recently (since version 6.41), and it is very convenient. However, there is an unpleasant bug (I reported it, but it has not yet been fixed), the bottom line is that after restarting the router, the firewall rules that use these lists do not work for the interfaces included in the child lists. It is treated by adding child lists. Automation is simple:
In Sheduler, we write a script for the start event (lists of interfaces for a balanced configuration):
In an urban environment, when the ether is extremely noisy, it makes sense to abandon 40MGhz channels, this increases the specific power of the signal on the channel, since a 40MGHz channel is essentially two channels of 20MGHz.
If your router distributes the Internet and gives clients the DHCP settings, it makes sense to set arp = reply-only, and enable add-arp = yes in the DHCP Server.
This setting will prevent you from manually setting the IP address, since the router agrees to work only with that pair MAC-IP, which issued itself.
For corporate use, I recommend creating lists of interfaces and addresses that represent access zones. Then, by creating such lists, you can configure the rules for the passage of traffic from one zone to another, and it is also easy to change the composition of zones. In general, use lists rather than the interfaces themselves more often, this will facilitate the transfer of configuration.
Unfortunately, in spite of the quite normal default settings that can be done through the Quick Set, on the Internet you can find many tips to clear the configuration, and do it somehow “special”, from scratch. In this article I want to share my experience and give recommendations on how to change the configuration from Quick Set to my needs, while maintaining a sufficient level of security.
What is a quick set?
Quick Set is an automatic configuration wizard that helps you quickly, without diving into the depths of fine-tuning RoS, configure your router and start using it. Depending on the device, several templates may be available to you:
- CAP - Managed access point mode, requires configured CAPsMAN
- CPE - WiFi client mode when the Internet comes to you via WiFi
- HomeAP [dual] - Home access point mode, here the number of settings is reduced, and their names are close to the slang of "home users"

- PTP Bridge AP \ CPE - The mode of organizing a wireless bridge, one point is configured in the AP, the rest in CPE
- WISP AP - Almost the same as HomeAP, but more settings, and the names are more "professional"
- Basic AP - Nearly empty configuration, suitable for deploying autonomously managed access points (without CAPsMAN)
Further we will basically configure HomeAP \ WISP AP, but tips will be useful in other configurations.
Security
The default configuration no longer allows you to connect to the router from an external network, but protection is based only on a packet filter. Do not forget about setting a password for the admin user. Therefore, in addition to filtering and password, I do the following:
Availability on external interfaces
I turn off the services that are not needed in the home network (and not in all non-home networks), and I limit the remaining ones to the scope, indicating the addresses from which I can connect to these services.
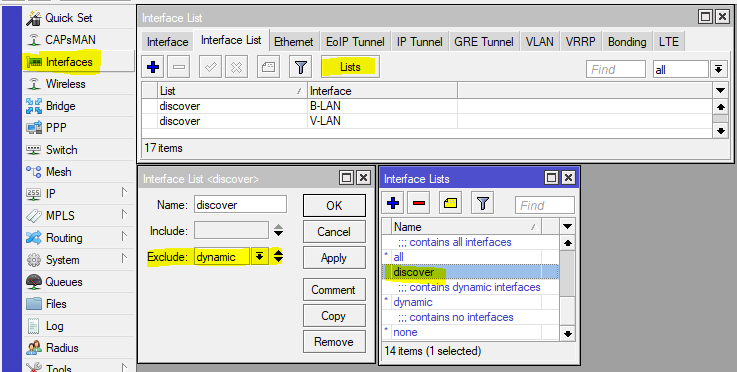
The next step is to restrict the discovery of the router using the search for neighbors. To do this, you should have a list of interfaces where this protocol can work, configure it:
/interface list add exclude=dynamic name=discoverAdd to the discovery list the interfaces on which we want the Neighbors Discovey protocol to work.
Now we’ll configure the operation of the protocol by specifying the discovery list in its settings:
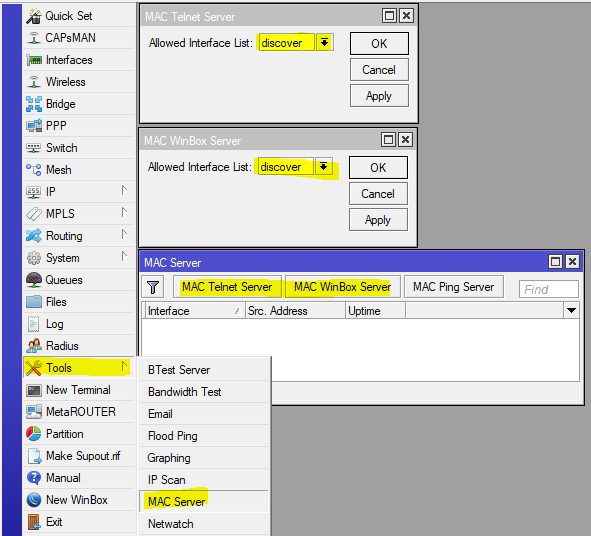
In a simple, home configuration, the discovery list may contain interfaces on which the access protocol for the MAC address can work, for situations when IP is not available, so we’ll configure this function:
Now , the router will become "invisible" on external interfaces, which will hide information about it (not all of course) from potential scanners, and even deprive the bad guys of the easy opportunity to gain control over the router.
DDoS Protection
Now, add some simple rules to the packet filter:
/ip firewall filter
add action=jump chain=forward connection-state=new in-interface-list=ISP jump-target=anti-DDoS
add action=jump chain=input connection-state=new in-interface-list=ISP jump-target=anti-DDoS
add action=drop chain=forward connection-state=new src-address-list=BAN-DDoS
add action=return chain=anti-DDoS dst-limit=15,15,src-address/10s
add action=add-src-to-address-list address-list=BAN-DDoS address-list-timeout=1d chain=anti-DDoS
add action=jump chain=input connection-state=new dst-port=22,8291 in-interface-list=ISP jump-target=anti-BruteForce-3 protocol=tcp
add action=drop chain=forward connection-state=new src-address-list=BAN-BruteForce-3
add action=return chain=anti-BruteForce-3 dst-limit=4/1m,1,src-address/1m40s
add action=add-src-to-address-list address-list=BAN-BruteForce-3 address-list-timeout=1d chain=anti-BruteForce-3
And put them after the defcon rule for the icmp protocol.
The result will be a 24-hour ban for those trying to open more than 15 new connections per second. There are many or few 15 connections, the question is debatable, pick the number yourself, I chose 50 for corporate use, and I get such a ban 1-2 per day. The second group of rules is much tougher, it blocks connection attempts to the ssh (22) and winbox (8291) ports, 3 attempts per minute, and rest for a day;). If you need to set the DNS server on the Internet, then a similar rule can cut off DNS Amplification Attacks attempts, but the solution is not perfect, and there are many false positives.
RFC 1918
RFC 1918 describes the allocation of address spaces for globally non-routable networks. Therefore, it makes sense to block traffic from \ to such networks, on the interface that looks to the provider, except in situations where the provider gives you a "gray" address.
/ip firewall address-list
add address=10.0.0.0/8 list="RFC 1918"
add address=172.16.0.0/12 list="RFC 1918"
add address=192.168.0.0/16 list="RFC 1918"
/ip firewall filter
add action=drop chain=input comment="Drop RFC 1918"in-interface-list=WAN src-address-list="RFC 1918"
add action=drop chain=forward comment="Drop RFC 1918" dst-address-list="RFC 1918" out-interface-list=WAN
add action=drop chain=output comment="Drop RFC 1918" dst-address-list="RFC 1918" out-interface-list=WAN
Put these rules closer to the beginning and do not forget to add to the list the WAN interface that looks towards the provider.
And here is a set of marshouts into the “black hole”
/ip route
add comment="RFC 1918" distance=249 dst-address=10.0.0.0/8 type=blackhole
add comment="RFC 1918" distance=249 dst-address=172.16.0.0/12 type=blackhole
add comment="RFC 1918" distance=249 dst-address=192.168.0.0/16 type=blackhole
This set of routes will direct all traffic to the RFC 1918 networks to the black hole, however, if there are routes with a lower metric, then such traffic will go through these routes. Useful for ensuring that private traffic does not leak into the external network.
Thanks for the advice achekalin
UPnP
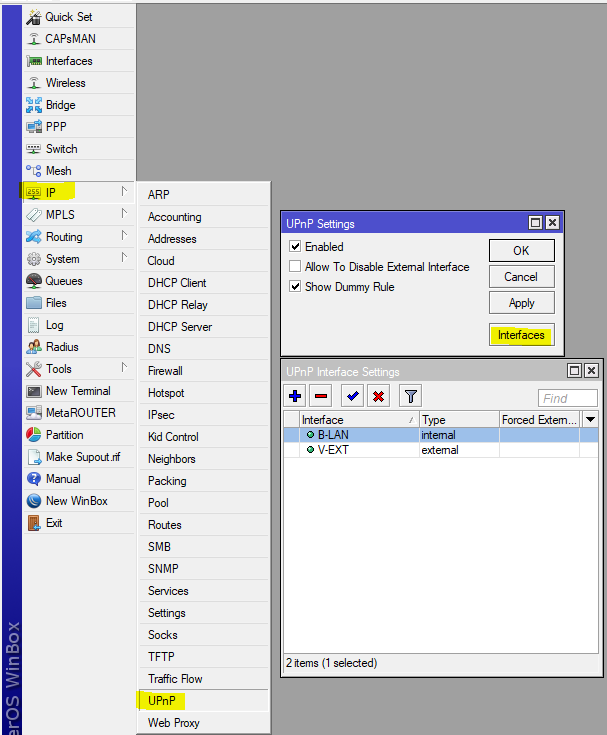
A rather controversial technology that allows applications to ask the router to forward ports through NAT, however, the protocol works without any authorization and control, this is simply not in the standard, and is often a point of reducing security. Customize as you wish:
SIP Conntrack
Among other things, it is worth disabling the conntrack SIP module, which can cause inadequate VoIP operation, most modern SIP clients and servers do well without its help, and SIP TLS makes it completely useless.
IPv6 tunnels
If you don’t use IPv6 or don’t want Windows machines to run IPv6 tunnels without demand, then block the following traffic:
/ip firewall filter
add action=drop chain=forward comment="Teredo TCP" dst-port=3544 protocol=tcp
add action=drop chain=forward comment="Teredo UDP" dst-port=3544 protocol=udp
add action=drop chain=forward comment=6to4 protocol=ipv6
Thanks again for the advice achekalin
Dynamic and nested interface lists
This feature has appeared recently (since version 6.41), and it is very convenient. However, there is an unpleasant bug (I reported it, but it has not yet been fixed), the bottom line is that after restarting the router, the firewall rules that use these lists do not work for the interfaces included in the child lists. It is treated by adding child lists. Automation is simple:
In Sheduler, we write a script for the start event (lists of interfaces for a balanced configuration):
/interface list
set ISP1TUN include=""set ISP include=""set TUN include=""
:delay 2
set ISP1TUN include=ISP1,TUN1
set ISP include=ISP1
set TUN include=TUN1
Wifi
In an urban environment, when the ether is extremely noisy, it makes sense to abandon 40MGhz channels, this increases the specific power of the signal on the channel, since a 40MGHz channel is essentially two channels of 20MGHz.
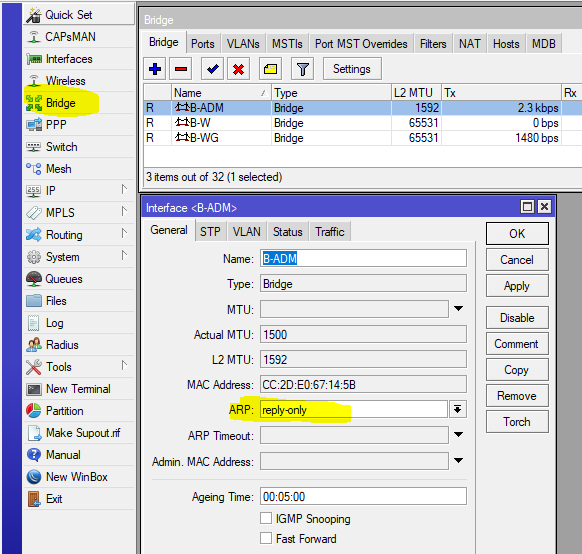
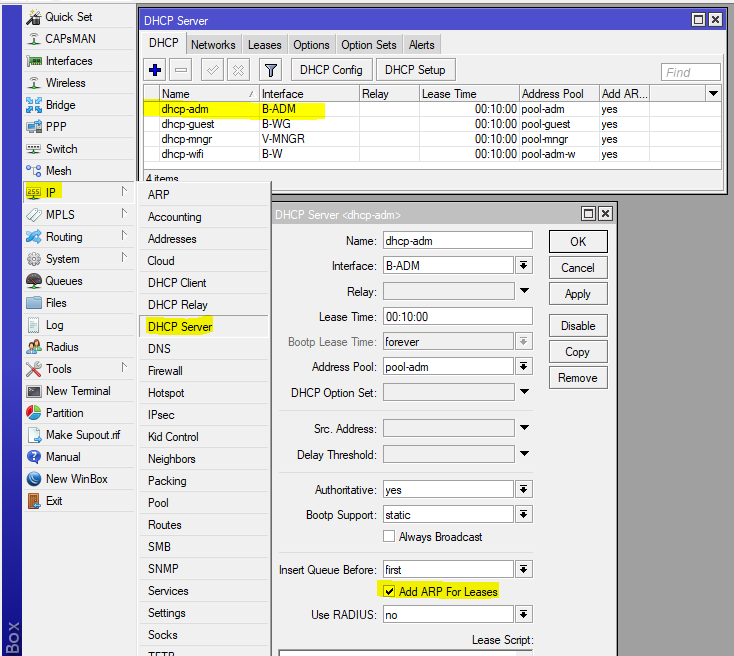
Bridge & arp
If your router distributes the Internet and gives clients the DHCP settings, it makes sense to set arp = reply-only, and enable add-arp = yes in the DHCP Server.
This setting will prevent you from manually setting the IP address, since the router agrees to work only with that pair MAC-IP, which issued itself.
Other
For corporate use, I recommend creating lists of interfaces and addresses that represent access zones. Then, by creating such lists, you can configure the rules for the passage of traffic from one zone to another, and it is also easy to change the composition of zones. In general, use lists rather than the interfaces themselves more often, this will facilitate the transfer of configuration.