Understanding redux-saga: From action generators to sagas
- Transfer
- Tutorial

Any redux developer will tell you that one of the hardest parts of application development is asynchronous calls - how you will handle requests, timeouts and other callbacks without complicating redux actions and reducers.
In this article, I will describe several different approaches to managing asynchrony in your application, ranging from simple approaches like redux-thunk, to more advanced libraries like redux-saga.
We are going to use React and Redux, so we will assume that you have at least some idea of how they work.
Action creators
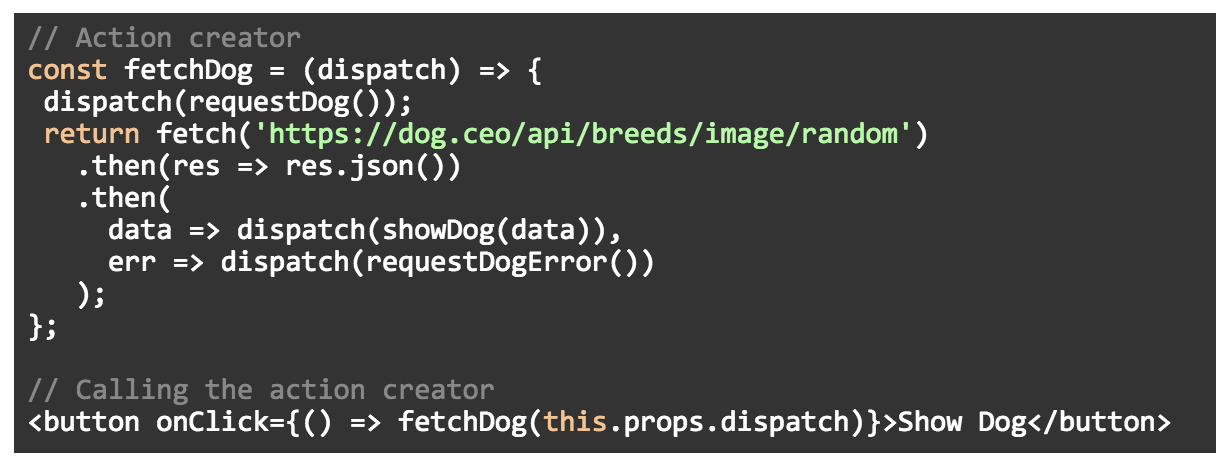
Interaction with the API is a fairly common requirement in applications. Imagine that we need to show a random picture of a dog when we click on a button.

we can use the Dog CEO API and something pretty simple like calling fetch inside an action creator.
const {Provider, connect} = ReactRedux;
const createStore = Redux.createStore
// Reducer
const initialState = {
url: '',
loading: false,
error: false,
};
const reducer = (state = initialState, action) => {
switch (action.type) {
case 'REQUESTED_DOG':
return {
url: '',
loading: true,
error: false,
};
case 'REQUESTED_DOG_SUCCEEDED':
return {
url: action.url,
loading: false,
error: false,
};
case 'REQUESTED_DOG_FAILED':
return {
url: '',
loading: false,
error: true,
};
default:
return state;
}
};
// Action Creators
const requestDog = () => {
return { type: 'REQUESTED_DOG' }
};
const requestDogSuccess = (data) => {
return { type: 'REQUESTED_DOG_SUCCEEDED', url: data.message }
};
const requestDogaError = () => {
return { type: 'REQUESTED_DOG_FAILED' }
};
const fetchDog = (dispatch) => {
dispatch(requestDog());
return fetch('https://dog.ceo/api/breeds/image/random')
.then(res => res.json())
.then(
data => dispatch(requestDogSuccess(data)),
err => dispatch(requestDogError())
);
};
// Component
class App extends React.Component {
render () {
return (
{this.props.loading
? Loading...
: this.props.error
? Error, try again
: 
}
)
}
}
// Store
const store = createStore(reducer);
const ConnectedApp = connect((state) => {
console.log(state);
return state;
})(App);
// Container component
ReactDOM.render(
jsfiddle.net/eh3rrera/utwt4dr8
There is nothing wrong with this approach. Other things being equal, it is always better to use a simpler approach.
However, using only Redux does not give us enough flexibility. The Redux kernel is a state container that only supports synchronous data streams.
For each action, an object is sent to the store describing what happened, then a reducer is called and the state is immediately updated.
But in the case of an asynchronous call, you must first wait for a response and then, if there were no errors, update the state. But what if your application has some kind of complex logic / workflow?
To do this, Redux uses middlewares. An intermediate layer is a piece of code that is executed after the action is submitted, but before the reducer is called.
The intermediate layers can be connected in a chain of calls for various processing of the action (action), but the output must be a simple object (action)
For asynchronous operations, Redux suggests using redux-thunk an intermediate layer.
Redux-thunk
Redux-thunk is the standard way to perform asynchronous operations on Redux.
For our purpose, redux-thunk introduces the concept of a thunk, which is a function that provides deferred execution, if necessary.
Take an example from redux-thunk documentation
let x = 1 + 2;
The value 3 is immediately assigned to the variable x.
However, if we have an expression like
let foo = () => 1 + 2;
That summation is not performed immediately, but only when the foo () function is called. This makes the foo function a thunk.
Redux-thunk allows an action creator to send a function in addition to an object, thus converting the action generator into a converter.
Below, we will rewrite the previous example using redux-thunk
const {Provider, connect} = ReactRedux;
const {createStore, applyMiddleware} = Redux;
const thunk = ReduxThunk.default;
// Reducer
const initialState = {
url: '',
loading: false,
error: false,
};
const reducer = (state = initialState, action) => {
switch (action.type) {
case 'REQUESTED_DOG':
return {
url: '',
loading: true,
error: false,
};
case 'REQUESTED_DOG_SUCCEEDED':
return {
url: action.url,
loading: false,
error: false,
};
case 'REQUESTED_DOG_FAILED':
return {
url: '',
loading: false,
error: true,
};
default:
return state;
}
};
// Action Creators
const requestDog = () => {
return { type: 'REQUESTED_DOG' }
};
const requestDogSuccess = (data) => {
return { type: 'REQUESTED_DOG_SUCCEEDED', url: data.message }
};
const requestDogError = () => {
return { type: 'REQUESTED_DOG_FAILED' }
};
const fetchDog = () => {
return (dispatch) => {
dispatch(requestDog());
fetch('https://dog.ceo/api/breeds/image/random')
.then(res => res.json())
.then(
data => dispatch(requestDogSuccess(data)),
err => dispatch(requestDogError())
);
}
};
// Component
class App extends React.Component {
render () {
return (
{this.props.loading
? Loading...
: this.props.error
? Error, try again
:
}
)
}
}
// Store
const store = createStore(
reducer,
applyMiddleware(thunk)
);
const ConnectedApp = connect((state) => {
console.log(state);
return state;
})(App);
// Container component
ReactDOM.render(
jsfiddle.net/eh3rrera/0s7b54n4
At first glance, it is not much different from the previous version.
Without redux-thunk
With redux-thunk
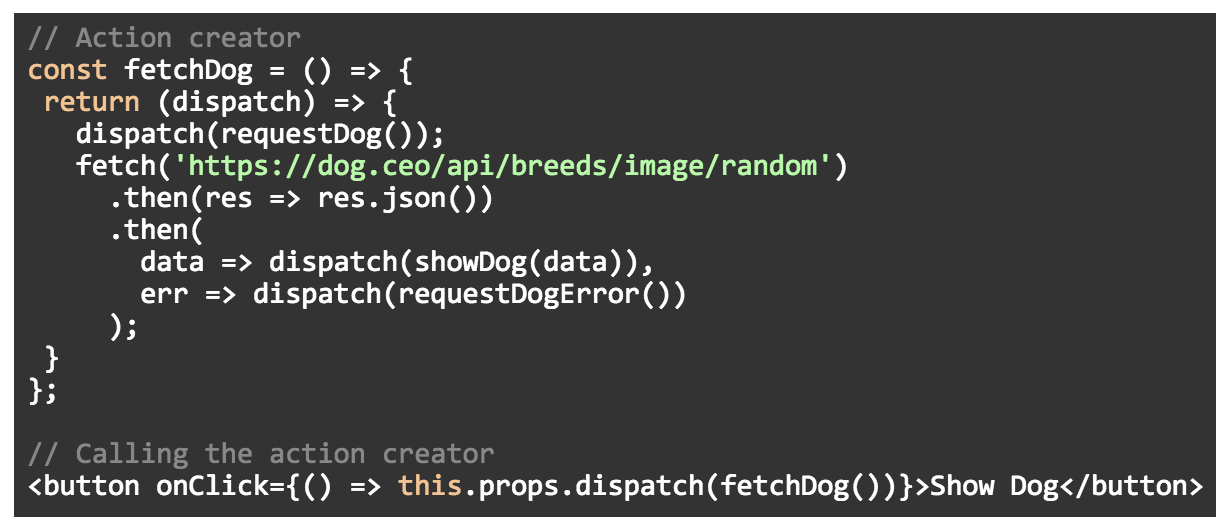
The advantage of using redux-thunk is that the component does not know that an asynchronous action is being performed.
Because the intermediate layer automatically passes the dispatch function to the function that the action generator returns, then outside, for the component, there is no difference in invoking synchronous and asynchronous actions (and the components no longer need to worry about this)
Thus, using the intermediate layer mechanism, we added an implicit layer (a layer of indirection), which gave us more flexibility.
Since redux-thunk passes dispatch and getState methods from the store as parameters to the returned functions, you can send other actions and use state to implement additional logic and workflow.
But what if we have something more complex to be expressed using a thunk, without changing the react component. In this case, we can try to use another middleware library and get more control.
Let's see how to replace redux-thunk with a library, which can give us more control - redux-saga.
Redux-saga
Redux-saga is a library aimed at making side effects easier and better by working with sagas.
Sagas are a design pattern that came from the world of distributed transactions, where the saga manages the processes that need to be performed in a transactional way, maintaining the execution state and compensating for failed processes.
To learn more about sagas, you can start by looking at the Caitie McCaffrey Application of the Saga pattern , but if you are ambitious, here is the article that first describes the sagas regarding distributed systems.
In the context of Redux, the saga is implemented as an intermediate layer (we cannot use reducers because they must be pure functions), which coordinates and induces asynchronous actions (side effects).
Redux-saga does this with ES6 generators.

Generators are functions that can be stopped and continued, instead of executing all expressions in a single pass.
When you call the generator function, it returns an iterator object. And with each call to the next () iterator method, the body of the generator function will be executed until the next yield expression and then stop.

This makes asynchronous code easier to write and understand.
For example, instead of the following expression:

With generators, we would write this:

Returning to redux-saga, generally speaking, we have a saga whose job is to monitor dispatched actions.

To coordinate the logic that we want to implement inside the saga, we can use the takeEvery helper function to create a new saga to perform the operation.

If there are multiple requests, takeEvery starts several instances of the worker saga. In other words, implements concurrency for you.
It should be noted that the watcher saga is another layer of indirection that provides more flexibility for implementing complex logic (but this may be superfluous for simple applications).
Now we can implement the fetchDogAsync () function (we assume that we have access to the dispatch method)

But redux-saga allows us to get an object that declares our intention to perform the operation, instead of the result of the operation itself. In other words, the example above is implemented in redux-saga as follows:
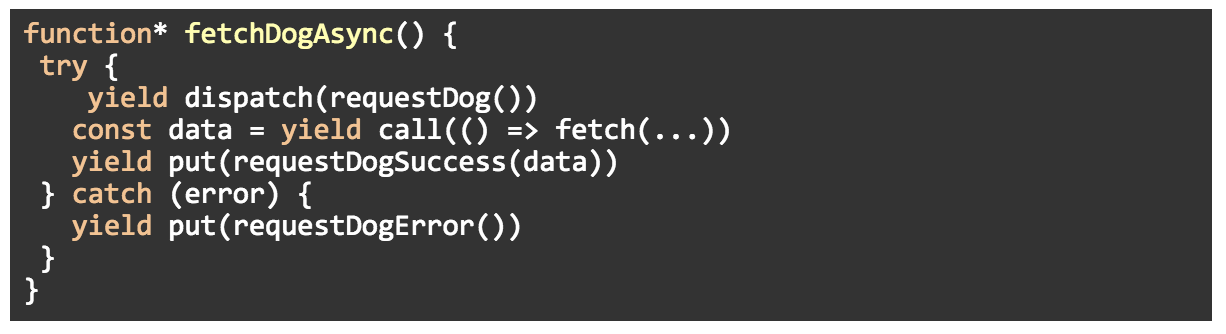
(Note by the translator: the author forgot to replace the very first dispatch call)
Instead of calling the asynchronous request directly, the call method will return only an object describing this operation and redux-saga will be able to take care of the call and return results in a function generator.
The same goes for the put method. Instead of dispatching actions inside the generator function, put returns an object with instructions for the middleware — send the action.
These return objects are called Effects. Below is an example of the effect returned by the call method:

When working with Effects, redux-saga makes sagas more declarative than imperative .
Declarative programming is a programming style that tries to minimize or eliminate side effects by describing what the program should do, instead of describing how it should do it.
The advantage that this gives, and what most people talk about, is that a function that returns a simple object is much easier to test than a function that makes an asynchronous call. For testing, you do not need to use a real IPA, make fakes or get wet.
For testing, you simply iterate the generator function by making an assert and compare the resulting values.

Another added benefit is the ability to easily combine different effects into a complex workflow.
In addition to takeEvery , call , put , redux-saga offers many methods for creating effects (Effects creators) to delay , obtain the current state , start parallel tasks , and cancel tasks . Just a few possibilities.
Returning to our simple example, below is the full implementation in redux-saga:
const {Provider, connect} = ReactRedux;
const {createStore, applyMiddleware} = Redux;
const createSagaMiddleware = ReduxSaga.default;
const {takeEvery} = ReduxSaga;
const {put, call} = ReduxSaga.effects;
// Reducer
const initialState = {
url: '',
loading: false,
error: false,
};
const reducer = (state = initialState, action) => {
switch (action.type) {
case 'REQUESTED_DOG':
return {
url: '',
loading: true,
error: false,
};
case 'REQUESTED_DOG_SUCCEEDED':
return {
url: action.url,
loading: false,
error: false,
};
case 'REQUESTED_DOG_FAILED':
return {
url: '',
loading: false,
error: true,
};
default:
return state;
}
};
// Action Creators
const requestDog = () => {
return { type: 'REQUESTED_DOG' }
};
const requestDogSuccess = (data) => {
return { type: 'REQUESTED_DOG_SUCCEEDED', url: data.message }
};
const requestDogError = () => {
return { type: 'REQUESTED_DOG_FAILED' }
};
const fetchDog = () => {
return { type: 'FETCHED_DOG' }
};
// Sagas
function* watchFetchDog() {
yield takeEvery('FETCHED_DOG', fetchDogAsync);
}
function* fetchDogAsync() {
try {
yield put(requestDog());
const data = yield call(() => {
return fetch('https://dog.ceo/api/breeds/image/random')
.then(res => res.json())
}
);
yield put(requestDogSuccess(data));
} catch (error) {
yield put(requestDogError());
}
}
// Component
class App extends React.Component {
render () {
return (
{this.props.loading
? Loading...
: this.props.error
? Error, try again
:
}
)
}
}
// Store
const sagaMiddleware = createSagaMiddleware();
const store = createStore(
reducer,
applyMiddleware(sagaMiddleware)
);
sagaMiddleware.run(watchFetchDog);
const ConnectedApp = connect((state) => {
console.log(state);
return state;
})(App);
// Container component
ReactDOM.render(
jsfiddle.net/eh3rrera/qu42h5ee
When you click on the button, this is what happens:
1. The FETCHED_DOG action is sent
2. The watcher saga watchFetchDog receives this action and calls the worker saga fetchDogAsync.
3. An action is sent to display the loading indicator.
4. A method API call is made.
5. An action to update the state is sent (success or failure)
If you think that several implicit layers and a little extra work are worth it, then redux-saga can give you more control for processing side effects in a functional way.
Conclusion
This article showed how to implement asynchronous operations in Redux using action creators, thunks, and sagas, going from a simple approach to a more complex one.
Redux does not prescribe a solution for handling side effects. When you decide which approach to follow, you need to consider the complexity of your application. My recommendation is to start with a simple solution.
There are also redux-saga alternatives that are worth a try. The two most popular are redux-observable (which is based on RxJS ) and redux-logic (also based on RxJS observers, but giving freedom to write your logic in other styles ).