BLE under the microscope 2

BLE under the microscope. Part 2
part 3In the first part, we analyzed why the Bluetooth LE standard was invented, and also examined the format of the advertising packages. In this part, we will continue to study the features of the format and consider the mechanism for connecting the BLE device to the smartphone.
BLE Modes
First, we'll talk about the different modes of operation of BLE devices. Let's start with the simplest. For unidirectional data transfer, for example from a street thermometer to a telephone, there is a beacon format. The device transmits static or slowly changing dynamic data to the air. Here users are warned by a pitfall. If you scan the ether using the android menu item (Settings => BlueTooth), we will not see the beacons. It's all about the type of scan. There is active and passive scanning. Passive scanning simply listens to the air, and with active scanning an additional request is made to the BLE device. There is a fundamental difference in the mode of operation of the advertisers.
Beacons have the header ADV_NONCONN_IND. This means that they are not attachable and do not carry additional information other than that already contained in the package. Due to the fact that they do not have additional functions and a reception mode, all the energy goes only to the transmission of advertising packages. This is the most economical type of operation for BLE devices. However, in order to see them, it is necessary to use a special program with a passive scanning mode on the smartphone. In principle, the information in the beacon package may vary. For example, you need to transfer more information than one package can hold. Then it is possible to cyclically change the information transmitted by the beacon.
The features of passive scanning are that all the data that an android receives from sending a beacon, it immediately transfers to the user application. With active scanning, the application will not see the BLE device until the gadget responds to the scan request from the smartphone. This is the most common mode of operation of devices. Consider its features. When scanning, when a smartphone receives a message from a device on one of the announcement channels (such as ADV_IND or ADV_SCAN_IND), it sends a request on the same channel. This is an empty SCAN_REQ command.

It must be transmitted no later than T_IFS (Time Inter Frame Space), which is 150 μs. In order for the announcement device to hear this request, after each advertising package it is delayed on the channel for the duration of T_IFS. In this case, of course, additional energy is consumed. If the request is received, the device responds with a response SCAN_RSP. The figure shows that the maximum response delay time is also T_IFS.
And here users are trapped by another pitfall. The fact is that the smartphone’s operating system, after receiving the response command SCAN_RSP, remembers the device’s parameters. She continues to repeat her SCAN_REQ requests to the gadget from time to time, but they are not regular. And at the request of a user application, the system will issue the latest data received, regardless of the needs of the application. Therefore, in order to update data, for example, from a position sensor, it will be necessary to restart the scanning process on the phone. Therefore, devices with the ADV_IND and ADV_SCAN_IND headers are poorly suited for transmitting rapidly changing data in beacon mode. It is better to go through the connection procedure and switch to working channels. We will consider this below, but immediately point out that only ADV_IND devices can do this.
At the end of the chapter I want to make out an interesting feature of the SCAN_REQ and SCAN_RSP commands. The fact is that the response command SCAN_RSP can be either empty or contain any useful information. This is used in two cases. Firstly, when all the necessary information does not fit into one package. Secondly, when they want to save battery power. It is done like this. The advertising package itself is as short as possible. It includes only the header, flags and MAC address of the device. And when SCAN_REQ is requested, the device transmits all additional information about itself (for example, name, battery level, etc.) already in the SCAN_RSP frame. The operating system on the phone stitches all the information in one block.
Joining mode
For the full use of all resources of the BLE protocol, it is necessary to work at operating frequencies. This is a synchronous mode of operation. Consider how to create it. After the smartphone, in response to a request with active scanning, receives the SCAN_RSP frame, it becomes possible to connect the gadget to the phone. The joining process is usually started by the user, but can also be started by the application, in case of disconnection. It was for the sake of synchronous mode that BLE was created. After joining, both the gadget and the phone go into an economical mode of operation. Devices stop transmitting at advertising frequencies, and start working on the other 37 channels. Consider how this happens. Take a look at the drawing.

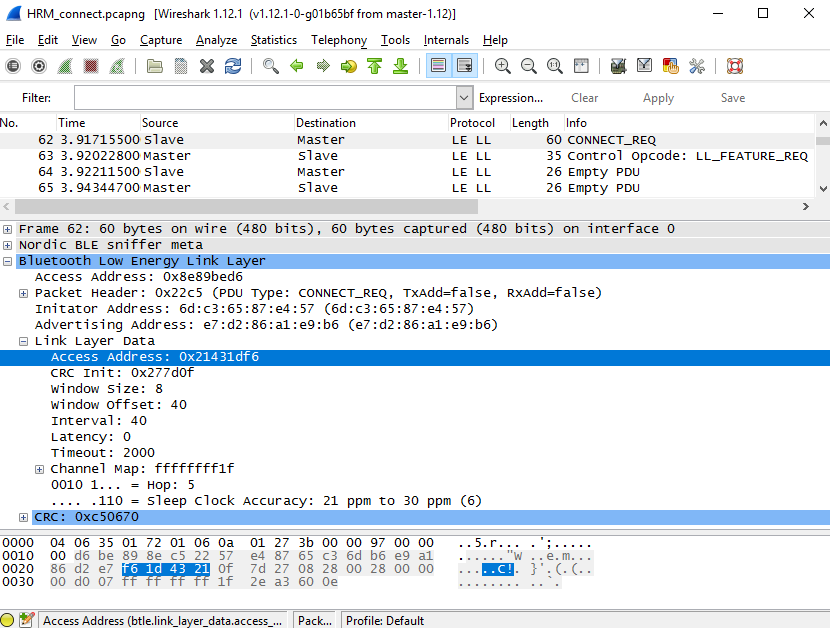
In response to the user's request to attach the gadget, the android sends the CONNECT_REQ packet. It must be sent no later than T_IFS. This package contains complete information about at what frequencies, with what interval and with what Access Address the smartphone offers to exchange data. Here is the data format of this package.

What he looks like in Wireshark we see in the following figure. In the Link Layer Data section, we see that the new Access Address is 0x21431df6. Next are three bytes of the 0x277d0f checksum. To get the four following time parameters, they must be multiplied by the corresponding coefficient.
transmitWindowSize = Win-Size * 1.25 ms
transmitWindowOffset = WinOffset * 1.25 ms
connInterval = Interval * 1.25 ms
connSupervisionTimeout = Timeout * 10 ms
The ChM part describes those working channels on which further work is expected. And in the Hop part - with what interval will allowed channels be moved. According to the specification, Hop is in the range from 5 to 16.
The following figure schematically shows the mechanism for switching to operating frequencies.

Next, the smartphone and the device begin to work in synchronous mode at operating frequencies. However, a smartphone (Master) can change the parameters of the gadget (Slave) at operating frequencies. This most often happens when another device joins the phone. To save energy, it is easier for a smartphone to arrange work with attached devices in such a way as to serve them sequentially in one waking session. In this case, the Feature Exchange Procedure is used. It is very similar to the connection procedure in many respects and takes place automatically, therefore we will not consider it.
In the conclusion of the chapter, we will touch on the topic of profiles. In order to systematize the transmission and reception of data, services were introduced into the BLE format. These are the various tasks that a device can perform. A service, for example, is the ability to report the battery voltage level, or reprogram the device over the air. A profile, as a rule, combines several services. See the full list of BLE device profiles here .
To develop your own devices, the easiest way is to use the NUS (Nordic UART Service) profile. To work with it, nordic has two applications. One is nRF UART 2.0. Another, and in my opinion more convenient, is part of the nRF Toolbox.

In this application, there is a field of 9 cells, each of which you can assign any command, and hang an icon on the cell itself. Thus, you can get a ready-made remote for controlling BLE devices. For example, to control electronic toys.
Work with nRFgoStudio
Nordic has a universal tool for working with various whales - this is the nRFgoStudio program. It, like others, can be downloaded on the manufacturer’s website here . Connect your device or kit using the programmer to the computer. Open nRFgoStudio and click on the nRF5x Programming line. If the programmer sees the processor, a window will open as in the figure.
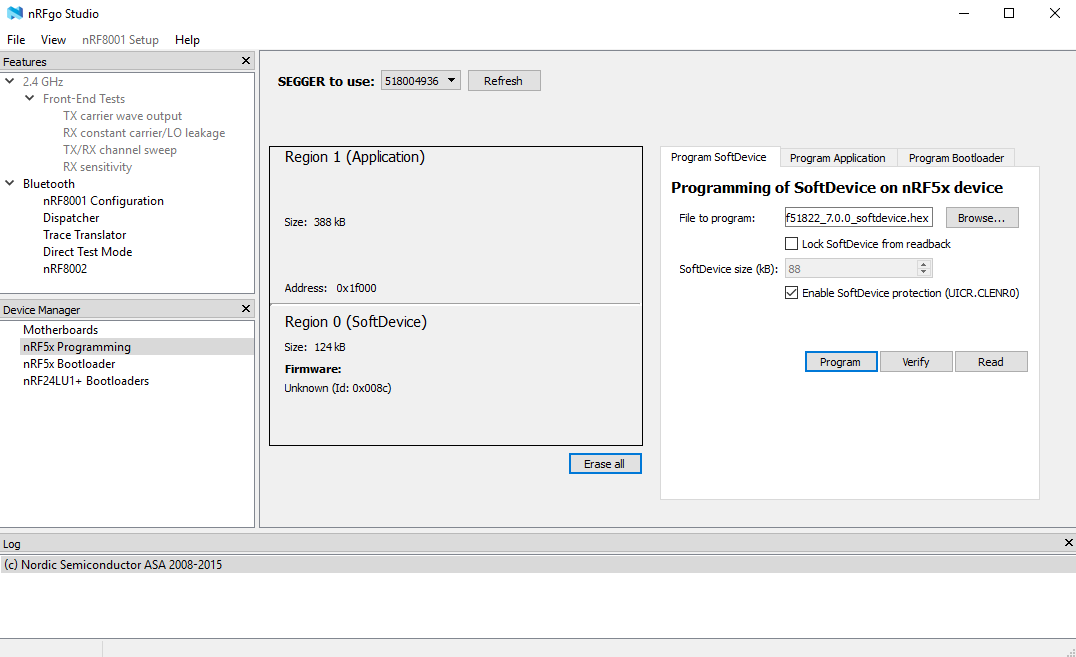
On the right side we see a window with three tabs: Program SoftDevise, Program Application, Program Bootloader. The first window (Program SoftDevise) allows you to load a stack from Nordic-a into the processor, the second - a user application, and the third - an over-the-air loader (DFU). There is an article on the site where it has already been casually covered.
Conclusion
I would like to note that we did not analyze in detail the advertising package advertising and the method of its formation. For those who are interested in how to do this with pens, I refer to the article . It indicates how you can try to work on a simpler Nordic chip nRF24L01, without using the stack. This will allow a deeper understanding of the structure of the package.
In addition, you can learn to form these same packages, bypassing the stack, and on the nRF51822 b nRF52832 chips. This is much easier than working with the stack. However, without a stack, we will not be able to work on production channels. It will be very difficult to independently implement synchronous mode. The BLE theme is very extensive and constantly evolving. Therefore, of course, we could not describe all the features of this protocol. But for the initial start-up, this information is more than enough. Further information can be found here , here and here .
Pecherskikh Vladimir