How we made a converter and player for CinemaDNG on CUDA
- Tutorial
On Habré I already had two articles ( 1 and 2 ), both of them concerned implementation of fast compression of images by JPEG algorithm on CUDA. Now I would like to talk about another, much larger task - how we made a converter and video player for the DNG series of images on CUDA. At the same time, we got a very high speed of operation, because all the processing of source data in DNG format is now performed on the NVIDIA graphics card.
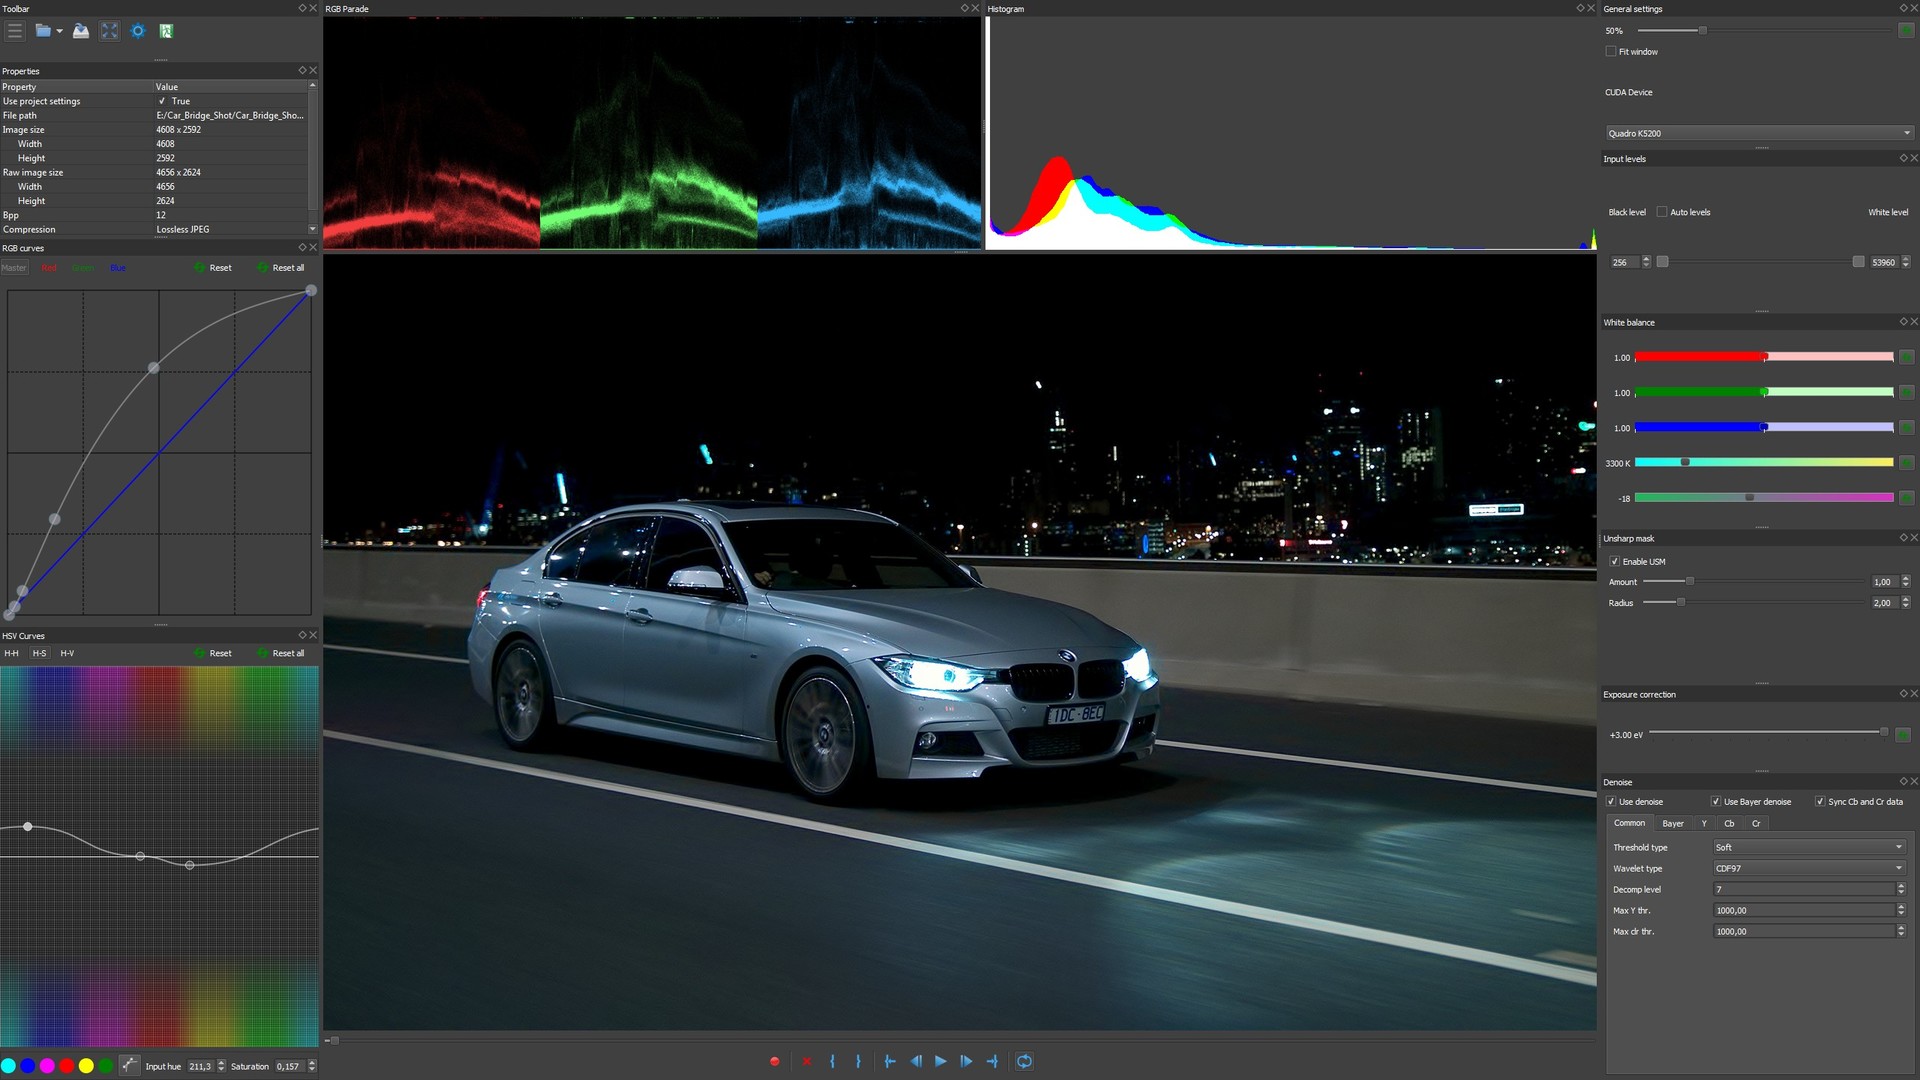
DNG source image taken from blackmagicdesign.com
Despite the fact that there are already a very large number of RAW converters in the world that work with the DNG format, we decided to make another, but very fast one, which could be used including for rejection and sorting. There are DNG video players too, but usually they work with a reduced resolution, so viewing the material just shot in DNG format at full resolution is a problem. Using our converter, we made an attempt to process the pictures so fast as to be able to view a series of DNG images in real time and at full resolution. Naturally, in addition to speed, it was necessary to get an acceptable quality of processing and noise reduction, and it seems to me that we succeeded.
Just in case, let me remind you that DNG is Adobe's open source format for RAW data captured on a camcorder or camera. We will consider the case of the video, although for photographs the task is almost the same.
Problem statement: on a fairly fast SSD there is a series of images in DNG format (all frames are compressed) with a resolution of up to 4K or 4.6K (for example, as with the latest models of URSA or URSA mini camcorders from BlackMagic Design) and you need to read them in real time, decode, do all the necessary processing and smoothly output the video to a monitor with a given frequency in the range of 24-30 frames per second at full resolution (without using proxies, i.e., reduced copies).
We have been developing algorithms and software for image and video processing on CUDA for quite some time, so we had our own fast SDK at our disposal, in which we implemented all the necessary functionality for working with RAW data from video cameras. As a result, the whole image processing scheme currently looks something like this:
1. Multithreaded reading of DNG files from SSD
2. Parsing DNG files, receiving tiles
3. Multithreaded decoding of DNG images
4. Transferring decoded images to a video card
5. Crop for DNG
6. Linearization of the source data, bringing them to 16 bits
7. Application of white and black levels
8. White balance
9. Exposure compensation
10. Shumodav before the debayer
11. Debyer (demosaic)
12. Shumodav after the debayer
13. Color conversions, temperature and tint
14. Curves and levels in RGB
15. Curves and levels in HSV
16. Crop and resize (for a given zoom)
17. Sharpness
18. Overlay monitor profile and gamma
19. Convert data to 8 bits per channel
20. Copy data from CUDA memory to OpenGL texture and then output to monitor after receiving V-Sync
21. Calculation and output of histograms and parades to the monitor for each frame
As can be seen from the description, the internal data presentation format is 16 bits per channel. This is not as bad as it might seem at first glance. All sections of the code where accuracy is very important are counted in float (noise reduction, resize, sharpe), and the final result of processing of each stage is stored in 16 bits. Many debayers are integer algorithms, so for them 16 bits are just right, but some stages still have to be done in a float. Also sometimes we combine neighboring processing stages, for example, white balance and exposure compensation, which reduces the number of intermediate rounding. We visually compared the results with a 32-bit implementation and did not find a significant difference. It seems to us that this is caused by a relatively small number of intermediate stages of processing in our software.
I would like to say a few words about debayers, i.e., about demosaic algorithms. Very often, converters use a bilinear algorithm or its analogs to reduce the computation time, because this is one of the fastest options. Indeed, this is true on the CPU, but if you look at the quality of the reconstructed picture from the point of view of the peak signal-to-noise ratio (PSNR), then for the standard set of Kodak images used for testing debayers, the bilinear algorithm produces less than 31 dB. The HQLI and DFPD debayer algorithms from our program give 36 dB and 39 dB on the same frame set. Since the performance of the debayer on the GPU is many times higher than on the CPU, there is no need for a bilinear debayer and better algorithms can be used. When we did the JPEG codec on the video card, we measured PSNR depending on the quality factor for different dealers and got an interesting result: the low PSNR of the final picture is determined precisely by the bilinear debayer, and not by jeep artifacts with a quality of at least 75%. The summary is simple: if quality is required, it is better not to use a bilinear debayer. It is clear that the PSNR metric (like SSIM and others) is quite arbitrary, but this is an objective criterion that works in most cases, although not always.
In the near future, we should complete the development of a new debugger algorithm for the GPU, which gives a PSNR of 40.7 dB on a Kodak set. The version on the CPU is ready and the test application with the command line is in the public domain. With it, you can test all of our debyer algorithms and compare them.
The new debayer algorithm is called MG (multiple gradients), it is made by us, it is not in other RAW converters.
Implementation of such a general processing scheme for 10/12/14-bit source data in DNG format in real time with a frame frequency in the range of 24-30 fps for resolutions from 2K to 4K requires careful optimization of each algorithm. In this case, it is necessary to achieve the maximum possible speed of SSD, CPU and GPU. If the performance of one of these three components of iron is insufficient, then real time will not work. For 4K-4.6K resolutions, we achieved processing speeds faster than real-time when using NVIDIA GeForce GTX 980 and 1080 video cards.
On good hardware, our DNG player works smoothly, the image can be scaled to full screen. OpenGL hardware resize is disabled because it defaults to a bilinear resize algorithm that produces significant artifacts, especially when downsized. To solve this problem, we always resize to CUDA according to the Lanczos algorithm and transfer to OpenGL a ready-made picture with the same size as the window. At the same time, we get an additional time delay, but the picture quality improves.
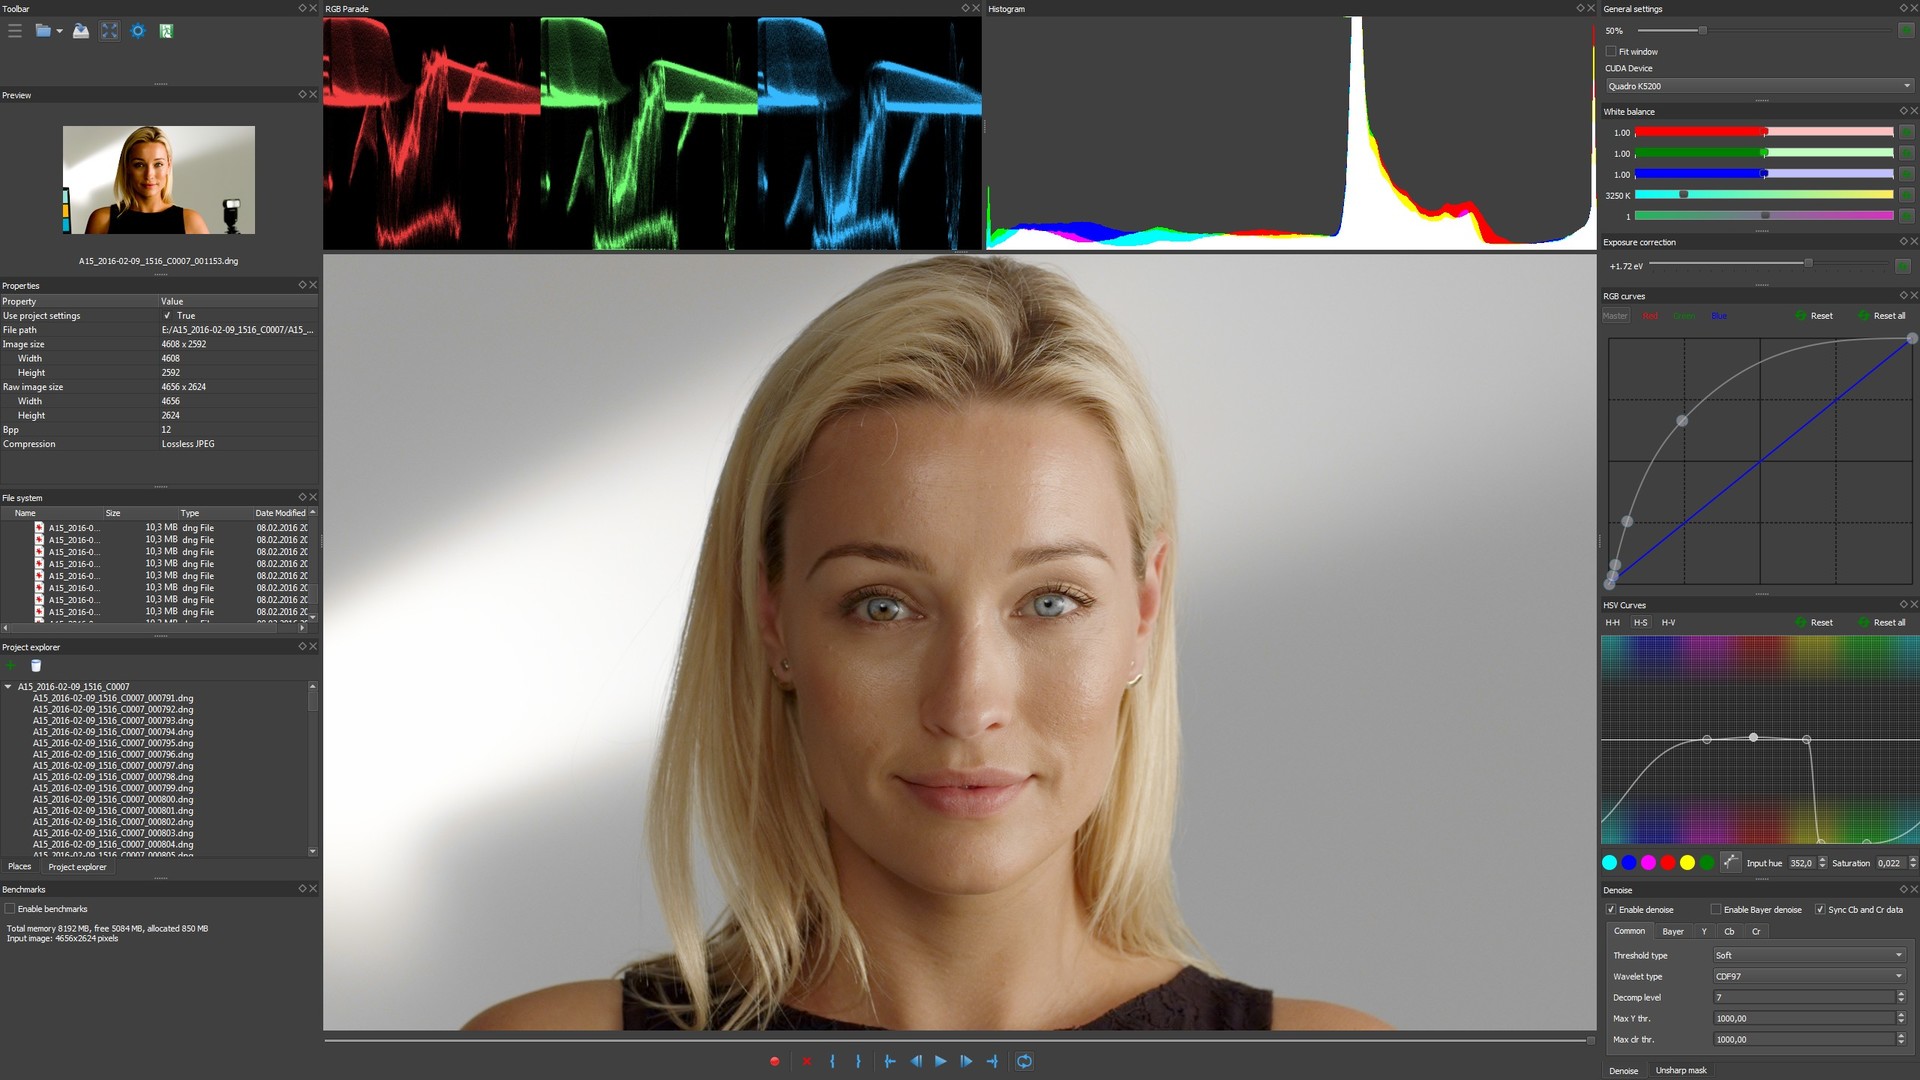
DNG image taken from this site , cameraman Joe Browley, test shots of the BlackMagic Ursa Mini 4.6K.
To save the results to an arbitrary container, you can use an external FFmpeg, which the user must install on his own, and you can run it from our program with the specified command line. Thus, for example, using an external FFmpeg, you can compress the output into a 10-bit 444 ProRes and save it in a MOV container. Without the help of FFmpeg, the program itself can save processed frames as a series of 16-bit TIFF or 8/12-bit JPEG images, and a color profile is embedded in the header of each frame.
You can also process photos in the same way. But since there are a lot of different closed formats in the photo, libraw will need to be connected for proper operation, but for now there are only options with preliminary conversion of the source data to DNG using Adobe DNG Converter. Our program was initially not focused on photos, so many important features are missing. In our SDK, on the basis of which the software is made, part of the necessary functionality has already been implemented, so, perhaps, we will also make a quick converter for photos. In this case, batch processing of photos should turn out to be very fast, because we compress on a video card in jeep too. On a good card, the processing time for one 50-megapixel image is shorter than the image loading time from the SSD. But to work with such large files, you need a GPU with at least 8 GB of memory.
The above image processing scheme is not complete enough, since there is no chromatic aberration suppression module yet, 3D LUT cannot yet be connected, interframe noise reduction is not ready, the editing codec is still external, and a lot of things are still missing. All this will be done soon. However, it is already clearly visible that the implementation of the entire scheme for processing DNG series of images on CUDA is possible even on one video card, in real time and at maximum resolution.
We know about the existence of Adobe Premiere Pro 2015, BlackMagic DaVinci Resolve 12 and many other universal professional solutions in this area, including on video cards. Our task was not to create a competitor to programs for file management, non-linear editing, grading and compression using assembly codecs - in these areas, existing solutions can do quite well with existing tasks, although there is room for speed and improvement. We made a solution for very fast and fairly high-quality data processing on the video card and users can evaluate what we did.
I would like to note an important point: in our approach, we are not talking about accelerating certain algorithms on the GPU in image processing, as is often the case in many applications. In our programall processing of series of DNG images is performed on the video card , and this is a fundamental difference from all the solutions we know in this area. From our point of view, this is the optimal approach to increase the speed of work and an interesting opportunity to improve quality in real-time applications.
So that the user can get information about the execution time of each stage of the general image processing scheme, we made a special module that measures and displays the operating time on the video card of each algorithm for a given image. If you activate the Benchmarks module, the basic data on the used memory, image parameters and a list of the processing algorithms involved along with their execution time will be displayed on the screen.
To solve the problem of quick preview of DNG series, we made a separate mode of operation. This feature was very requested by those users who are engaged in the rejection and sorting of materials in the DNG format. Now you can start the program from the Explorer through the context menu and in the player view the video from a series of DNG images lying in this folder.
A promising option for the development of this direction is the creation of plug-ins for Adobe Premiere Pro and After Effects. In this case, it will be possible to combine our speed and processing quality with the ability to save results using a variety of editing codecs without using FFmpeg. Such plugins can also be used instead of the editing codec to make real-time processed frames from DNG with a resolution of 16 bits per channel and transfer them directly to After Effects, then the decoding stage from ProRes is not required.
We are also working on another interesting aspect of this project - we are making a fast JPEG2000 codec on a video card to use it as an editing codec. Such a codec will be able to work with 16-bit data in real time, which will provide higher quality compared to other editing codecs. Even compression of 10/12-bit data can be done with better quality than it is now. Such a JPEG2000 codec will be able to work in real time and will provide higher quality compared to the widely used ProRes, DNxHD, DNxHR. Currently, such a JPEG2000 codec on the CPU is already part of Adobe Premiere Pro, but it is very slow, so in practical terms it is of little use. Fast JPEG2000 codec will fundamentally change everything and will improve the quality of intermediate materials for subsequent installation.
We are continuing to work on improving the quality of image processing, and in the near future we are expecting the release of a new MG debater, which should be no worse than Adobe Camera Raw (from our point of view, the ACR debayer is very good). And our DFPD debayer in the current release is clearly better than Adobe Premiere Pro 2015. In our free version there are noise suppressors before the debayer and after the debayer, but this is not in the free version of DaVinci Resolve, and Premiere Pro does not have its own real-time noise reduction even in paid version. Each program has its pros and cons, so you can compare a lot and for a long time, but in the end, everyone still finds a tool for themselves that meets their own needs and tasks.
The free demo version of the program for Windows-7/8/10 (64 bit) can be downloaded from here, and a test series of CinemaDNG images can be taken here . The program can also work with video from Canon 5D Mark III with an alternative Magic Lantern firmware after converting MLV to DNG.
I would be grateful for comments on the quality and speed of the solution presented. Once again, I want to remind you that the program works only with NVIDIA graphics cards, and for working with 4K DNG images, it is desirable to have at least 2 GB of memory on the GPU. Unfortunately, the program will not work on AMD and Intel video cards. And if almost the entire memory of the NVIDIA graphics card is occupied by other applications, then alas. To achieve high processing speed, you need fast SSD, CPU and GPU.
DNG source image taken from blackmagicdesign.com
Despite the fact that there are already a very large number of RAW converters in the world that work with the DNG format, we decided to make another, but very fast one, which could be used including for rejection and sorting. There are DNG video players too, but usually they work with a reduced resolution, so viewing the material just shot in DNG format at full resolution is a problem. Using our converter, we made an attempt to process the pictures so fast as to be able to view a series of DNG images in real time and at full resolution. Naturally, in addition to speed, it was necessary to get an acceptable quality of processing and noise reduction, and it seems to me that we succeeded.
Just in case, let me remind you that DNG is Adobe's open source format for RAW data captured on a camcorder or camera. We will consider the case of the video, although for photographs the task is almost the same.
Problem statement: on a fairly fast SSD there is a series of images in DNG format (all frames are compressed) with a resolution of up to 4K or 4.6K (for example, as with the latest models of URSA or URSA mini camcorders from BlackMagic Design) and you need to read them in real time, decode, do all the necessary processing and smoothly output the video to a monitor with a given frequency in the range of 24-30 frames per second at full resolution (without using proxies, i.e., reduced copies).
We have been developing algorithms and software for image and video processing on CUDA for quite some time, so we had our own fast SDK at our disposal, in which we implemented all the necessary functionality for working with RAW data from video cameras. As a result, the whole image processing scheme currently looks something like this:
1. Multithreaded reading of DNG files from SSD
2. Parsing DNG files, receiving tiles
3. Multithreaded decoding of DNG images
4. Transferring decoded images to a video card
5. Crop for DNG
6. Linearization of the source data, bringing them to 16 bits
7. Application of white and black levels
8. White balance
9. Exposure compensation
10. Shumodav before the debayer
11. Debyer (demosaic)
12. Shumodav after the debayer
13. Color conversions, temperature and tint
14. Curves and levels in RGB
15. Curves and levels in HSV
16. Crop and resize (for a given zoom)
17. Sharpness
18. Overlay monitor profile and gamma
19. Convert data to 8 bits per channel
20. Copy data from CUDA memory to OpenGL texture and then output to monitor after receiving V-Sync
21. Calculation and output of histograms and parades to the monitor for each frame
As can be seen from the description, the internal data presentation format is 16 bits per channel. This is not as bad as it might seem at first glance. All sections of the code where accuracy is very important are counted in float (noise reduction, resize, sharpe), and the final result of processing of each stage is stored in 16 bits. Many debayers are integer algorithms, so for them 16 bits are just right, but some stages still have to be done in a float. Also sometimes we combine neighboring processing stages, for example, white balance and exposure compensation, which reduces the number of intermediate rounding. We visually compared the results with a 32-bit implementation and did not find a significant difference. It seems to us that this is caused by a relatively small number of intermediate stages of processing in our software.
I would like to say a few words about debayers, i.e., about demosaic algorithms. Very often, converters use a bilinear algorithm or its analogs to reduce the computation time, because this is one of the fastest options. Indeed, this is true on the CPU, but if you look at the quality of the reconstructed picture from the point of view of the peak signal-to-noise ratio (PSNR), then for the standard set of Kodak images used for testing debayers, the bilinear algorithm produces less than 31 dB. The HQLI and DFPD debayer algorithms from our program give 36 dB and 39 dB on the same frame set. Since the performance of the debayer on the GPU is many times higher than on the CPU, there is no need for a bilinear debayer and better algorithms can be used. When we did the JPEG codec on the video card, we measured PSNR depending on the quality factor for different dealers and got an interesting result: the low PSNR of the final picture is determined precisely by the bilinear debayer, and not by jeep artifacts with a quality of at least 75%. The summary is simple: if quality is required, it is better not to use a bilinear debayer. It is clear that the PSNR metric (like SSIM and others) is quite arbitrary, but this is an objective criterion that works in most cases, although not always.
In the near future, we should complete the development of a new debugger algorithm for the GPU, which gives a PSNR of 40.7 dB on a Kodak set. The version on the CPU is ready and the test application with the command line is in the public domain. With it, you can test all of our debyer algorithms and compare them.
The new debayer algorithm is called MG (multiple gradients), it is made by us, it is not in other RAW converters.
Implementation of such a general processing scheme for 10/12/14-bit source data in DNG format in real time with a frame frequency in the range of 24-30 fps for resolutions from 2K to 4K requires careful optimization of each algorithm. In this case, it is necessary to achieve the maximum possible speed of SSD, CPU and GPU. If the performance of one of these three components of iron is insufficient, then real time will not work. For 4K-4.6K resolutions, we achieved processing speeds faster than real-time when using NVIDIA GeForce GTX 980 and 1080 video cards.
On good hardware, our DNG player works smoothly, the image can be scaled to full screen. OpenGL hardware resize is disabled because it defaults to a bilinear resize algorithm that produces significant artifacts, especially when downsized. To solve this problem, we always resize to CUDA according to the Lanczos algorithm and transfer to OpenGL a ready-made picture with the same size as the window. At the same time, we get an additional time delay, but the picture quality improves.
DNG image taken from this site , cameraman Joe Browley, test shots of the BlackMagic Ursa Mini 4.6K.
To save the results to an arbitrary container, you can use an external FFmpeg, which the user must install on his own, and you can run it from our program with the specified command line. Thus, for example, using an external FFmpeg, you can compress the output into a 10-bit 444 ProRes and save it in a MOV container. Without the help of FFmpeg, the program itself can save processed frames as a series of 16-bit TIFF or 8/12-bit JPEG images, and a color profile is embedded in the header of each frame.
You can also process photos in the same way. But since there are a lot of different closed formats in the photo, libraw will need to be connected for proper operation, but for now there are only options with preliminary conversion of the source data to DNG using Adobe DNG Converter. Our program was initially not focused on photos, so many important features are missing. In our SDK, on the basis of which the software is made, part of the necessary functionality has already been implemented, so, perhaps, we will also make a quick converter for photos. In this case, batch processing of photos should turn out to be very fast, because we compress on a video card in jeep too. On a good card, the processing time for one 50-megapixel image is shorter than the image loading time from the SSD. But to work with such large files, you need a GPU with at least 8 GB of memory.
The above image processing scheme is not complete enough, since there is no chromatic aberration suppression module yet, 3D LUT cannot yet be connected, interframe noise reduction is not ready, the editing codec is still external, and a lot of things are still missing. All this will be done soon. However, it is already clearly visible that the implementation of the entire scheme for processing DNG series of images on CUDA is possible even on one video card, in real time and at maximum resolution.
We know about the existence of Adobe Premiere Pro 2015, BlackMagic DaVinci Resolve 12 and many other universal professional solutions in this area, including on video cards. Our task was not to create a competitor to programs for file management, non-linear editing, grading and compression using assembly codecs - in these areas, existing solutions can do quite well with existing tasks, although there is room for speed and improvement. We made a solution for very fast and fairly high-quality data processing on the video card and users can evaluate what we did.
I would like to note an important point: in our approach, we are not talking about accelerating certain algorithms on the GPU in image processing, as is often the case in many applications. In our programall processing of series of DNG images is performed on the video card , and this is a fundamental difference from all the solutions we know in this area. From our point of view, this is the optimal approach to increase the speed of work and an interesting opportunity to improve quality in real-time applications.
So that the user can get information about the execution time of each stage of the general image processing scheme, we made a special module that measures and displays the operating time on the video card of each algorithm for a given image. If you activate the Benchmarks module, the basic data on the used memory, image parameters and a list of the processing algorithms involved along with their execution time will be displayed on the screen.
To solve the problem of quick preview of DNG series, we made a separate mode of operation. This feature was very requested by those users who are engaged in the rejection and sorting of materials in the DNG format. Now you can start the program from the Explorer through the context menu and in the player view the video from a series of DNG images lying in this folder.
A promising option for the development of this direction is the creation of plug-ins for Adobe Premiere Pro and After Effects. In this case, it will be possible to combine our speed and processing quality with the ability to save results using a variety of editing codecs without using FFmpeg. Such plugins can also be used instead of the editing codec to make real-time processed frames from DNG with a resolution of 16 bits per channel and transfer them directly to After Effects, then the decoding stage from ProRes is not required.
We are also working on another interesting aspect of this project - we are making a fast JPEG2000 codec on a video card to use it as an editing codec. Such a codec will be able to work with 16-bit data in real time, which will provide higher quality compared to other editing codecs. Even compression of 10/12-bit data can be done with better quality than it is now. Such a JPEG2000 codec will be able to work in real time and will provide higher quality compared to the widely used ProRes, DNxHD, DNxHR. Currently, such a JPEG2000 codec on the CPU is already part of Adobe Premiere Pro, but it is very slow, so in practical terms it is of little use. Fast JPEG2000 codec will fundamentally change everything and will improve the quality of intermediate materials for subsequent installation.
We are continuing to work on improving the quality of image processing, and in the near future we are expecting the release of a new MG debater, which should be no worse than Adobe Camera Raw (from our point of view, the ACR debayer is very good). And our DFPD debayer in the current release is clearly better than Adobe Premiere Pro 2015. In our free version there are noise suppressors before the debayer and after the debayer, but this is not in the free version of DaVinci Resolve, and Premiere Pro does not have its own real-time noise reduction even in paid version. Each program has its pros and cons, so you can compare a lot and for a long time, but in the end, everyone still finds a tool for themselves that meets their own needs and tasks.
The free demo version of the program for Windows-7/8/10 (64 bit) can be downloaded from here, and a test series of CinemaDNG images can be taken here . The program can also work with video from Canon 5D Mark III with an alternative Magic Lantern firmware after converting MLV to DNG.
I would be grateful for comments on the quality and speed of the solution presented. Once again, I want to remind you that the program works only with NVIDIA graphics cards, and for working with 4K DNG images, it is desirable to have at least 2 GB of memory on the GPU. Unfortunately, the program will not work on AMD and Intel video cards. And if almost the entire memory of the NVIDIA graphics card is occupied by other applications, then alas. To achieve high processing speed, you need fast SSD, CPU and GPU.