Development through testing: improving skills
- Transfer
- Recovery Mode
Testing is an important skill that every developer must possess. However, some do so reluctantly.
Each of us came across a developer who argued that tests are useless, they require too much effort, and indeed his code is so excellent that no tests are needed. Do not believe. Testing is extremely important.

Tests make your code more stable and reduce the number of bugs. It seems to you that this is not the case, because you know every bit of your code. After all, you wrote it, why else tests?
Suppose you are creating an application for the weather. You wrote the code a few days or weeks, so you know the code inside and out.
Now imagine that you have completed the work on the application and will return to it in a few months. You will not remember every detail of the old code. You change it ... and damn it ... something broke. How do you fix this? Look at each file created and set it up so that it works again? Maybe it will. But changing this file will break something else.
Take another example. After several months of hard work, you finally got the position you have long wanted! You join a team and start creating something. You work with other developers code and vice versa. And one day everything breaks down. If the team did not integrate the tests into your application, I do not envy you.
Each team must write tests when it creates software or applications. You do not want to be a person who does not know how to test?
Yes, writing tests takes time. Yes, difficult at first. Yes, creating applications is more interesting. But tests are important and save time if they are correctly implemented.
My goal today is to improve testing skills. We will look at unit testing and development through testing with Jest (a JavaScript testing tool). Of course, there are other testing tools that you can use, such as Mocha and Chai.
Let's start!
When you decide to test an application, you encounter various types of testing: unit testing (unit), integration tests, and functional tests. Let's stop on modular tests.
Functional and integration tests are just as important, but they are more difficult to set up and implement than unit tests. In a nutshell, a unit test consists of testing small parts of your code: functions, class methods, etc. You input data and confirm that you received the expected result.
Advantages of unit testing:
Development Through Testing (TDD)
To understand and use development through testing, remember these 2 rules:
When we use TDD, we are talking about the “red, green, refactor” cycle.
Red: you write a failed test without writing code.
Green: write the simplest code that can pass the test. Even if the code seems to you the most stupid.
Refactor: code refactoring, if necessary. Do not worry if you change the code and your unit tests break if something goes wrong.
Jest provides functions for structuring tests:
describe: used to group your tests and describe the behavior of your function / module / class. It takes two parameters. The first is a string describing your group. The second is a callback function in which you have test examples or hook functions.
it or test: your unit test. Parameters are the same as with describe. Must be descriptive. The naming of the test is up to you, but you can start with "should".
beforeAll (afterAll): the hook function runs all tests before (and after). Accepts one parameter, which is a function that you will run before (and after) all tests.
beforeEach (afterEach):hook function that runs before (and after) each test. Accepts one parameter, which is a function that you will run before (and after) each test.
Before writing any test, you should know the following:
You can skip the test using .skip on describe and it : it.skip (...) or describe.skip (...) . Using .skip , you tell Jest to ignore a test or group.
You can choose exactly the tests you want to run using .only on describe and it : it.only (...) or describe.only (...). This is useful if you have a lot of tests and you want to focus only on one thing or you want to “debug” your tests.
In order to show you the testing functions that we discussed above, we need to configure Jest. It is very simple.
You need only Node.js and npm or Yarn. Make sure you are using the latest version of Node.js, since we will be using ES6. Create a new directory and initialize it.
-y answers “yes” to all questions npm or yarn. He had to create a very simple package.json file.
Then add the Jest to the development environment.
Then add the following script to your package.json :
yarn test will run your test files in the directory. By default, Jest recognizes files that are inside the __tests__ directory, or files that end in .spec.js, or .test.js.
That's all. You are ready to write the first test.
When you check something, you need an input and an expected result. This is why Jest provides samples for checking our values:
Jest has many samples, here is the most important:
toBe: compares strict equality (===).
toEqual: compares values between two variables, arrays or objects.
toBeTruthy (toBeFalsy): indicates whether the value is true (or false).
toContain: checks if the array contains an element.
toThrow: checks if the function causes an error.
Now we are going to write our first test and play with our functions. First, create an example.spec.js file in your directory and paste in the following:
Please note that we do not need to import all the functions that we use. They are already provided by Jest.
Run yarn test :

Since you do not have statements in the tests, they will pass. Have you seen different console.log instructions? You should understand better how your functions and test cases work.
Now remove all hook functions and add .skip to the first test:
Run the yarn test again:
It's okay if the first test will not work.
Add a third test and use .only :
Rerun yarn test :
In the second part of this article we will make a simple implementation of a stack in JavaScript using TDD.
Each of us came across a developer who argued that tests are useless, they require too much effort, and indeed his code is so excellent that no tests are needed. Do not believe. Testing is extremely important.
Tests make your code more stable and reduce the number of bugs. It seems to you that this is not the case, because you know every bit of your code. After all, you wrote it, why else tests?
Suppose you are creating an application for the weather. You wrote the code a few days or weeks, so you know the code inside and out.
Now imagine that you have completed the work on the application and will return to it in a few months. You will not remember every detail of the old code. You change it ... and damn it ... something broke. How do you fix this? Look at each file created and set it up so that it works again? Maybe it will. But changing this file will break something else.
Take another example. After several months of hard work, you finally got the position you have long wanted! You join a team and start creating something. You work with other developers code and vice versa. And one day everything breaks down. If the team did not integrate the tests into your application, I do not envy you.
Each team must write tests when it creates software or applications. You do not want to be a person who does not know how to test?
Yes, writing tests takes time. Yes, difficult at first. Yes, creating applications is more interesting. But tests are important and save time if they are correctly implemented.
My goal today is to improve testing skills. We will look at unit testing and development through testing with Jest (a JavaScript testing tool). Of course, there are other testing tools that you can use, such as Mocha and Chai.
Let's start!
Unit testing
When you decide to test an application, you encounter various types of testing: unit testing (unit), integration tests, and functional tests. Let's stop on modular tests.
Functional and integration tests are just as important, but they are more difficult to set up and implement than unit tests. In a nutshell, a unit test consists of testing small parts of your code: functions, class methods, etc. You input data and confirm that you received the expected result.
Advantages of unit testing:
- Makes code more stable;
- Facilitates changes in the implementation of a function without changing its behavior;
- Documents your code. You will soon understand why.
- Makes you do the right design. Indeed, poorly designed code is often more difficult to test.
Development Through Testing (TDD)
To understand and use development through testing, remember these 2 rules:
- Write a test that fails before writing code.
- Then write the code that can pass the test.
When we use TDD, we are talking about the “red, green, refactor” cycle.
Red: you write a failed test without writing code.
Green: write the simplest code that can pass the test. Even if the code seems to you the most stupid.
Refactor: code refactoring, if necessary. Do not worry if you change the code and your unit tests break if something goes wrong.
Structuring a test file
Jest provides functions for structuring tests:
describe: used to group your tests and describe the behavior of your function / module / class. It takes two parameters. The first is a string describing your group. The second is a callback function in which you have test examples or hook functions.
it or test: your unit test. Parameters are the same as with describe. Must be descriptive. The naming of the test is up to you, but you can start with "should".
beforeAll (afterAll): the hook function runs all tests before (and after). Accepts one parameter, which is a function that you will run before (and after) all tests.
beforeEach (afterEach):hook function that runs before (and after) each test. Accepts one parameter, which is a function that you will run before (and after) each test.
Before writing any test, you should know the following:
You can skip the test using .skip on describe and it : it.skip (...) or describe.skip (...) . Using .skip , you tell Jest to ignore a test or group.
You can choose exactly the tests you want to run using .only on describe and it : it.only (...) or describe.only (...). This is useful if you have a lot of tests and you want to focus only on one thing or you want to “debug” your tests.
Jest setting
In order to show you the testing functions that we discussed above, we need to configure Jest. It is very simple.
You need only Node.js and npm or Yarn. Make sure you are using the latest version of Node.js, since we will be using ES6. Create a new directory and initialize it.
mkdir test-example && cd test-example
npm init -y
# OR
yarn init -y
-y answers “yes” to all questions npm or yarn. He had to create a very simple package.json file.
Then add the Jest to the development environment.
yarn add jest --devThen add the following script to your package.json :
"scripts": {
  "test": "jest"
}
yarn test will run your test files in the directory. By default, Jest recognizes files that are inside the __tests__ directory, or files that end in .spec.js, or .test.js.
That's all. You are ready to write the first test.
Matchers
When you check something, you need an input and an expected result. This is why Jest provides samples for checking our values:
expect(input).matcher(output)Jest has many samples, here is the most important:
toBe: compares strict equality (===).
expect(1 + 1).toBe(2)
let testsAreEssential = true
expect(testAreEssential).toBe(true)
toEqual: compares values between two variables, arrays or objects.
let arr = [1, 2]
arr.push(3)
expect(arr).toEqual([1, 2, 3])
let x= 1
x++
expect(x).toEqual(2)
toBeTruthy (toBeFalsy): indicates whether the value is true (or false).
expect(null).toBeFalsy()
expect(undefined).toBeFalsy()
expect(false).toBeFalsy()
expect("Hello world").toBeTruthy()
expect({foo: 'bar'}).toBeTruthy()
toContain: checks if the array contains an element.
expect(['Apple', 'Banana', 'Strawberry']).toContain('Apple')toThrow: checks if the function causes an error.
function connect () {
  throw new ConnectionError()
}
expect(connect).toThrow(ConnectionError)
First tests
Now we are going to write our first test and play with our functions. First, create an example.spec.js file in your directory and paste in the following:
describe('Example', () => {
  beforeAll(() => {
    console.log('running before all tests')
  })
  afterAll(() => {
    console.log('running after all tests')
  })
  beforeEach(() => {
    console.log('running before each test')
  })
  afterEach(() => {
    console.log('running after each test')
  })
  it('Should do something', () => {
    console.log('first test')
  })
  it('Should do something else', () => {
    console.log('second test')
  })
})
Please note that we do not need to import all the functions that we use. They are already provided by Jest.
Run yarn test :
Since you do not have statements in the tests, they will pass. Have you seen different console.log instructions? You should understand better how your functions and test cases work.
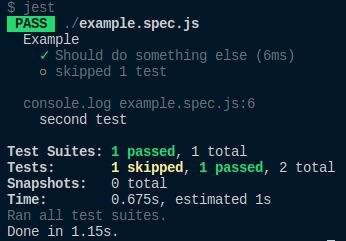
Now remove all hook functions and add .skip to the first test:
describe('Example', () => {
  it.skip('Should do something', () => {
    console.log('first test')
  })
  it('Should do something else', () => {
    console.log('second test')
  })
})
Run the yarn test again:
It's okay if the first test will not work.
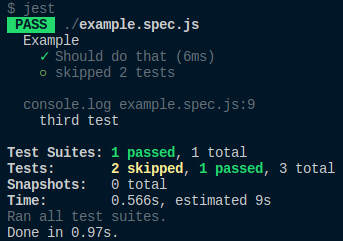
Add a third test and use .only :
describe('Example', () => {
  it('Should do something', () => {
    console.log('first test')
  })
  it('Should do something else', () => {
    console.log('second test')
  })
  it.only('Should do that', () => {
    console.log('third test')
  })
})
Rerun yarn test :
In the second part of this article we will make a simple implementation of a stack in JavaScript using TDD.