We make a wireless network bridge on 2 Mikrotik
- Tutorial
Situation: Mikrotik has its own nets at different ports:
In these networks, Mikrotik (model RB751G-2HnD) distributes settings via DHCP.
Task: using Wi-Fi to connect more equipment so that it appears on the network 192.168.3.0/24.
I had this problem due to the fact that on the balcony, network attached storage (NAS) is wired to the router (the router itself in the hallway). And in the living room - a media player that should show movies from a NAS device. But there is no Ethernet cable in the living room (that is, it was, but I refused it).
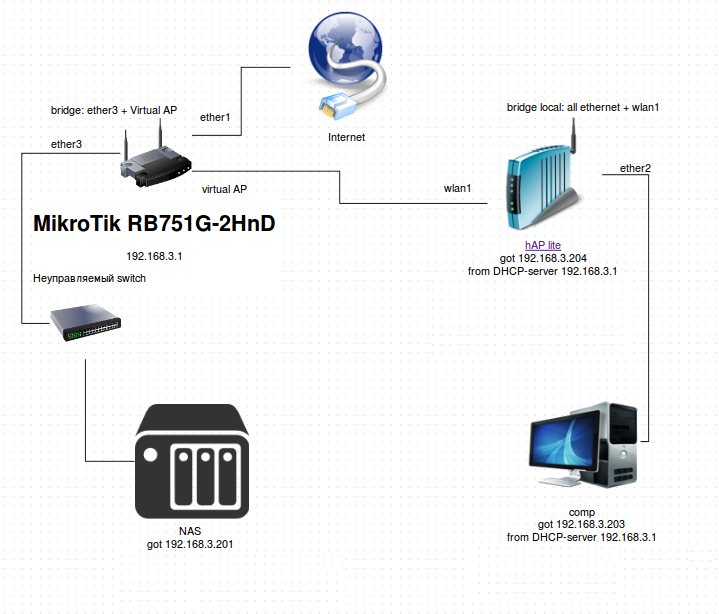
For this we will use the second Mikrotik (hAP lite model). Both Mikrotik will form a wireless network bridge. To do this, on the main Mikrotik we will create another wireless interface - a virtual access point (Virtual AP). As a result, the circuit should look something like this:

Those. In this scheme, the NAS and Comp equipment must be on the 192.168.3.0/24 network. At the same time, NAS and Comp are physically separated and connected to different Mikrotik.
ether1 on the main Mikrotik is the source of the Internet.
At the end of the setup, the average speed between microtics for 5 minutes was 220 Mb / s (according to the ping test utility included in RouterOS):

Hereinafter, Comp and the media player are one and the same.
All settings were made through the web administration interface (webfig).
As mentioned above, RB751G-2HnD is initially configured to distribute different subnets on different physical ports. I will not consider this in detail. It is already described here .
On RB751G-2HnD, create and configure VirtualAP.
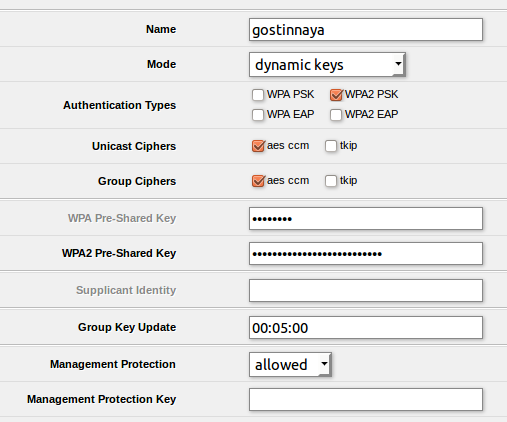
Go to the Wireless-> Security Profiles section and click the Add New button . We set the profile name and password for our future virtual access point.
The second router (hAP Lite) is located in the living room. It is for him that a network is being created. Therefore, I called the profile gostinnaya:
Next, we create the virtual access point itself. To do this, go to Wireless-> Interfaces and select Add New-> VirtualAP. We indicate the previously created profile and set the master interface by the name of the existing wireless adapter (I have wlan1).

After that, in addition to wlan1, the virtual interface gostinnaya appears in the list of wireless interfaces .
You need to make a network bridge, consisting of interfaces:
To do this, in the Bridge section , click Add New and fill in the parameters. The NAS is on the balcony, so I called the network interface bridge_balcon and gostinnaya_wi-fi

After which we will have a new virtual interface (I have it bridge_balcon and gostinnaya_wi-fi ).
Now you need to assign which real interfaces will be associated with the created bridge. Go to Bridge-> Ports , click Add New . Select the desired Ether (I have ether3-slave-local ). Click Add New again and select the previously created VirtualAP interface (I have gostinnaya ). Now both selected interfaces will be displayed in the Ports tab.

Setup on the RB751G-2HnD is complete.
I configured hAP Lite in such a way that any equipment connected to any Ethernet port was on the 192.168.3.0/24 network. Those. I need to create a network bridge consisting of all Ethernet ports + wireless connection (through which hAP Lite will connect to RB751G-2HnD). T.O. hAP Lite turns into a switch. And it will have its address in the grid 192.168.3.0/24.
HAP Lite had factory settings that needed to be changed.
In IP-> Firewall-> NAT, deactivate the network masking rule

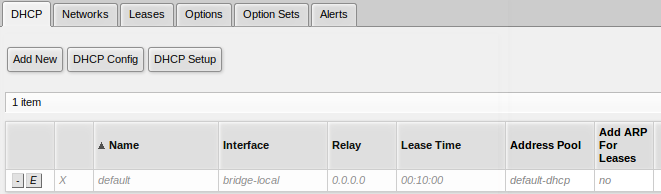
In IP-> DHCP Server-> DHCP we delete (or make inactive) the default DHCP distribution settings:
Now you need to configure the receipt of the address to hAP Lite itself from its relative (RB751G-2HnD) via DHCP. In IP-> DHCP Client-> DHCP Client, click Add New and set the network bridge interface (I have bridge-local).
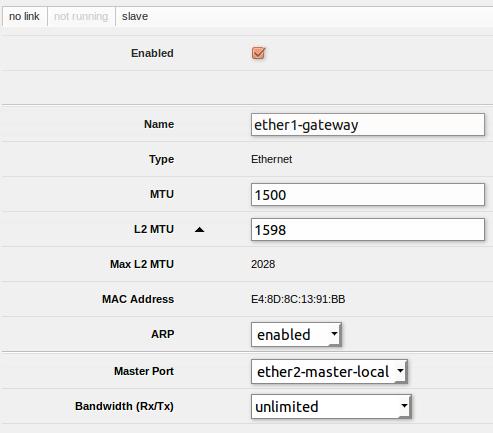
Ether1 is not yet part of the network bridge - this is the factory setting. You can add it like this. Go to Interfaces , click on Ether1 and select ether2-master-local in the Master Port field
Configuration in Wireless-> Security Profiles is performed in the same way as it was on RB751G-2HnD. After that, in the Wireless-> Interfaces tab, configure the existing wireless interface (I have wlan1 ):
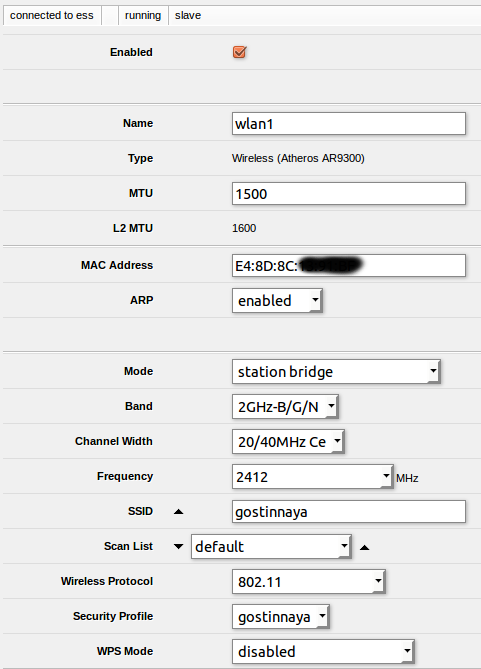
If everything is set correctly, then after setting, here you will see the line “connected to ess”.
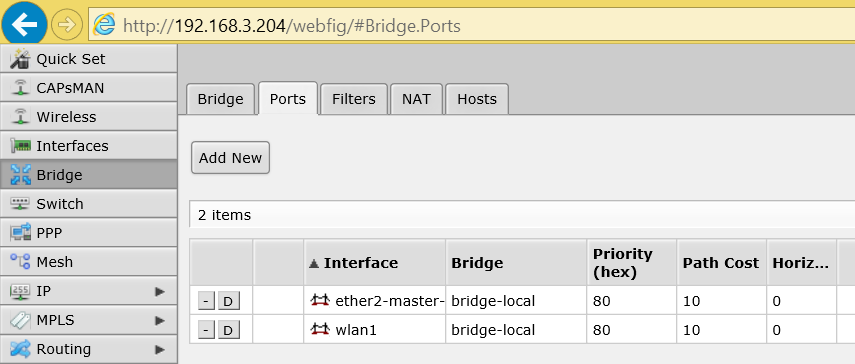
Further in Bridge-> Ports , click Add New and select the just configured wireless interface (I have wlan1 )
At the same time, on MikroTik hap Lite, wlan1 was added to the existing default bridge-local (which was created when you pressed reset on the device to reset it to the default settings) and removed the DHCP server.
On hAP in wlan1 settings, change Mode from “station” to “Station bridge” or “Station pseudobridge”. Both options work.
Network bridge settings on hap Lite:
As a result, the equipment correctly received DHCP settings from the 192.168.3.0/24 network. NAS and Comp see each other perfectly.
At the time of settings, all Mikrotik had firmware RouterOS 6.29.1. The configuration feels great on RouterOS 6.33.5 (the latest available at the moment).
As I indicated at the very beginning, the average speed between Mikrotiks for 5 minutes was 220 Mbps (according to the ping test utility. I’ll give you a few more numbers. All tests passed without an uncontrolled switch, which is shown in the very first figure.
Average speed between RB751G- 2HnD and equipment for hAP lite (media player): 54 Mbit / s. It would seem that there is a serious drop in speed during transit through hAP lite. Actually, it’s not so bad: in hAP lite, the Ethernet port in the settings shows a speed of 100 Mbit / s. Speed between hAP lite and the equipment behind it ((media player) 85 Mbps / Maybe someone will not be happy with such a drop in speed, but this channel is enough for me to make the media player show films with NAS, the average size of which is 30-45 GB.
UPD
This was my first experience creating a wireless bridge, not only on Mikrotik, but in principle. And the first time I was close to a working solution. An annoying nuance intervened, which took a lot of time and nerves. hAP in wlan1 settings Mode was set to "station". After changing to “Station bridge” or “Station pseudobridge” everything was repaired. Read more about the problem and its manifestation here .
- ether2 - 192.168.2.0/24
- ether3 - 192.168.3.0/24
- ether4 - 192.168.4.0/24
- ether5 - 192.168.5.0/24
- wlan0 - 192.168.10.0/24
In these networks, Mikrotik (model RB751G-2HnD) distributes settings via DHCP.
Task: using Wi-Fi to connect more equipment so that it appears on the network 192.168.3.0/24.
I had this problem due to the fact that on the balcony, network attached storage (NAS) is wired to the router (the router itself in the hallway). And in the living room - a media player that should show movies from a NAS device. But there is no Ethernet cable in the living room (that is, it was, but I refused it).
For this we will use the second Mikrotik (hAP lite model). Both Mikrotik will form a wireless network bridge. To do this, on the main Mikrotik we will create another wireless interface - a virtual access point (Virtual AP). As a result, the circuit should look something like this:
Those. In this scheme, the NAS and Comp equipment must be on the 192.168.3.0/24 network. At the same time, NAS and Comp are physically separated and connected to different Mikrotik.
ether1 on the main Mikrotik is the source of the Internet.
At the end of the setup, the average speed between microtics for 5 minutes was 220 Mb / s (according to the ping test utility included in RouterOS):
Hereinafter, Comp and the media player are one and the same.
All settings were made through the web administration interface (webfig).
Creating VirtualAP on RB751G-2HnD
As mentioned above, RB751G-2HnD is initially configured to distribute different subnets on different physical ports. I will not consider this in detail. It is already described here .
On RB751G-2HnD, create and configure VirtualAP.
Go to the Wireless-> Security Profiles section and click the Add New button . We set the profile name and password for our future virtual access point.
The second router (hAP Lite) is located in the living room. It is for him that a network is being created. Therefore, I called the profile gostinnaya:
Next, we create the virtual access point itself. To do this, go to Wireless-> Interfaces and select Add New-> VirtualAP. We indicate the previously created profile and set the master interface by the name of the existing wireless adapter (I have wlan1).
After that, in addition to wlan1, the virtual interface gostinnaya appears in the list of wireless interfaces .
Bridge Configuration on RB751G-2HnD between VirtualAP and Ethernet
You need to make a network bridge, consisting of interfaces:
- ether3
- gostinnaya
To do this, in the Bridge section , click Add New and fill in the parameters. The NAS is on the balcony, so I called the network interface bridge_balcon and gostinnaya_wi-fi
After which we will have a new virtual interface (I have it bridge_balcon and gostinnaya_wi-fi ).
Now you need to assign which real interfaces will be associated with the created bridge. Go to Bridge-> Ports , click Add New . Select the desired Ether (I have ether3-slave-local ). Click Add New again and select the previously created VirtualAP interface (I have gostinnaya ). Now both selected interfaces will be displayed in the Ports tab.
Setup on the RB751G-2HnD is complete.
HAP Lite setup
I configured hAP Lite in such a way that any equipment connected to any Ethernet port was on the 192.168.3.0/24 network. Those. I need to create a network bridge consisting of all Ethernet ports + wireless connection (through which hAP Lite will connect to RB751G-2HnD). T.O. hAP Lite turns into a switch. And it will have its address in the grid 192.168.3.0/24.
HAP Lite had factory settings that needed to be changed.
In IP-> Firewall-> NAT, deactivate the network masking rule
In IP-> DHCP Server-> DHCP we delete (or make inactive) the default DHCP distribution settings:
Now you need to configure the receipt of the address to hAP Lite itself from its relative (RB751G-2HnD) via DHCP. In IP-> DHCP Client-> DHCP Client, click Add New and set the network bridge interface (I have bridge-local).
Ether1 is not yet part of the network bridge - this is the factory setting. You can add it like this. Go to Interfaces , click on Ether1 and select ether2-master-local in the Master Port field
Connect hAP Lite to RB751G-2HnD via Wi-Fi
Configuration in Wireless-> Security Profiles is performed in the same way as it was on RB751G-2HnD. After that, in the Wireless-> Interfaces tab, configure the existing wireless interface (I have wlan1 ):
If everything is set correctly, then after setting, here you will see the line “connected to ess”.
Further in Bridge-> Ports , click Add New and select the just configured wireless interface (I have wlan1 )
At the same time, on MikroTik hap Lite, wlan1 was added to the existing default bridge-local (which was created when you pressed reset on the device to reset it to the default settings) and removed the DHCP server.
On hAP in wlan1 settings, change Mode from “station” to “Station bridge” or “Station pseudobridge”. Both options work.
Network bridge settings on hap Lite:
As a result, the equipment correctly received DHCP settings from the 192.168.3.0/24 network. NAS and Comp see each other perfectly.
At the time of settings, all Mikrotik had firmware RouterOS 6.29.1. The configuration feels great on RouterOS 6.33.5 (the latest available at the moment).
Performance tests (RouterOS version 6.33.5 on both devices)
As I indicated at the very beginning, the average speed between Mikrotiks for 5 minutes was 220 Mbps (according to the ping test utility. I’ll give you a few more numbers. All tests passed without an uncontrolled switch, which is shown in the very first figure.
Average speed between RB751G- 2HnD and equipment for hAP lite (media player): 54 Mbit / s. It would seem that there is a serious drop in speed during transit through hAP lite. Actually, it’s not so bad: in hAP lite, the Ethernet port in the settings shows a speed of 100 Mbit / s. Speed between hAP lite and the equipment behind it ((media player) 85 Mbps / Maybe someone will not be happy with such a drop in speed, but this channel is enough for me to make the media player show films with NAS, the average size of which is 30-45 GB.
UPD
This was my first experience creating a wireless bridge, not only on Mikrotik, but in principle. And the first time I was close to a working solution. An annoying nuance intervened, which took a lot of time and nerves. hAP in wlan1 settings Mode was set to "station". After changing to “Station bridge” or “Station pseudobridge” everything was repaired. Read more about the problem and its manifestation here .