STM32F4 USB RNDIS driver (device control via Web-interface)
Good time, dear friends!
First of all, I would like to congratulate everyone on the New Year holidays with best wishes.
Earlier in the article , the development of the RNDIS USB driver for the STM32F4 series controllers was announced. Since then, the library has gradually evolved and now has grown to the first release version. A library called LRNDIS (LWIP + RNDIS) allows us to create, on the basis of the STM32F4 controller, both USB modem devices and any other devices with web-based control. An example of controlling the stm32f4-discovery board from a web browser on an Android tablet is shown in the video:
The video page provides a link to the source codes and the HEX firmware file for the discovery board, with which you can repeat this experiment. The article describes how and when access technology via the WEB-interface is useful, as well as how the LRNDIS library works for STM32F4 controllers. There is also training material on the operation of USB and the device Ethernet-networks.
Background to the creation of the library

Background to the project is very typical.It was a warm summer day. Ghm ... For the customer, the task was to develop a device with a service management interface.
It was decided to use standards with guaranteed long-term support. Those standards that will allow us to create a client device management program that will be supported by the most complete set of operating systems in the present and future tense. On the first couple, the disadvantages of popular cross-platform frameworks were found:
- java: the need for a JVM in the OS , and the necessity of distributing a virtual machine arising from a nasty assumption
- qt: the periodic need for versioned porting and the nuances of running under Android.
No, these difficulties should not be scary. The question is, perhaps, only in the hours that we sometimes underestimate taking into account the factor of long-term support.
So the idea was born to create a WEB-interface for controlling the device. It does not require the development of third-party software, browsers for displaying the control page are in all required OS. The potential for interface design is huge. The duration of support in terms of http / html / js standards is also not in doubt.
By design, management was supposed to work as follows.
1. The USB device connected is represented by a network card
2. The client computer (PC or gadget) receives an IP address for working on the network of our device
3. Upon the request of a web browser on the client computer, our device returns page
4. The page contains information about the current state and available controls
5. When the client activates the controls, the corresponding HTTP requests are sent from the browser.
In fact, between the browser and the device, the same text commands go, but only in the format of the HTTP protocol.
You need to understand that this is just one of the options from a large set of possible solutions. It has its pros and cons. It so happened that now manufacturers of mainly purely network devices resort to the use of web interfaces: setting up modems and routers. The message of this article - let's apply what is really convenient. And let's not be afraid of the difficulties on the way: overcoming them now will save us much more time in the future!
Scope of the library

Unfortunately, the first announcement was not fully successful, because a story about the scope was missed.
Let's try to catch up a little and reveal this topic.
If we are at the stage of system design of the device, the following considerations may lead us to use web-based interfaces (regardless of the physical channel, Ethernet or USB):
1. The device must have a control and / or diagnostic interface
2. Control tools can be used not only in the development phase, but also during operation (user)
3. Users' qualifications may not be high enough, which requires user-friendly management interface
4. The method of "friendly" management should be s is available from a different operating system platforms and
5. Suitable means must be maintained in working condition for a long time
An additional criterion may be whether we are initially developing a network device. And also: whether (otherwise) adding the network stack and web server to the firmware would be redundant against the background of much less rich device functionality. In other words, adding a web interface to a light bulb controller is obviously a redundant solution.
If we believe in a web-based interface, then the following considerations may help us in choosing a physical communication channel (from Ethernet and USB perspectives).
I’ll add from myself - in spite of all the charms, I would not recommend using USB in industrial nodes with the requirement of increased reliability: often there is a negative experience. If there is no alternative, then the issue of sustainability needs to be studied thoroughly.
Based on the above points, the scope of the library becomes clear: household and part of industrial devices that:
- work on the basis of MK STM32F4
- must have a friendly control interface
- must be controlled from a different hardware and software set
- may not have a guaranteed power source
- should have a long period of support for management software
There are many possible examples of using the technology even outside the field of purely network devices.
For example, at the moment there are plans to turn stm32f4-discovery into an amateur development tool with the functions of a portable signal generator / analyzer and oscilloscope. Connect such an assistant to the phone and look in dynamics what is happening in the circuit you are interested in. From free pluses - it is not required to collect or install software; it is enough to flash the HEX file and open the browser - all the charms of the GUI interface will be present in it. For my fastidious taste - what you need. Of course, the tool is not for professional development, but there is a certain interest in it.
So, I hope, sorted it out. And now about how the library works.
How does it work

We will not rush to answer this question. A person with little experience interacting with networks may quite rightly be embarrassed. Therefore, referring to a particular interaction protocol, I will also give a brief technical description at that level ... which I myself once lacked.
Step 1. Connect the USB device.
As mentioned earlier, at this stage, our device tells the host, "I am the network card!"
A host (i.e., a client computer), after connecting our crafts to it, starts sending requests.
After receiving information about the device, the host OS searches for a suitable driver for interaction. In a typical case, like flash-drives (USB class MSC) or keyboard with mouse (HID class), the standard driver for the class is loaded. In a more “difficult” case, like our USB network card (CDC class with RNDIS subclass), the operating system does so at its discretion:
- OS linux / android / mac, as a rule, successfully tries to establish a typical exchange
- OS windows asks to install an external driver
Our the device in the first case works immediately.
In the case of windows (later XP), you can install the standard Microsoft driver . For Windows XP, you must install the inf-file available in the repository of the LRNDIS library .
Step 2. The driver initializes the RNDIS device
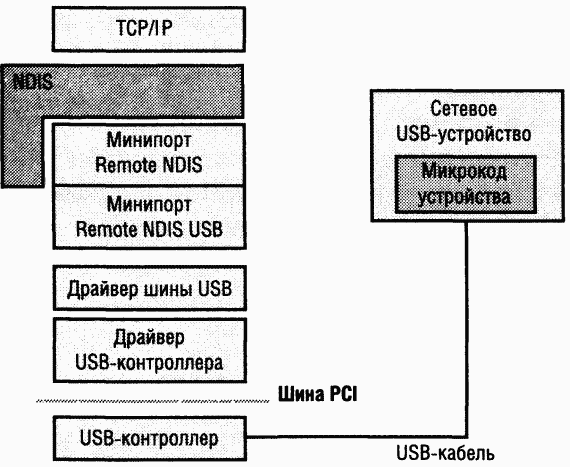
. This picture shows the principle of communication with the RNDIS device (Windows OS).
You can read more about it here and there .
In short, the RNDIS protocol is an extension of NDIS for external devices. The role of the protocol is to provide PnP support and network packet exchange. In essence, RNDIS is an independent network interface, the information load of which is the frames of the channel / network layers (Ethernet or IP frames, optional).
In the above diagram, this implements the “Miniport Remote NDIS” cube, which is responsible for:
- communication service (ask the network device for its MAC address, packet size, speed, etc.)
- wraps the network packets sent by the host to the RNDIS header
- translates the packets received from the device, throwing out the RNDIS header The
“Mini NDIS USB Miniport ” cube is responsible for the transit of RNDIS packets while working with the USB bus driver.
STM32 on the controller side for support RNDIS protocol and work with USB responds file usbd_rndis_core.c . It does the same thing as the “cube” of the Miniport Remote NDIS host — it glues / unsticks the headers, and also answers driver questions. He takes answers, such as the MAC address and speed, from the usbd_rndis_core.h file .
After successfully initializing RNDIS, the Windows driver creates a network interface, which is subsequently displayed in the "Network Control Center" and in the tray indicator area.
Step 3. Obtaining an IP address
So, why do we need a service for obtaining a dynamic address. This service is called DHCP (Dynamic Host Configuration Protocol).
After the host initializes our device, it creates a network interface.
There are two main strategies for assigning an IP address to an interface: the static method (when the user himself writes the address to the interface) and the dynamic one (using the DHCP service).
The latter is that when creating the interface on the host, the DHCP client service is activated. She begins to send broadcast packets over the UDP protocol to the network (the configuration of which is not yet known) , in the hope that a DHCP server is present in the network.
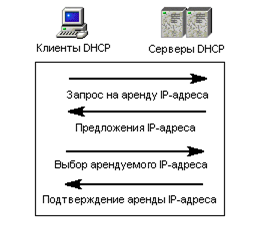
The function of the DHCP server in general, and in particular on our controller, is to respond to the client. In response, the controller “says”: the client, you are on such and such a network, keep such and such an IP address, and we also have a DNS server with such and such address.
After that, the host “feels” much better: it assigns the given IP address to the interface and remembers the IP address of the DNS server.
Initialization is over, now you can enter the page name (run.stm) in the host browser.
I must say that the behavior of the LRNDIS library is customizable. The DHCP server service can be excluded from the assembly. Then the host will have to register any address that belongs to the range 192.168.7. (2-254). Such a network is created by default. Its parameters (192.168.7.0/24) are also configurable. In the example, the client receives addresses in the range 192.168.7.2 ... 192.168.7.4 with a leasing time of 24 hours.
For more information on setting up the library, see the previous article .
Step 4. Loading the page
To download the page, the user can enter the address of our device 192.168.7.1 directly.
However, remembering the numbers is not required, because In addition to the DHCP server, it is possible to build a library with support for the DNS server, the function of which is to resolve network names. In the published example, the DNS server is trained to resolve the resource name “run.stm”.
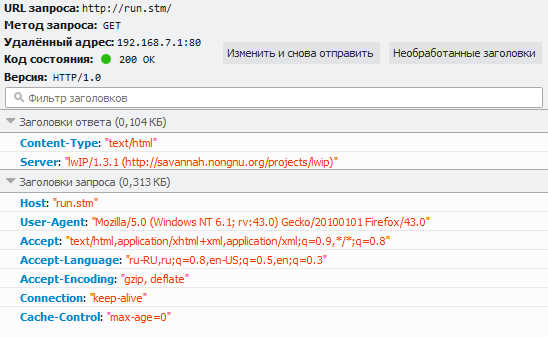
Therefore, if we write run.stm in the browser , the host network service will send a request to our (and not only) DNS server, in response to which the server will helpfully inform: the “run.stm” domain name corresponds to the IP address 192.168.7.1 . Next, the host browser at a known address will make a TCP connection in order to send an HTTP request to get the root page.
Request and response between the Firefox browser and the controller:
History of requests when loading the page:
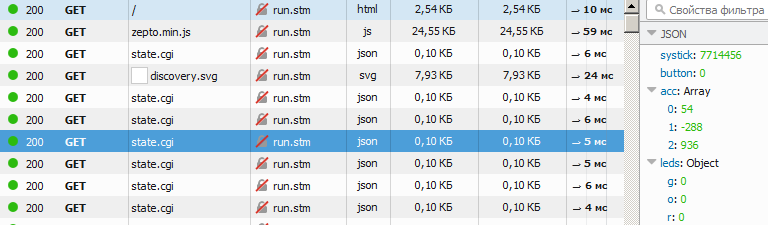
From the history we see that, after loading the root HTML document, the browser also loads the other two files from the controller: discovery.svg and zepto.min.js. The first is an image of the discovery board. SVG format is selected, because, being an image of vector graphics, it takes up little space in the ROM of the microcontroller. The script file zepto.min.js is included, as is a stripped down analogue of the famous JQUERY. It should be noted that there was no meticulous saving of space in the ROM; Despite the sacrifice of 35 KB for all static resources, the controller memory is still quite enough. In addition, this size with a further increase in the complexity of the interface promises to grow noticeably slower. If the interface has grown significantly - there is always a way to store and give static resources in a compressed form - all known browsers currently support decompression on the fly.
Another request that the browser sends is the /state.cgi request. It is formed by a script from the root HTML document with a frequency of 5 times per second. Need a request to get the dynamics of the current state of the device.
When receiving this request, the controller generates and responds with the following line in JSON format:
It contains all the data about the current state of the device, which are subsequently displayed on the page using JavaScript code.
Well, and perhaps the last moment in communicating with the browser is the way to manage it.
In the example, three LEDs are controlled. For example, when you click on the red LED flag using JavaScript, an HTTP GET request is sent with the “r” parameter passed and the value 0 or 1. The full request looks like this /ctl.cgi?r=1
In one way or another, you can transfer any data set, whether it is a logical state 0/1, or the value of a text field, or a notification of a button click. The beauty of the approach lies in the fact that program logic may not know about controls at all, because it receives strictly formalized control messages. You can also change and debug the interface part (HTML + JS) locally with all the amenities, and then upload it to the controller once as part of the firmware. Local web development, which is not unimportant, can be handled by an appropriate specialist.
About the LWIP stack
No network exchange would be possible if it weren’t for this network stack, which was built into the library.
Since the library works under bare metal (without an OS and dynamic memory allocation), the socket add-in is not available for use. Writing network applications therefore occurs using the raw API stack. Fortunately, there is a lot of information on this topic on the net .
Also in the package of contributions there are many ready-made solutions. Including from there the HTTP server was used.
In a previous article, I gave a brief description of the stack and its settings. At the moment, the set of definitions important for the stack in the file has been refined:
The problem with mem_malloc was also resolved. Although the current firmware version does not use dynamic allocation, the hardware crash when calling mem_malloc was on guard. Allowed by adding the definition MEM_ALIGNMENT, which was previously ignored.
For the same reason, the HTTP server supported by the community has been working steadily, which prompted to abandon plans to create your own.
Unresolved issues
1. News of the re-licensing of the lwip stack, which may have its own conditions for inclusion in other software;
2. Finalization of the DNS server for processing "multi-query" packets;
Instead of a conclusion, I
thank the reader for his patience and hope that this article will be useful to him. Source Code Library LRNDISavailable for use under the rights of a MIT license. I consider it wonderful if the work, which was given tangible time and a reserve of strength, is useful to someone else. At the worst, without the use of open libraries this would not work.
Support for the library is currently planned, so you can contact us at fsenok@gmail.com for questions.
First of all, I would like to congratulate everyone on the New Year holidays with best wishes.
Earlier in the article , the development of the RNDIS USB driver for the STM32F4 series controllers was announced. Since then, the library has gradually evolved and now has grown to the first release version. A library called LRNDIS (LWIP + RNDIS) allows us to create, on the basis of the STM32F4 controller, both USB modem devices and any other devices with web-based control. An example of controlling the stm32f4-discovery board from a web browser on an Android tablet is shown in the video:
The video page provides a link to the source codes and the HEX firmware file for the discovery board, with which you can repeat this experiment. The article describes how and when access technology via the WEB-interface is useful, as well as how the LRNDIS library works for STM32F4 controllers. There is also training material on the operation of USB and the device Ethernet-networks.
Background to the creation of the library
Background to the project is very typical.
Details
As the firmware developed, several VCP control commands were introduced. This means that after connecting a USB device to the OS, a virtual COM port was created. Using it, control and diagnostic commands were transmitted from the user terminal. In response, the device received the execution status and its current status.
The system is quite typical from a service point of view: there is a serial port and a set of commands for management and diagnostics.
Everything has changed in a short time. For objective reasons, the required set of teams grew. Interaction of output was also required: some parameters became necessary to be displayed in dynamics. As, for example, the readings of a magnetic sensor when a ferromagnet passes by it. For this, additional commands were introduced, which, operatingescape sequencesprinted information in the user terminal with high frequency. This created the necessary sense of realtime observation. Interactive teams were so convenient for engineers that some of the teams were later added in accordance with the concept. And then there was a crack. It was required to support several groups of commands at once: interactive, diagnostic, control commands. At the same time, periodic refactoring of the code was associated with laborious editing in a large number of processed commands. It became clear that there still had to be a user group of teams - for less skilled personnel who would simply follow the operating instructions. For them, the idea came up of writing a client terminal with buttons and flags ... And then doubts arose: it became clear that we were doing the service part, paying less attention to functionality! But a user program running on a client computer must also have its own requirements: cross-platform and LTS (duration of support).
Suppose we finished the device, and we must port and test the user software with each version of the released operating systems! And how long?
So the question was born - how to get rid of additional labor costs?
It was decided to use standards with guaranteed long-term support. Those standards that will allow us to create a client device management program that will be supported by the most complete set of operating systems in the present and future tense. On the first couple, the disadvantages of popular cross-platform frameworks were found:
- java: the need for a JVM in the OS , and the necessity of distributing a virtual machine arising from a nasty assumption
- qt: the periodic need for versioned porting and the nuances of running under Android.
No, these difficulties should not be scary. The question is, perhaps, only in the hours that we sometimes underestimate taking into account the factor of long-term support.
So the idea was born to create a WEB-interface for controlling the device. It does not require the development of third-party software, browsers for displaying the control page are in all required OS. The potential for interface design is huge. The duration of support in terms of http / html / js standards is also not in doubt.
By design, management was supposed to work as follows.
1. The USB device connected is represented by a network card
2. The client computer (PC or gadget) receives an IP address for working on the network of our device
3. Upon the request of a web browser on the client computer, our device returns page
4. The page contains information about the current state and available controls
5. When the client activates the controls, the corresponding HTTP requests are sent from the browser.
In fact, between the browser and the device, the same text commands go, but only in the format of the HTTP protocol.
You need to understand that this is just one of the options from a large set of possible solutions. It has its pros and cons. It so happened that now manufacturers of mainly purely network devices resort to the use of web interfaces: setting up modems and routers. The message of this article - let's apply what is really convenient. And let's not be afraid of the difficulties on the way: overcoming them now will save us much more time in the future!
Scope of the library
Unfortunately, the first announcement was not fully successful, because a story about the scope was missed.
Let's try to catch up a little and reveal this topic.
If we are at the stage of system design of the device, the following considerations may lead us to use web-based interfaces (regardless of the physical channel, Ethernet or USB):
1. The device must have a control and / or diagnostic interface
2. Control tools can be used not only in the development phase, but also during operation (user)
3. Users' qualifications may not be high enough, which requires user-friendly management interface
4. The method of "friendly" management should be s is available from a different operating system platforms and
5. Suitable means must be maintained in working condition for a long time
An additional criterion may be whether we are initially developing a network device. And also: whether (otherwise) adding the network stack and web server to the firmware would be redundant against the background of much less rich device functionality. In other words, adding a web interface to a light bulb controller is obviously a redundant solution.
If we believe in a web-based interface, then the following considerations may help us in choosing a physical communication channel (from Ethernet and USB perspectives).
| A type | In-circuit connection | Typical application |
| Ethernet | Ethernet PHY Controller | - Industrial devices - Domestic devices with network function and add. food |
| USB | ULPI controller or direct connection to MK | Household and part industrial devices. In particular, if: - devices have an unsupported power source (battery powered, for example) - devices potentially connected to the host only with a USB interface (e.g. tablet) - miniature device class |
I’ll add from myself - in spite of all the charms, I would not recommend using USB in industrial nodes with the requirement of increased reliability: often there is a negative experience. If there is no alternative, then the issue of sustainability needs to be studied thoroughly.
Based on the above points, the scope of the library becomes clear: household and part of industrial devices that:
- work on the basis of MK STM32F4
- must have a friendly control interface
- must be controlled from a different hardware and software set
- may not have a guaranteed power source
- should have a long period of support for management software
There are many possible examples of using the technology even outside the field of purely network devices.
For example, at the moment there are plans to turn stm32f4-discovery into an amateur development tool with the functions of a portable signal generator / analyzer and oscilloscope. Connect such an assistant to the phone and look in dynamics what is happening in the circuit you are interested in. From free pluses - it is not required to collect or install software; it is enough to flash the HEX file and open the browser - all the charms of the GUI interface will be present in it. For my fastidious taste - what you need. Of course, the tool is not for professional development, but there is a certain interest in it.
So, I hope, sorted it out. And now about how the library works.
How does it work
We will not rush to answer this question. A person with little experience interacting with networks may quite rightly be embarrassed. Therefore, referring to a particular interaction protocol, I will also give a brief technical description at that level ... which I myself once lacked.
Step 1. Connect the USB device.
As mentioned earlier, at this stage, our device tells the host, "I am the network card!"
A host (i.e., a client computer), after connecting our crafts to it, starts sending requests.
The host needs the following information
- what is the product called
- what is the VID and PID of the product (manufacturer and product identifiers, see the list )
- which class and subclass the device belongs to
- which endpoints and which blocks should be exchanged for data
Well, and some other information. In this case, configuration packets are transmitted at endpoint 0. Response packets from the device with information about itself are usually called "descriptors of the USB device."
You can read more about the process of polling (enumeration) here .
In general, the USB protocol is quite rich ... sometimes it even seems to be redundant. However, this wealth for many years now allows you to connect completely different devices, makes it possible to transfer isochronous streams, data blocks, interrupts. In general, everything you need that may require a wide range of modern devices. The reverse side of the coin is a high threshold for entering the development of USB devices.
After receiving information about the device, the host OS searches for a suitable driver for interaction. In a typical case, like flash-drives (USB class MSC) or keyboard with mouse (HID class), the standard driver for the class is loaded. In a more “difficult” case, like our USB network card (CDC class with RNDIS subclass), the operating system does so at its discretion:
- OS linux / android / mac, as a rule, successfully tries to establish a typical exchange
- OS windows asks to install an external driver
Our the device in the first case works immediately.
In the case of windows (later XP), you can install the standard Microsoft driver . For Windows XP, you must install the inf-file available in the repository of the LRNDIS library .
Step 2. The driver initializes the RNDIS device
. This picture shows the principle of communication with the RNDIS device (Windows OS).
You can read more about it here and there .
In short, the RNDIS protocol is an extension of NDIS for external devices. The role of the protocol is to provide PnP support and network packet exchange. In essence, RNDIS is an independent network interface, the information load of which is the frames of the channel / network layers (Ethernet or IP frames, optional).
In the above diagram, this implements the “Miniport Remote NDIS” cube, which is responsible for:
- communication service (ask the network device for its MAC address, packet size, speed, etc.)
- wraps the network packets sent by the host to the RNDIS header
- translates the packets received from the device, throwing out the RNDIS header The
“Mini NDIS USB Miniport ” cube is responsible for the transit of RNDIS packets while working with the USB bus driver.
STM32 on the controller side for support RNDIS protocol and work with USB responds file usbd_rndis_core.c . It does the same thing as the “cube” of the Miniport Remote NDIS host — it glues / unsticks the headers, and also answers driver questions. He takes answers, such as the MAC address and speed, from the usbd_rndis_core.h file .
After successfully initializing RNDIS, the Windows driver creates a network interface, which is subsequently displayed in the "Network Control Center" and in the tray indicator area.
Step 3. Obtaining an IP address
So, why do we need a service for obtaining a dynamic address. This service is called DHCP (Dynamic Host Configuration Protocol).
After the host initializes our device, it creates a network interface.
Network interface (if anyone does not know)
A network interface is a software entity that provides access to the resources of a physical or virtual network.
Most often, each network interface of a host corresponds to a specific network adapter. But there are many other interfaces, such as a local loop or those that serve to interact with the virtual machine. In their case, in the signal form, nothing comes out of the host - the exchange takes place programmatically.
Each host network interface must have at least one IP address associated with it. According to it, "residents of the network" can contact the host.
If several networks are addressed “on the wire” (for example, devices with IP addresses 10.4.1.xx and 192.168.1.xx), then two “personal” IP addresses can be assigned to the interface. They may look like this: 10.4.1.151 and 192.168.1.200. To find out the set of network interfaces and their associated IP addresses in Windows, use the ipconfig command and ifconfig in Linux.
A mask is used to describe networks / subnets. For example, the correct description of the network 10.4.1.xx is: network 10.4.1.0, mask 255.255.255.0. Or, if you represent the 4-byte number of the mask in binary form and calculate the number of leading units, you get the value 24. Then the network can be described as follows: 10.4.1.0/24.
You can read more about this in the relevant sources .
There are two main strategies for assigning an IP address to an interface: the static method (when the user himself writes the address to the interface) and the dynamic one (using the DHCP service).
The latter is that when creating the interface on the host, the DHCP client service is activated. She begins to send broadcast packets over the UDP protocol to the network (the configuration of which is not yet known) , in the hope that a DHCP server is present in the network.
The function of the DHCP server in general, and in particular on our controller, is to respond to the client. In response, the controller “says”: the client, you are on such and such a network, keep such and such an IP address, and we also have a DNS server with such and such address.
After that, the host “feels” much better: it assigns the given IP address to the interface and remembers the IP address of the DNS server.
Initialization is over, now you can enter the page name (run.stm) in the host browser.
I must say that the behavior of the LRNDIS library is customizable. The DHCP server service can be excluded from the assembly. Then the host will have to register any address that belongs to the range 192.168.7. (2-254). Such a network is created by default. Its parameters (192.168.7.0/24) are also configurable. In the example, the client receives addresses in the range 192.168.7.2 ... 192.168.7.4 with a leasing time of 24 hours.
For more information on setting up the library, see the previous article .
Step 4. Loading the page
To download the page, the user can enter the address of our device 192.168.7.1 directly.
However, remembering the numbers is not required, because In addition to the DHCP server, it is possible to build a library with support for the DNS server, the function of which is to resolve network names. In the published example, the DNS server is trained to resolve the resource name “run.stm”.
Therefore, if we write run.stm in the browser , the host network service will send a request to our (and not only) DNS server, in response to which the server will helpfully inform: the “run.stm” domain name corresponds to the IP address 192.168.7.1 . Next, the host browser at a known address will make a TCP connection in order to send an HTTP request to get the root page.
Request and response between the Firefox browser and the controller:
History of requests when loading the page:
From the history we see that, after loading the root HTML document, the browser also loads the other two files from the controller: discovery.svg and zepto.min.js. The first is an image of the discovery board. SVG format is selected, because, being an image of vector graphics, it takes up little space in the ROM of the microcontroller. The script file zepto.min.js is included, as is a stripped down analogue of the famous JQUERY. It should be noted that there was no meticulous saving of space in the ROM; Despite the sacrifice of 35 KB for all static resources, the controller memory is still quite enough. In addition, this size with a further increase in the complexity of the interface promises to grow noticeably slower. If the interface has grown significantly - there is always a way to store and give static resources in a compressed form - all known browsers currently support decompression on the fly.
Another request that the browser sends is the /state.cgi request. It is formed by a script from the root HTML document with a frequency of 5 times per second. Need a request to get the dynamics of the current state of the device.
When receiving this request, the controller generates and responds with the following line in JSON format:
{ "systick": 9528746, "button": 0, "acc": [54, -288, 936], "leds": { "g": 0, "o": 0, "r": 0 } }
It contains all the data about the current state of the device, which are subsequently displayed on the page using JavaScript code.
Well, and perhaps the last moment in communicating with the browser is the way to manage it.
In the example, three LEDs are controlled. For example, when you click on the red LED flag using JavaScript, an HTTP GET request is sent with the “r” parameter passed and the value 0 or 1. The full request looks like this /ctl.cgi?r=1
In one way or another, you can transfer any data set, whether it is a logical state 0/1, or the value of a text field, or a notification of a button click. The beauty of the approach lies in the fact that program logic may not know about controls at all, because it receives strictly formalized control messages. You can also change and debug the interface part (HTML + JS) locally with all the amenities, and then upload it to the controller once as part of the firmware. Local web development, which is not unimportant, can be handled by an appropriate specialist.
About the LWIP stack
No network exchange would be possible if it weren’t for this network stack, which was built into the library.
Since the library works under bare metal (without an OS and dynamic memory allocation), the socket add-in is not available for use. Writing network applications therefore occurs using the raw API stack. Fortunately, there is a lot of information on this topic on the net .
Also in the package of contributions there are many ready-made solutions. Including from there the HTTP server was used.
In a previous article, I gave a brief description of the stack and its settings. At the moment, the set of definitions important for the stack in the file has been refined:
lwipopts.h
#define NO_SYS                          1
#define MEM_ALIGNMENT                   4
#define LWIP_RAW                        1
#define LWIP_NETCONN                    0
#define LWIP_SOCKET                     0
#define LWIP_DHCP                       0
#define LWIP_ICMP                       1
#define LWIP_UDP                        1
#define LWIP_TCP                        1
#define ETH_PAD_SIZE                    0
#define LWIP_IP_ACCEPT_UDP_PORT(p)      ((p) == PP_NTOHS(67))
#define MEM_SIZE                        10000
#define TCP_MSS                         (1500 /*mtu*/ - 20 /*iphdr*/ - 20 /*tcphhr*/)
#define TCP_SND_BUF                     (2 * TCP_MSS)
#define ETHARP_SUPPORT_STATIC_ENTRIES   1
#define LWIP_HTTPD_CGI                  1
#define LWIP_HTTPD_SSI                  1
#define LWIP_HTTPD_SSI_INCLUDE_TAG      0
The problem with mem_malloc was also resolved. Although the current firmware version does not use dynamic allocation, the hardware crash when calling mem_malloc was on guard. Allowed by adding the definition MEM_ALIGNMENT, which was previously ignored.
For the same reason, the HTTP server supported by the community has been working steadily, which prompted to abandon plans to create your own.
Unresolved issues
1. News of the re-licensing of the lwip stack, which may have its own conditions for inclusion in other software;
2. Finalization of the DNS server for processing "multi-query" packets;
Instead of a conclusion, I
thank the reader for his patience and hope that this article will be useful to him. Source Code Library LRNDISavailable for use under the rights of a MIT license. I consider it wonderful if the work, which was given tangible time and a reserve of strength, is useful to someone else. At the worst, without the use of open libraries this would not work.
Support for the library is currently planned, so you can contact us at fsenok@gmail.com for questions.
Only registered users can participate in the survey. Please come in.
Would you use a web-interface in your development
- 58.9% Definitely 86
- 32.8% Maybe 48
- 2% No need or opportunity 3
- 5.4% Would prefer a different alternative 8
- 0.6% What is this? 1