How does the frame render in GTA V
- Transfer
The Grand Theft Auto game series has come a long way since its first release in 1997. About 2 years ago, Rockstar released GTA V. Just an incredible success: in 24 hours the game was bought by 11 million users, 7 world records were broken in a row. Having tested the new product on the PS3, I was very impressed with both the overall picture and, in fact, the technical characteristics of the game.
Nothing spoils the impression of the process like a loading screen, but in GTA V you can play for hours, overcoming endless hundreds of kilometers without interruptions. Considering the transfer of a solid stream of information and the properties of PS3 (256 Mb of RAM and a video card for 256 Mb), I was completely surprised how I was not thrown out of the game in the 20th minute. This is where the wonders of technology.
In this article I will talk about the analysis of the frame.in the PC version in DirectX 11, which eats a couple of gigs of both RAM and the GPU. Despite the fact that my review is with reference to the PC, I am sure that most of the points apply to the PS4 and to a certain extent to the PS3.
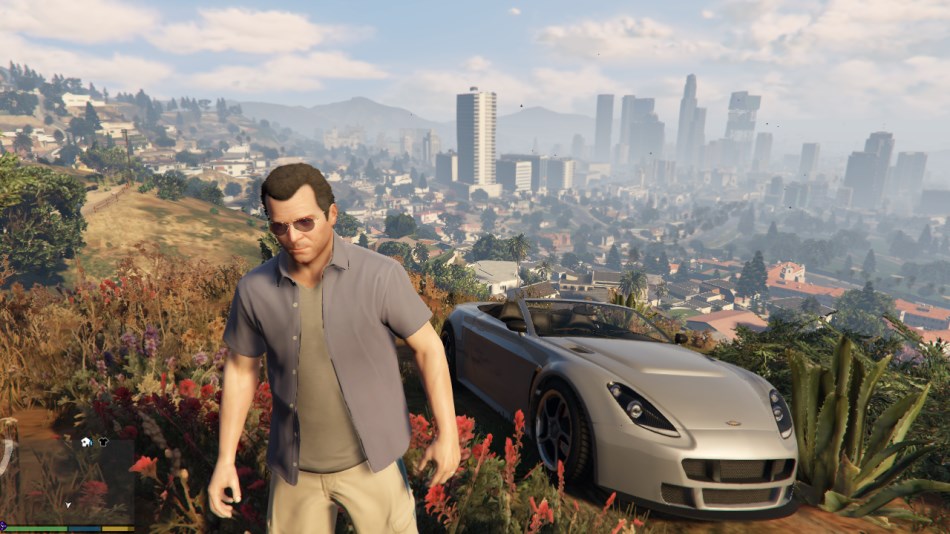
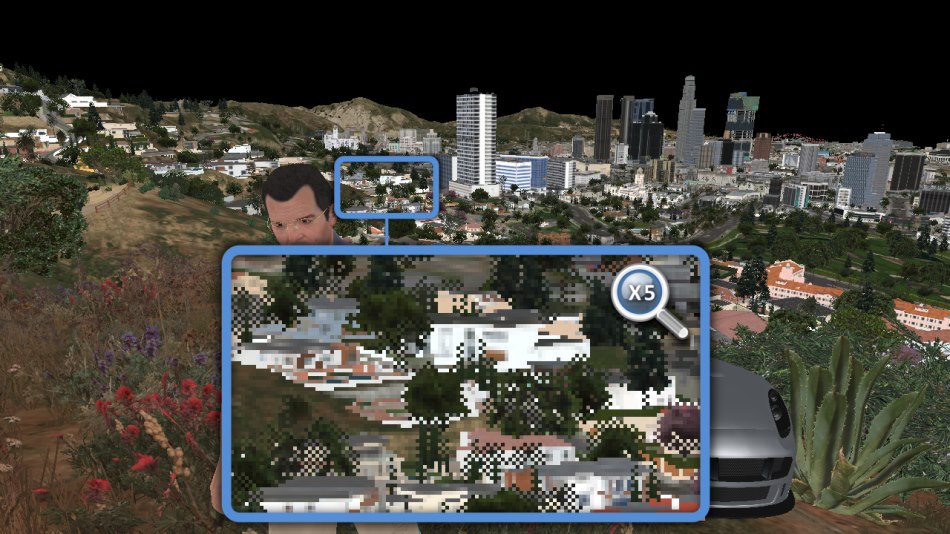
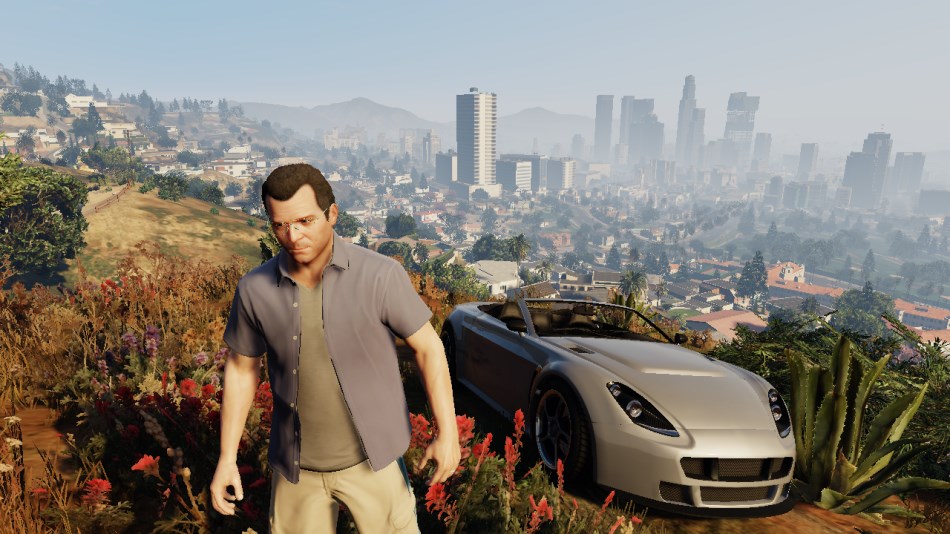
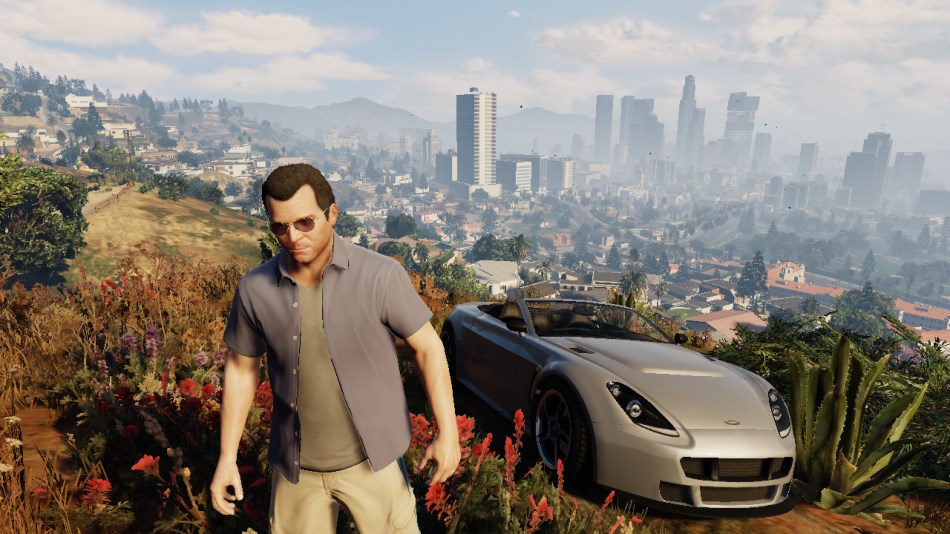
So, let's take a look at the following shot: Michael in the background of his beloved Rapid GT, beautiful Los Santos in the background.
Caution! Traffic!
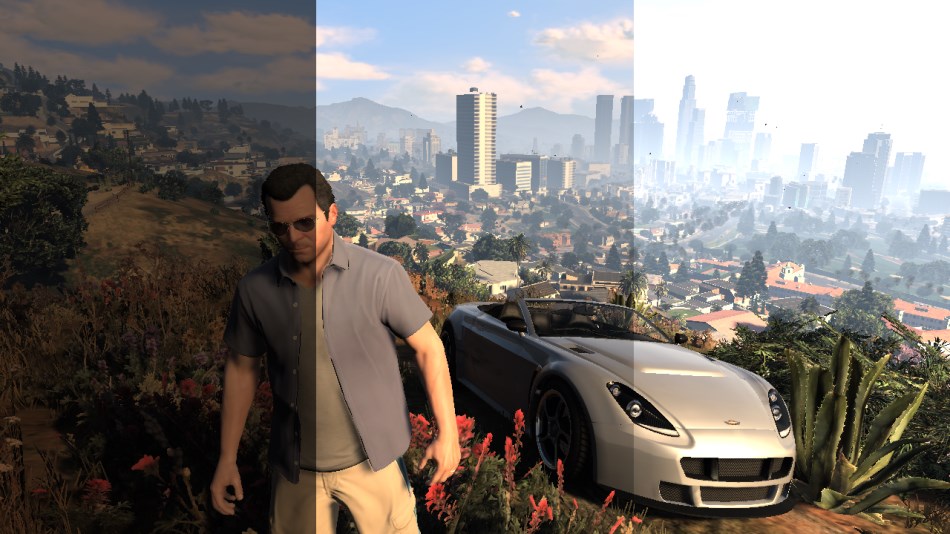
GTA V uses a deferred rendering system that works with many HDR buffers. On the monitor, such buffers do not display correctly, and therefore I used the Reinhardt method to bring everything back to the 8-bit format per channel.
First of all, we visualize the cubic texture of the environment. This texture is generated in real time for each individual frame, which subsequently allows you to create realistic reflections. She is brought to the fore.
How is a cubic texture created? For those who are not familiar with the technique, I will explain. This is how to take panoramic shots: putting the camera on a tripod, imagine that you are standing right in the center of a large cube and taking pictures of all 6 of its faces one at a time, rotating 90 ° each time.
The game uses the same principle: each face turns into a 128x128 HDR texture. The first face is as follows:

The same pattern is repeated for the 5 remaining faces, and in the end we get a cubic texture (cubemap):
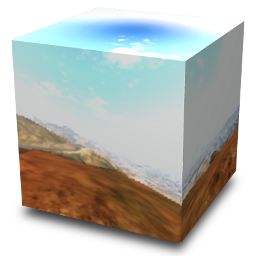
So the cube looks outside

This is how it looks from the inside (unfortunately, it was not possible to insert a panoramic image presented in the source as a js-script on the Habr)
More than 30 calls of the rendering procedure are provided for each face, the cells of the graphic grid are very low-poly, and therefore only the "landscape" is drawn ( terrain, sky, some buildings), characters and cars remain untouched.
That's why in the game, when viewed from a car, the panorama looks great, but other cars and characters do not.
The resulting cubic texture of the environment is subsequently converted into a double paraboloid.
Simply put, a cube is simply projected in another space. The projection is similar to spherical modeling, however, here we have 2 “hemispheres”.
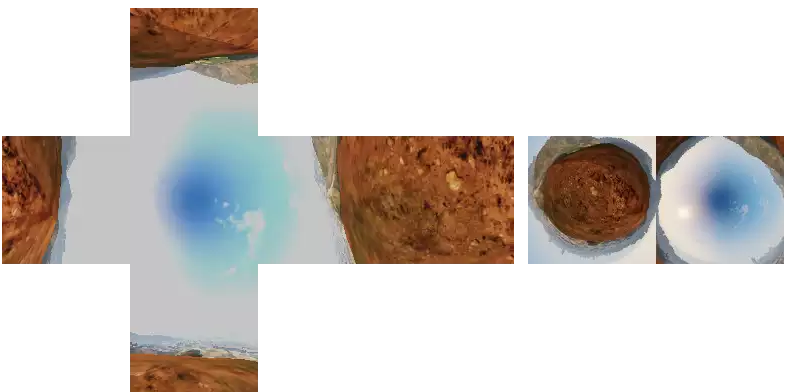
A cube in a “U-turn” and the resulting “hemispheres”
Why do we need such transformations? I think the whole thing (as always) is optimization: in a cubic texture, fragment shaders, in theory, have access to 6 faces 128x128 in size, while in the case of a double paraboloid texture everything comes down to 2 128x128 hemispheres. In addition, since most of the time the camera is on the roof of the car, most requests come to the upper hemisphere.
The projection of the double paraboloid preserves the reflection details of the upper and lower parts of the object due to some side errors. For GTA, this is fine: the roofs and hoods of cars are usually shown from above, and therefore it is important that this reflection be of high quality.
Plus, the edges of cubic maps often leave much to be desired: if the accuracy of displaying textures depends on the distance to the object, then separate seams can be found within the edges, especially along the contours, and edge filters are not provided at all in older GPUs. For double paraboloids, this problem is irrelevant, because textures remain clear, regardless of distance, and no seams interfere with the perception of the picture as a whole.
Addition: in the comments, I noted that, in all likelihood, GTA IV also used a double paraboloid map, although not in the process of post-processing a cubic texture. Graphics grid cells are converted directly using the vertex shader.
Since the shader is responsible for this stage, I will not have an illustration for it.
Depending on the distance to the camera, the subject will be high or low poly or will not be drawn at all. This happens, for example, with grass or flowers in the distance. So, at this stage, the need to draw an object is determined and, if there is one, with what level of detail.
This is where the differences between launching the game on the PS3 (lack of computational support for shaders) and a PC or PS4 are found.
The "main" share of rendering occurs here. All visible cells of the graphic grid are drawn one after another, but instead of immediately calculating the degree of shading, the draw calls only record the necessary information in separate buffers, called G-Buffer. GTA V uses MRT technology, which allows each draw call to capture up to 5 special commands.
In the subsequent compilation of the buffers, it is possible to calculate the total shading values for each pixel. Hence the name “deferred” as opposed to “direct” shading, in which each draw call is responsible for independently calculating the final indicator of shading of pixels.
At this stage, only opaque objects are drawn, since transparent details, such as glass, require additional delayed processing, which is performed later.
Generation of G-buffer

Generation of 15%

Generation of 30%

Generation of 50%
Generation of 75%

Generation of 100%
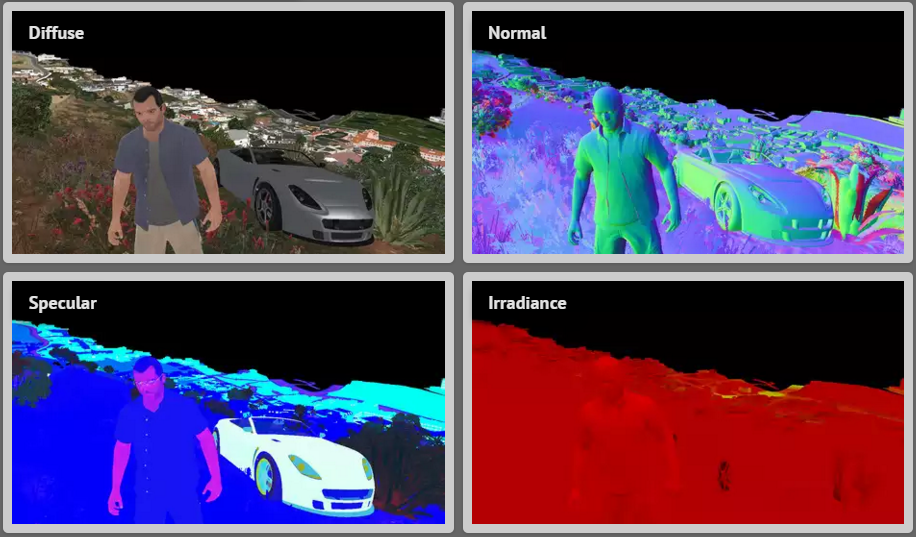
The rendering goals are responsible for rendering all these effects - LDR-buffers (RGBA with 8 bits per channel) that store various information that later it will be needed to calculate the total shading indicators:
• Diffuse map: preserves the "original color" of the cell. In fact, it is a property of the material and, in fact, does not change under different lighting conditions. But see the white highlights on the hood of the car? It is noteworthy that in GTA V, shading is calculated based on the incoming sunlight before the formation of the diffuse map itself. The necessary information about “mixing” is stored in the alpha channel (more on this later).
• Normal map: saves the normal vectors for each pixel (R, G, B). The alpha channel is also used here, although I'm not sure how: it seems to act as a binary mask for individual plants located next to the camera;
• Flare map. Information related to glare / reflections is stored here:
• Illumination map: apparently, the red channel stores data on the illumination of each pixel due to sunlight (based on the data of the normal pixels, their position and direction of incoming sunlight). I'm not quite sure about the green channel, but it seems that it is responsible for lighting due to additional light sources. Blue channel - data on the emission properties of pixels (non-zero value for neon lamps). A significant part of the alpha channel is not involved, except for marking pixels corresponding to the skin of the character or image of vegetation.
So, earlier I mentioned the creation of teams at the same time for 5 rendering purposes, but I spoke only about 4 of them.
The visualization left without attention is a special buffer combining depth and template indicators. Here's what we get as a result:

Depth on the left and the template on the right, respectively
Depth map : it records information about the distance of each pixel to the camera.
Intuitively, one would expect that the distant pixels will be white (depth 1), and those that are closer will be darker. But this is not the case: apparently, GTA V used the logarithmic Z-buffer, changing Z. But why? It seems that the matter is with floating point numbers, which are much more accurate during the encoding process if their value is close to 0. So, changing Z, you can enter much more accurate data on the depth of distant objects, which, in turn, eliminate Z-errors. Given the range of rendering, it was simply impossible not to use this technique. Although, GTA V did not discover America, because a similar technique is found in the same Just Cause 2, for example.
Template: Used to identify the various rendered cells, assigning a common ID to all the pixels of a specific group of cells. For example, here are some values in the template:
All of these buffers were generated thanks to 1900+ draw calls.
Please note that the rendering was performed “back to front”, which allows you to optimize all the necessary operations, taking into account the comparison of the fragment depth with the depth buffer value at the rasterization stage: in the process of rendering the scene, a lot of details fail the depth test, as they overlap with closely spaced pixels, drawn earlier. If it is obvious that the pixel does not pass the depth test, the GPU can automatically skip it without even starting the shader. If we are dealing with heavy pixel shaders, only the standard direct rendering order is appropriate, while the “reverse” ( artist’s algorithm ) will turn out to be the most inefficient in this case.
And now I would like to say a few words about the role of the alpha channel in the diffuse map. Look at the screenshot:
An approximate fragment of the diffuse map.
See that some pixels are missing? This is especially noticeable with trees. It’s as if the sprites lack separate texels .
I already paid attention to this feature before, starting games on the PS3, and then I was very puzzled. Could it be all about over-reducing the texture sprite? But now I know that this is not so, because the elements were compiled correctly.
Such a model, indeed, looks strange, almost like a chessboard. Is it possible that ... does the game render only for 1 out of 2 pixels?
To clarify, I looked into the D3D bytecode. And here you are:
In fact, we see the condition (X + Y)% 2 == 0, which is observed only for one pixel out of 2 (where x and y are the coordinates of the pixel).
This is only one of the reasons for rejecting the piscels (the second is the alpha value <0.75), although it was quite enough to explain the specifics of the detected phenomenon.
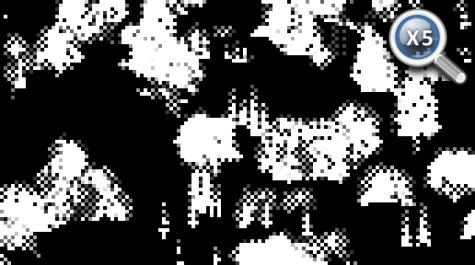
Information about which cells were drawn in the considered "selective" mode is stored on the alpha channel of the diffuse map, as can be seen in the picture
 So why are some models rendered that way? Maybe this helped save the fill or the shading options? I didn’t mean at all to say that GPUs do not provide for such detailing: pixels are not painted over individually, but in 2x2 groups. And it's not about performance, it's about the level of detail: this model makes filled cells more transparent due to different levels of detail.
This method is called alpha stippling .
The game uses CSM (cascading shadow maps): 4 shadow maps form textures of 1024x4096. Each shadow map is designed for different visibility. The more often the actions are repeated, the wider the camera’s pyramid of visibility, the larger the panorama of the frame. Thanks to this approach, the shadows of objects near the game character have a higher resolution than the shadows of distant objects. Here is a brief overview of the information about the depth of 4 maps:

This process may require a lot of energy, since you have to do a scene re-rendering as much as 4 times, but clipping it along the visibility pyramid allows you to omit processing of unnecessary polygons. In this case, CSMs were created as a result of 1000 draw calls.
With this depth data, you can calculate the shadow for each pixel. Information about the shadows is stored for the purpose of rendering: shadows cast as a result of direct sunlight are fixed in the red channel, shadows from clouds in - in red and green.
Shadow maps provide a smoothing pattern (if you look closely at the texture below, you will see the checkerboard effect mentioned earlier in the red channel). This allows you to smooth the borders of the shadows.
Later, these gaps are filled: shadows from the sun and clouds are combined into one buffer, a certain blurring is performed in depth, and the result is stored in the alpha channel of the glare map.

Shadows from the sun and clouds (green)

Blurred shadows
A few words about the blur: the technique is not cheap, because You have to deal with different textures separately. Thus, in order to facilitate the task, just before the blurring is performed, a “lightweight” texture is created: the shadow buffer scale is reduced to 1: 8 and the pixel shader easily blurs it by repeating the Grab () command four times. This allows you to roughly estimate the total number of fully lit pixels. Subsequently, when full blur is needed, first of all, information about the “lightened” version of the procedure is read: as soon as the shader comes across a fully lit pixel, it automatically issues units and it does not have to start the laborious process of full-scale blur.
 I will not go into details, since I covered the topic of reflection (image of the reflection map of the plane on the right ) in the second part and in this scene, the effect is barely noticeable. I can only say that this step generates a reflection map for the surface of the ocean. The essence of the principle is to re-render the scene (650 draw calls) within the tiny 240x120 texture, but in the “upside down” mode to create the feeling of reflection in the water.
Here we are dealing with the creation of a linear version of the depth buffer, on the basis of which the SSAO map is formed (blocking ambient light in the screen space).
Clear image

Blurred image
First, the first version appears with all the noise, after which the depth is blurred sequentially in both horizontal and vertical directions, which noticeably smoothes the image.
All work is done with a resolution of only half of the original, which guarantees higher performance.
So, it is time to combine all the generated buffers!
The pixel shader reads data from various buffers and determines the final pixel shading value in HDR.
In case we work with night scenes, lights and other lighting elements will gradually, one after another, overlap on top of the stage.

And we get the final image: The
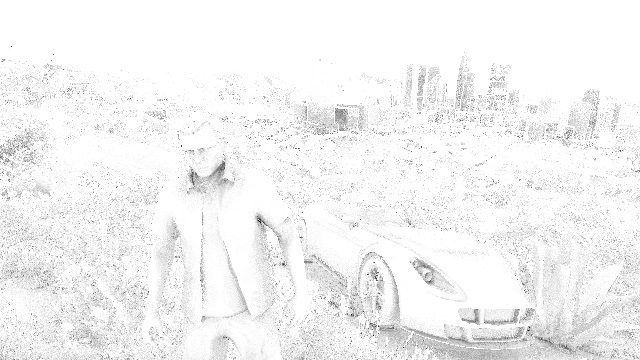
picture is becoming more pleasant, although there is still not enough ocean, sky, transparent objects ... But first, the main thing: you need to refine the image of Michael.
There are questions with the shading of Michael's skin: very dark patches are found on the face and it seems as if it is a dense plastic, not a human body.
That's what we need SSS for. Scattering imitates natural skin lighting. Look at the ears or lips: thanks to SSS they look much more real, a healthy pinkish tint appears in them.

But how did you manage to start SSS separately for the image of Michael?
Firstly, only the silhouette is cut out. This is where the previously generated template buffer comes to the rescue: all Michael pixels are assigned the value 0x89. Thus, we can concentrate precisely on them, but you need to apply SSS only to the skin, and not to the clothes.
In fact, when all the G-buffers were combined, in addition to the shading values stored in RGB, individual data were also recorded in the alpha channel. More specifically, the alpha channels of the irradiance map and the glare map were used to create a binary mask: pixels corresponding to Michael's skin and the image of some plants were marked with a unit in the alpha channel. Other pixels, in particular, clothing pixels, were assigned an alpha value of 0.
Thus, you can apply SSS, having as the source data the combined information from the target of the G-buffer and a buffer comparing the depth and pattern.
Yes, it may seem that such insignificant local transformations are not worth such serious calculations. And, perhaps, you would be right if it weren’t for one thing: while playing a game, we instinctively look at the face, and therefore processing relating to this part of the body allows us to bring the game as close as possible to reality. In GTA V, SSS is applied both to the image of the main character, and in the case of non-player characters.
In the scene in question, not so much water fell into the frame, but still: the ocean in the background, a couple of pools here and there.
The visualization of water in GTA V is concentrated in two directions - reflection and refraction.
The previously created logarithmic Z-buffer allows you to generate a second version, this time linear with a resolution half that of the original.
The ocean and pools are drawn in turn in MRT mode. Thus, several goals are simultaneously achieved:
Water diffusion on the left, opacity on the right
Now we can combine the previously created buffers and generate a refraction map: Refraction

map for water
On this refraction map, the pools are filled with water (the deeper the water, the bluer it is), caustics are also added.
It is time to start the final visualization of water: again, one by one, all cells are drawn corresponding to the images of the ocean and basins, but this time reflection and refraction are combined, and relief maps are formed that introduce corrections to the surface normal.

Image before adding water.

Refraction on a plane, reflection and relief maps.

Image after adding water.
We create a map of so-called volumetric shadows: it helps to darken the atmosphere / fog, which is not directly illuminated by the sun.
The map is generated at half the resolution by scanning pixels and comparing the data with a map of shadows from the sun. After receiving the first option with all the noise, the buffer is blurred.
Basic Image
Then a fog effect is added to the scene: this perfectly hides the missing details of the low-poly buildings visible in the distance. Here, data is read from the volumetric shadow map (does not play a significant role at this stage) and the depth buffer, on the basis of which fog indicators are formed.

The basic image with the addition of fog.
After the sky is visualized.
And at the very end, after him, clouds are drawn.

The final image
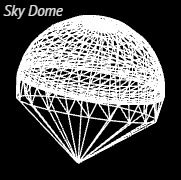 In fact, the rendering of the sky is carried out by a single draw call: the graphic grid of the sky forms a huge dome covering the entire scene (see right).
At this stage, individual textures are involved, reminiscent of the effect of Perlin noise .
Clouds are also visualized: an extensive grid appears on the horizon, this time in the form of a ring. One normal map and one density map allow you to visualize the clouds: these are large 2048x512 seamless textures (connected in an arc from the left and right sides).

Left cloud density, right normal
Now let's deal with all the transparent objects: glasses, windshield, specks of dust in the air ...
In total, 11 draw calls will be required, however, when processing dust, you will have to go to the installer repeatedly.
Final image
Remember the previous brief excursion about the individual trees smoothed on a diffuse map? This is how the image looks without smoothing: It's

time to fix it all: start the pixel shader for post-processing - and it reads the buffer data of the original color and alpha channel of the diffuse map to find out which pixels are smoothed. For each pixel, up to 2 adjacent pixels may be needed to determine the final color of the “smoothed” element.

After smoothing,
this is a great trick, because with its help the whole image is “aligned" in one approach: moreover, the variety of geometric shapes in a particular scene does not play a role.
We note, however, that this filter is not ideal: in some cases, apparently, it could not cope, I still noticed the effect of a chessboard on both PS3 and PC.
Prior to this, the processed image was saved in the HDR format: each RGB channel was stored as a 16-bit floating-point index, which allowed us to significantly expand the range of illumination intensities. But monitors are not able to display so different values and reduce everything to RGB colors with 8 bits per channel.
Tone compression converts these color values from HDR to LDR. There are several functions by which one format is replaced by another. The classic version, which has become widespread, the Reinhardt method (I used it when creating screenshots published earlier), gives results close to the final form of the game.
But did GTA V really use the Reinhardt method? We’ll have to get into the shader bytecode again:
So, so ... what's with us? It was the type equation that
It turns out that GTA V does not even talk about the Reinhardt method, but the principle from Uncharted 2, according to which black areas do not fade, is also not good.
The process of converting to LDR is as follows: The
resolution of the HDR buffer is reduced to исходного from the original value.
The final result is largely dependent on the exposure. Let us give, literally, several examples of the influence of this parameter:
The exposure changes gradually, frame by frame, you will not see sudden changes.
So an attempt was made to imitate the nature of the human eye: did you notice that after a long journey through a dark tunnel and a sudden exit to the sun, the environment is perceived too bright for some time? Then it stops “cutting the eye” and becomes “normal”, and the exposure adapts to the new value. It seems that GTA V went even further, maximizing the adaptation of the exposure along the line “Dark → Bright” to the similar properties of the human eye.
If the FXAA method is used, then now he definitely pays attention to smoothing uneven cell outlines.
Then, using small pixel shaders to simulate a real camera, the lens distortion effect is triggered. This not only distorts the image, it also initiates minor color changes along the frame contour, where the red channel slightly dominates the green and blue.

Before distortion

After distortion
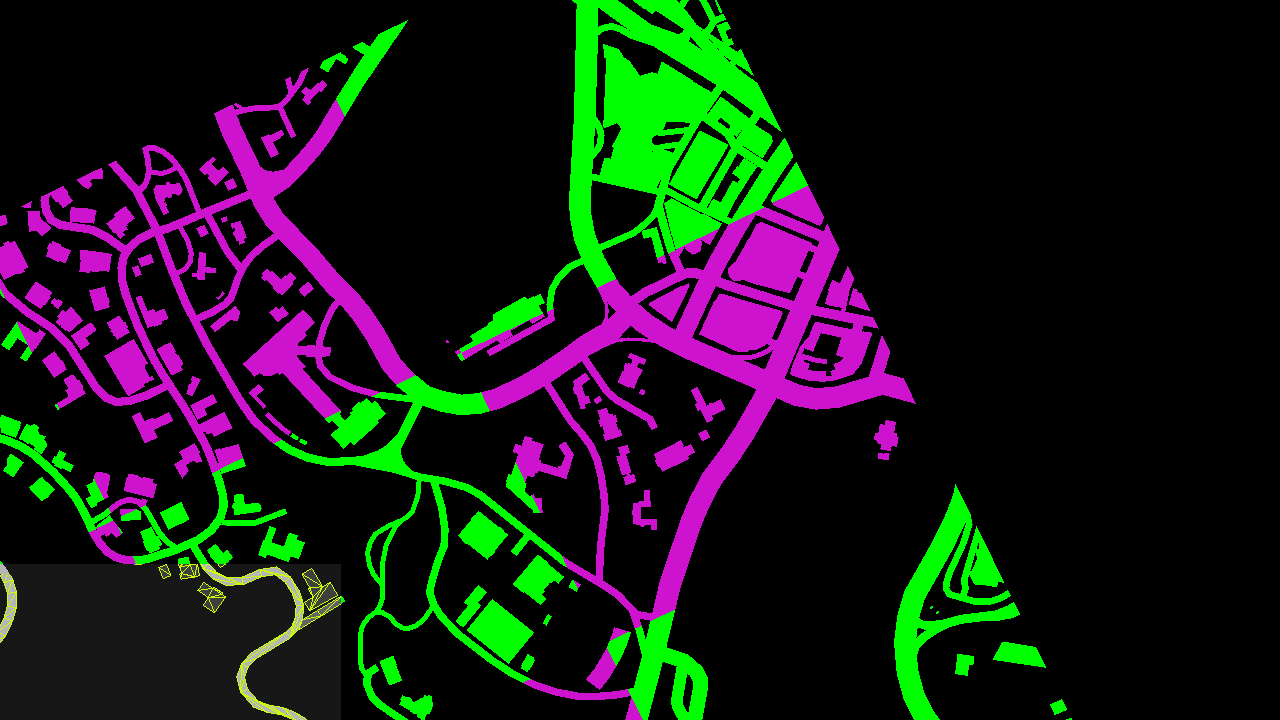
And the final touch: the user interface represented by a minimap in the lower left corner of the screen. The map is actually divided into several square zones, the engine is only responsible for those that are displayed on the screen. Each square is associated with a draw call. I painted the squares to more clearly demonstrate the structure:
Mini-map
Clipping test allows not only to process the area in the lower left corner, but also to delete the contents of the area. Vectors are provided on all roads (see the screenshot above), they are displayed in the form of graphic grids and look great even with a significant increase.
Image before adding the minimap
At this stage, the minimap is sent to the main image buffer, a couple of small icons and widgets are added on top of it.
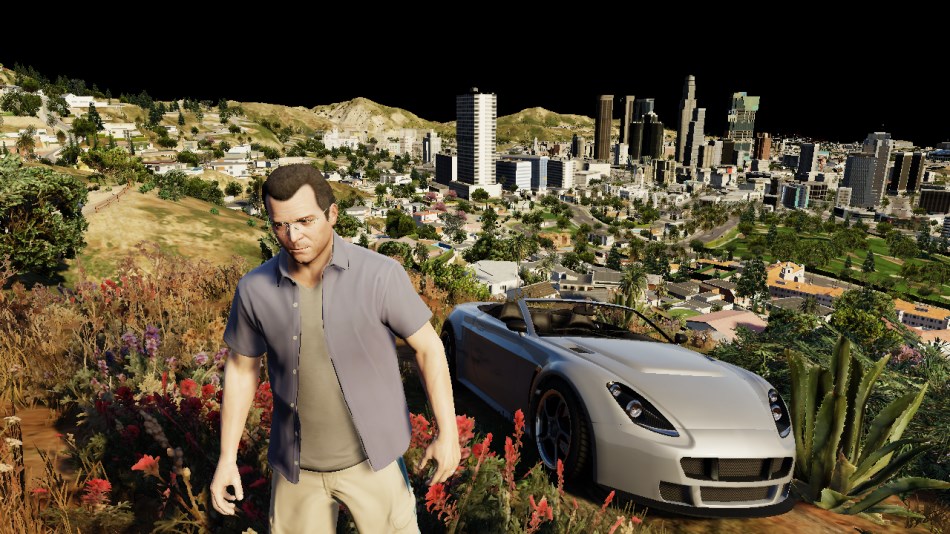
Yes, we spent a lot of time, but it was worth it: here is the final shot in all its glory!
A total of 4,155 draw calls, 1,113 textures, and 88 rendering goals.
Послесловие от переводчика.
Nothing spoils the impression of the process like a loading screen, but in GTA V you can play for hours, overcoming endless hundreds of kilometers without interruptions. Considering the transfer of a solid stream of information and the properties of PS3 (256 Mb of RAM and a video card for 256 Mb), I was completely surprised how I was not thrown out of the game in the 20th minute. This is where the wonders of technology.
In this article I will talk about the analysis of the frame.in the PC version in DirectX 11, which eats a couple of gigs of both RAM and the GPU. Despite the fact that my review is with reference to the PC, I am sure that most of the points apply to the PS4 and to a certain extent to the PS3.
Frame analysis
So, let's take a look at the following shot: Michael in the background of his beloved Rapid GT, beautiful Los Santos in the background.
Caution! Traffic!
GTA V uses a deferred rendering system that works with many HDR buffers. On the monitor, such buffers do not display correctly, and therefore I used the Reinhardt method to bring everything back to the 8-bit format per channel.
Environment Cubemap
First of all, we visualize the cubic texture of the environment. This texture is generated in real time for each individual frame, which subsequently allows you to create realistic reflections. She is brought to the fore.
How is a cubic texture created? For those who are not familiar with the technique, I will explain. This is how to take panoramic shots: putting the camera on a tripod, imagine that you are standing right in the center of a large cube and taking pictures of all 6 of its faces one at a time, rotating 90 ° each time.
The game uses the same principle: each face turns into a 128x128 HDR texture. The first face is as follows:
The same pattern is repeated for the 5 remaining faces, and in the end we get a cubic texture (cubemap):
So the cube looks outside
This is how it looks from the inside (unfortunately, it was not possible to insert a panoramic image presented in the source as a js-script on the Habr)
More than 30 calls of the rendering procedure are provided for each face, the cells of the graphic grid are very low-poly, and therefore only the "landscape" is drawn ( terrain, sky, some buildings), characters and cars remain untouched.
That's why in the game, when viewed from a car, the panorama looks great, but other cars and characters do not.
From cubic texture to double paraboloid texture
The resulting cubic texture of the environment is subsequently converted into a double paraboloid.
Simply put, a cube is simply projected in another space. The projection is similar to spherical modeling, however, here we have 2 “hemispheres”.
A cube in a “U-turn” and the resulting “hemispheres”
Why do we need such transformations? I think the whole thing (as always) is optimization: in a cubic texture, fragment shaders, in theory, have access to 6 faces 128x128 in size, while in the case of a double paraboloid texture everything comes down to 2 128x128 hemispheres. In addition, since most of the time the camera is on the roof of the car, most requests come to the upper hemisphere.
The projection of the double paraboloid preserves the reflection details of the upper and lower parts of the object due to some side errors. For GTA, this is fine: the roofs and hoods of cars are usually shown from above, and therefore it is important that this reflection be of high quality.
Plus, the edges of cubic maps often leave much to be desired: if the accuracy of displaying textures depends on the distance to the object, then separate seams can be found within the edges, especially along the contours, and edge filters are not provided at all in older GPUs. For double paraboloids, this problem is irrelevant, because textures remain clear, regardless of distance, and no seams interfere with the perception of the picture as a whole.
Addition: in the comments, I noted that, in all likelihood, GTA IV also used a double paraboloid map, although not in the process of post-processing a cubic texture. Graphics grid cells are converted directly using the vertex shader.
Culling and level of detail
Since the shader is responsible for this stage, I will not have an illustration for it.
Depending on the distance to the camera, the subject will be high or low poly or will not be drawn at all. This happens, for example, with grass or flowers in the distance. So, at this stage, the need to draw an object is determined and, if there is one, with what level of detail.
This is where the differences between launching the game on the PS3 (lack of computational support for shaders) and a PC or PS4 are found.
G-buffer generation
The "main" share of rendering occurs here. All visible cells of the graphic grid are drawn one after another, but instead of immediately calculating the degree of shading, the draw calls only record the necessary information in separate buffers, called G-Buffer. GTA V uses MRT technology, which allows each draw call to capture up to 5 special commands.
In the subsequent compilation of the buffers, it is possible to calculate the total shading values for each pixel. Hence the name “deferred” as opposed to “direct” shading, in which each draw call is responsible for independently calculating the final indicator of shading of pixels.
At this stage, only opaque objects are drawn, since transparent details, such as glass, require additional delayed processing, which is performed later.
Generation of G-buffer
Generation of 15%
Generation of 30%
Generation of 50%
Generation of 75%
Generation of 100%
The rendering goals are responsible for rendering all these effects - LDR-buffers (RGBA with 8 bits per channel) that store various information that later it will be needed to calculate the total shading indicators:
• Diffuse map: preserves the "original color" of the cell. In fact, it is a property of the material and, in fact, does not change under different lighting conditions. But see the white highlights on the hood of the car? It is noteworthy that in GTA V, shading is calculated based on the incoming sunlight before the formation of the diffuse map itself. The necessary information about “mixing” is stored in the alpha channel (more on this later).
• Normal map: saves the normal vectors for each pixel (R, G, B). The alpha channel is also used here, although I'm not sure how: it seems to act as a binary mask for individual plants located next to the camera;
• Flare map. Information related to glare / reflections is stored here:
- Red: flare saturation;
- Green: gloss (smoothness);
- Blue: Intermediate flare saturation (usually a constant metric for all pixels with the same material).
• Illumination map: apparently, the red channel stores data on the illumination of each pixel due to sunlight (based on the data of the normal pixels, their position and direction of incoming sunlight). I'm not quite sure about the green channel, but it seems that it is responsible for lighting due to additional light sources. Blue channel - data on the emission properties of pixels (non-zero value for neon lamps). A significant part of the alpha channel is not involved, except for marking pixels corresponding to the skin of the character or image of vegetation.
So, earlier I mentioned the creation of teams at the same time for 5 rendering purposes, but I spoke only about 4 of them.
The visualization left without attention is a special buffer combining depth and template indicators. Here's what we get as a result:
Depth on the left and the template on the right, respectively
Depth map : it records information about the distance of each pixel to the camera.
Intuitively, one would expect that the distant pixels will be white (depth 1), and those that are closer will be darker. But this is not the case: apparently, GTA V used the logarithmic Z-buffer, changing Z. But why? It seems that the matter is with floating point numbers, which are much more accurate during the encoding process if their value is close to 0. So, changing Z, you can enter much more accurate data on the depth of distant objects, which, in turn, eliminate Z-errors. Given the range of rendering, it was simply impossible not to use this technique. Although, GTA V did not discover America, because a similar technique is found in the same Just Cause 2, for example.
Template: Used to identify the various rendered cells, assigning a common ID to all the pixels of a specific group of cells. For example, here are some values in the template:
- 0x89: player controlled character
- 0x82: car driven by the player;
- 0x01: non-player characters;
- 0x02: vehicles, including cars, bicycles and so on;
- 0x03: vegetation and foliage;
- 0x07: sky.
All of these buffers were generated thanks to 1900+ draw calls.
Please note that the rendering was performed “back to front”, which allows you to optimize all the necessary operations, taking into account the comparison of the fragment depth with the depth buffer value at the rasterization stage: in the process of rendering the scene, a lot of details fail the depth test, as they overlap with closely spaced pixels, drawn earlier. If it is obvious that the pixel does not pass the depth test, the GPU can automatically skip it without even starting the shader. If we are dealing with heavy pixel shaders, only the standard direct rendering order is appropriate, while the “reverse” ( artist’s algorithm ) will turn out to be the most inefficient in this case.
And now I would like to say a few words about the role of the alpha channel in the diffuse map. Look at the screenshot:
An approximate fragment of the diffuse map.
See that some pixels are missing? This is especially noticeable with trees. It’s as if the sprites lack separate texels .
I already paid attention to this feature before, starting games on the PS3, and then I was very puzzled. Could it be all about over-reducing the texture sprite? But now I know that this is not so, because the elements were compiled correctly.
Such a model, indeed, looks strange, almost like a chessboard. Is it possible that ... does the game render only for 1 out of 2 pixels?
To clarify, I looked into the D3D bytecode. And here you are:
dp2 r1.y, v0.xyxx, l(0.5, 0.5, 0.0, 0.0)  // Dot product of the pixel's (x,y) with (0.5, 0.5)
frc r1.y, r1.y                            // Keeps only the fractional part: always 0.0 or 0.5
lt r1.y, r1.y, l(0.5)                     // Test if the fractional part is smaller than 0.5
In fact, we see the condition (X + Y)% 2 == 0, which is observed only for one pixel out of 2 (where x and y are the coordinates of the pixel).
This is only one of the reasons for rejecting the piscels (the second is the alpha value <0.75), although it was quite enough to explain the specifics of the detected phenomenon.
Information about which cells were drawn in the considered "selective" mode is stored on the alpha channel of the diffuse map, as can be seen in the picture
Diffuse map alpha channel
So why are some models rendered that way? Maybe this helped save the fill or the shading options? I didn’t mean at all to say that GPUs do not provide for such detailing: pixels are not painted over individually, but in 2x2 groups. And it's not about performance, it's about the level of detail: this model makes filled cells more transparent due to different levels of detail. This method is called alpha stippling .
Shadows
The game uses CSM (cascading shadow maps): 4 shadow maps form textures of 1024x4096. Each shadow map is designed for different visibility. The more often the actions are repeated, the wider the camera’s pyramid of visibility, the larger the panorama of the frame. Thanks to this approach, the shadows of objects near the game character have a higher resolution than the shadows of distant objects. Here is a brief overview of the information about the depth of 4 maps:
Shadow cards
This process may require a lot of energy, since you have to do a scene re-rendering as much as 4 times, but clipping it along the visibility pyramid allows you to omit processing of unnecessary polygons. In this case, CSMs were created as a result of 1000 draw calls.
With this depth data, you can calculate the shadow for each pixel. Information about the shadows is stored for the purpose of rendering: shadows cast as a result of direct sunlight are fixed in the red channel, shadows from clouds in - in red and green.
Shadow maps provide a smoothing pattern (if you look closely at the texture below, you will see the checkerboard effect mentioned earlier in the red channel). This allows you to smooth the borders of the shadows.
Later, these gaps are filled: shadows from the sun and clouds are combined into one buffer, a certain blurring is performed in depth, and the result is stored in the alpha channel of the glare map.
Shadows from the sun and clouds (green)
Blurred shadows
A few words about the blur: the technique is not cheap, because You have to deal with different textures separately. Thus, in order to facilitate the task, just before the blurring is performed, a “lightweight” texture is created: the shadow buffer scale is reduced to 1: 8 and the pixel shader easily blurs it by repeating the Grab () command four times. This allows you to roughly estimate the total number of fully lit pixels. Subsequently, when full blur is needed, first of all, information about the “lightened” version of the procedure is read: as soon as the shader comes across a fully lit pixel, it automatically issues units and it does not have to start the laborious process of full-scale blur.
I will not go into details, since I covered the topic of reflection (image of the reflection map of the plane on the right ) in the second part and in this scene, the effect is barely noticeable. I can only say that this step generates a reflection map for the surface of the ocean. The essence of the principle is to re-render the scene (650 draw calls) within the tiny 240x120 texture, but in the “upside down” mode to create the feeling of reflection in the water.Screen space obstruction
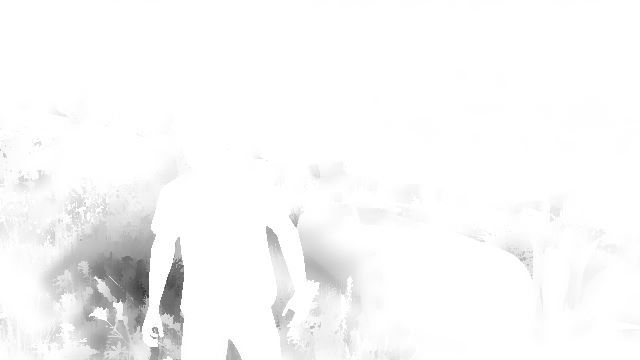
Here we are dealing with the creation of a linear version of the depth buffer, on the basis of which the SSAO map is formed (blocking ambient light in the screen space).
Clear image
Blurred image
First, the first version appears with all the noise, after which the depth is blurred sequentially in both horizontal and vertical directions, which noticeably smoothes the image.
All work is done with a resolution of only half of the original, which guarantees higher performance.
G-buffer combination
So, it is time to combine all the generated buffers!
The pixel shader reads data from various buffers and determines the final pixel shading value in HDR.
In case we work with night scenes, lights and other lighting elements will gradually, one after another, overlap on top of the stage.
And we get the final image: The
picture is becoming more pleasant, although there is still not enough ocean, sky, transparent objects ... But first, the main thing: you need to refine the image of Michael.
Subsurface Scattering
There are questions with the shading of Michael's skin: very dark patches are found on the face and it seems as if it is a dense plastic, not a human body.
That's what we need SSS for. Scattering imitates natural skin lighting. Look at the ears or lips: thanks to SSS they look much more real, a healthy pinkish tint appears in them.
But how did you manage to start SSS separately for the image of Michael?
Firstly, only the silhouette is cut out. This is where the previously generated template buffer comes to the rescue: all Michael pixels are assigned the value 0x89. Thus, we can concentrate precisely on them, but you need to apply SSS only to the skin, and not to the clothes.
In fact, when all the G-buffers were combined, in addition to the shading values stored in RGB, individual data were also recorded in the alpha channel. More specifically, the alpha channels of the irradiance map and the glare map were used to create a binary mask: pixels corresponding to Michael's skin and the image of some plants were marked with a unit in the alpha channel. Other pixels, in particular, clothing pixels, were assigned an alpha value of 0.
Thus, you can apply SSS, having as the source data the combined information from the target of the G-buffer and a buffer comparing the depth and pattern.
Yes, it may seem that such insignificant local transformations are not worth such serious calculations. And, perhaps, you would be right if it weren’t for one thing: while playing a game, we instinctively look at the face, and therefore processing relating to this part of the body allows us to bring the game as close as possible to reality. In GTA V, SSS is applied both to the image of the main character, and in the case of non-player characters.
Water
In the scene in question, not so much water fell into the frame, but still: the ocean in the background, a couple of pools here and there.
The visualization of water in GTA V is concentrated in two directions - reflection and refraction.
The previously created logarithmic Z-buffer allows you to generate a second version, this time linear with a resolution half that of the original.
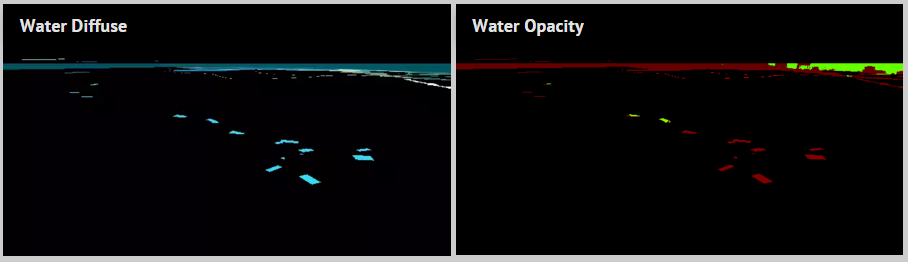
The ocean and pools are drawn in turn in MRT mode. Thus, several goals are simultaneously achieved:
Water diffusion on the left, opacity on the right
- Diffuse water map: captures the original color of the water.
- Map of water opacity: in the red channel, in fact, information about the individual properties of water opacity is stored (for example, for the ocean it is always 0.102, for pools - 0.129). The green channel marks how deep the pixel is relative to the surface of the water (deep pixels correspond to less transparent water, which requires a diffuse map to be connected, while the pixels of the water from the surface are much more transparent).
- Please note: all pools are visualized without reference to the conditions, even if they are practically blocked by data from other cells, they are still stored in the red channel. As for the green channel, where only really visible pixels are taken into account, only “water” pixels fall on the finished image.
Now we can combine the previously created buffers and generate a refraction map: Refraction
map for water
On this refraction map, the pools are filled with water (the deeper the water, the bluer it is), caustics are also added.
It is time to start the final visualization of water: again, one by one, all cells are drawn corresponding to the images of the ocean and basins, but this time reflection and refraction are combined, and relief maps are formed that introduce corrections to the surface normal.
Image before adding water.
Refraction on a plane, reflection and relief maps.
Image after adding water.
Atmosphere
We create a map of so-called volumetric shadows: it helps to darken the atmosphere / fog, which is not directly illuminated by the sun.
The map is generated at half the resolution by scanning pixels and comparing the data with a map of shadows from the sun. After receiving the first option with all the noise, the buffer is blurred.
Basic Image
Then a fog effect is added to the scene: this perfectly hides the missing details of the low-poly buildings visible in the distance. Here, data is read from the volumetric shadow map (does not play a significant role at this stage) and the depth buffer, on the basis of which fog indicators are formed.
The basic image with the addition of fog.
After the sky is visualized.
And at the very end, after him, clouds are drawn.
The final image
In fact, the rendering of the sky is carried out by a single draw call: the graphic grid of the sky forms a huge dome covering the entire scene (see right). At this stage, individual textures are involved, reminiscent of the effect of Perlin noise .
Clouds are also visualized: an extensive grid appears on the horizon, this time in the form of a ring. One normal map and one density map allow you to visualize the clouds: these are large 2048x512 seamless textures (connected in an arc from the left and right sides).
Left cloud density, right normal
Transparent objects
Now let's deal with all the transparent objects: glasses, windshield, specks of dust in the air ...
In total, 11 draw calls will be required, however, when processing dust, you will have to go to the installer repeatedly.
Final image
Bit Smoothing
Remember the previous brief excursion about the individual trees smoothed on a diffuse map? This is how the image looks without smoothing: It's
time to fix it all: start the pixel shader for post-processing - and it reads the buffer data of the original color and alpha channel of the diffuse map to find out which pixels are smoothed. For each pixel, up to 2 adjacent pixels may be needed to determine the final color of the “smoothed” element.
After smoothing,
this is a great trick, because with its help the whole image is “aligned" in one approach: moreover, the variety of geometric shapes in a particular scene does not play a role.
We note, however, that this filter is not ideal: in some cases, apparently, it could not cope, I still noticed the effect of a chessboard on both PS3 and PC.
Tone compression and glow
Prior to this, the processed image was saved in the HDR format: each RGB channel was stored as a 16-bit floating-point index, which allowed us to significantly expand the range of illumination intensities. But monitors are not able to display so different values and reduce everything to RGB colors with 8 bits per channel.
Tone compression converts these color values from HDR to LDR. There are several functions by which one format is replaced by another. The classic version, which has become widespread, the Reinhardt method (I used it when creating screenshots published earlier), gives results close to the final form of the game.
But did GTA V really use the Reinhardt method? We’ll have to get into the shader bytecode again:
// Suppose r0 is the HDR color, r1.xyzw is (A, B, C, D) and r2.yz is (E, F)
mul r3.xy, r1.wwww, r2.yzyy            // (DE, DF)
mul r0.w, r1.y, r1.z                   //  BC
[...]
div r1.w, r2.y, r2.z                   // E/F
[...]
mad r2.xyz, r1.xxxx, r0.xyzx, r0.wwww  // Ax+BC
mad r2.xyz, r0.xyzx, r2.xyzx, r3.xxxx  // x(Ax+BC)+DE
mad r3.xzw, r1.xxxx, r0.xxyz, r1.yyyy  // Ax+B
mad r0.xyz, r0.xyzx, r3.xzwx, r3.yyyy  // x(Ax+B)+ DF
div r0.xyz, r2.xyzx, r0.xyzx           // (x(Ax+BC)+DE) / (x(Ax+B)+DF)
add r0.xyz, -r1.wwww, r0.xyzx          // (x(Ax+BC)+DE) / (x(Ax+B)+DF) - (E/F)
So, so ... what's with us? It was the type equation that
(x(Ax+BC)+DE) / (x(Ax+B)+DF) - (E/F)marked the breakthrough of John Hable in the film industry in 2009. It turns out that GTA V does not even talk about the Reinhardt method, but the principle from Uncharted 2, according to which black areas do not fade, is also not good.
The process of converting to LDR is as follows: The
resolution of the HDR buffer is reduced to исходного from the original value.
- The computational shader determines the average brightness of the buffer, displaying the result as a 1x1 texture.
- A new exposure is calculated, due to which the scene will be bright / dark.
- The brightness filter only asks for pixels that have a brightness above a certain value (set by exposure).
- In this scene, only a few pixels were filtered: some lighted areas on a car with high reflectivity.
- Показатели буфера яркости неоднократно сокращаются вплоть до 1/16 от исходных, а затем увеличиваются до 1/2 от исходных.
- К исходным HDR пикселям добавляется свечение, а затем при помощи конвертера из Uncharted 2, цвет преобразуется в LDR. Одновременно производится гамма-коррекция, позволяющая заменить линейные каналы на sRGB.
The final result is largely dependent on the exposure. Let us give, literally, several examples of the influence of this parameter:
The exposure changes gradually, frame by frame, you will not see sudden changes.
So an attempt was made to imitate the nature of the human eye: did you notice that after a long journey through a dark tunnel and a sudden exit to the sun, the environment is perceived too bright for some time? Then it stops “cutting the eye” and becomes “normal”, and the exposure adapts to the new value. It seems that GTA V went even further, maximizing the adaptation of the exposure along the line “Dark → Bright” to the similar properties of the human eye.
Lens smoothing and distortion
If the FXAA method is used, then now he definitely pays attention to smoothing uneven cell outlines.
Then, using small pixel shaders to simulate a real camera, the lens distortion effect is triggered. This not only distorts the image, it also initiates minor color changes along the frame contour, where the red channel slightly dominates the green and blue.
Before distortion
After distortion
User interface
And the final touch: the user interface represented by a minimap in the lower left corner of the screen. The map is actually divided into several square zones, the engine is only responsible for those that are displayed on the screen. Each square is associated with a draw call. I painted the squares to more clearly demonstrate the structure:
Mini-map
Clipping test allows not only to process the area in the lower left corner, but also to delete the contents of the area. Vectors are provided on all roads (see the screenshot above), they are displayed in the form of graphic grids and look great even with a significant increase.
Image before adding the minimap
At this stage, the minimap is sent to the main image buffer, a couple of small icons and widgets are added on top of it.
Yes, we spent a lot of time, but it was worth it: here is the final shot in all its glory!
A total of 4,155 draw calls, 1,113 textures, and 88 rendering goals.