Complex modular architectural environment in UE4
- Transfer
Tyler Anlauf prepared a detailed analysis of the ROME modular environment : the Church of Sant'Ivo he created in UE4 and 3ds Max. In the article, he talks about the preliminary draft plan (blockout), modular assembly, lighting, post-processing, and much more.
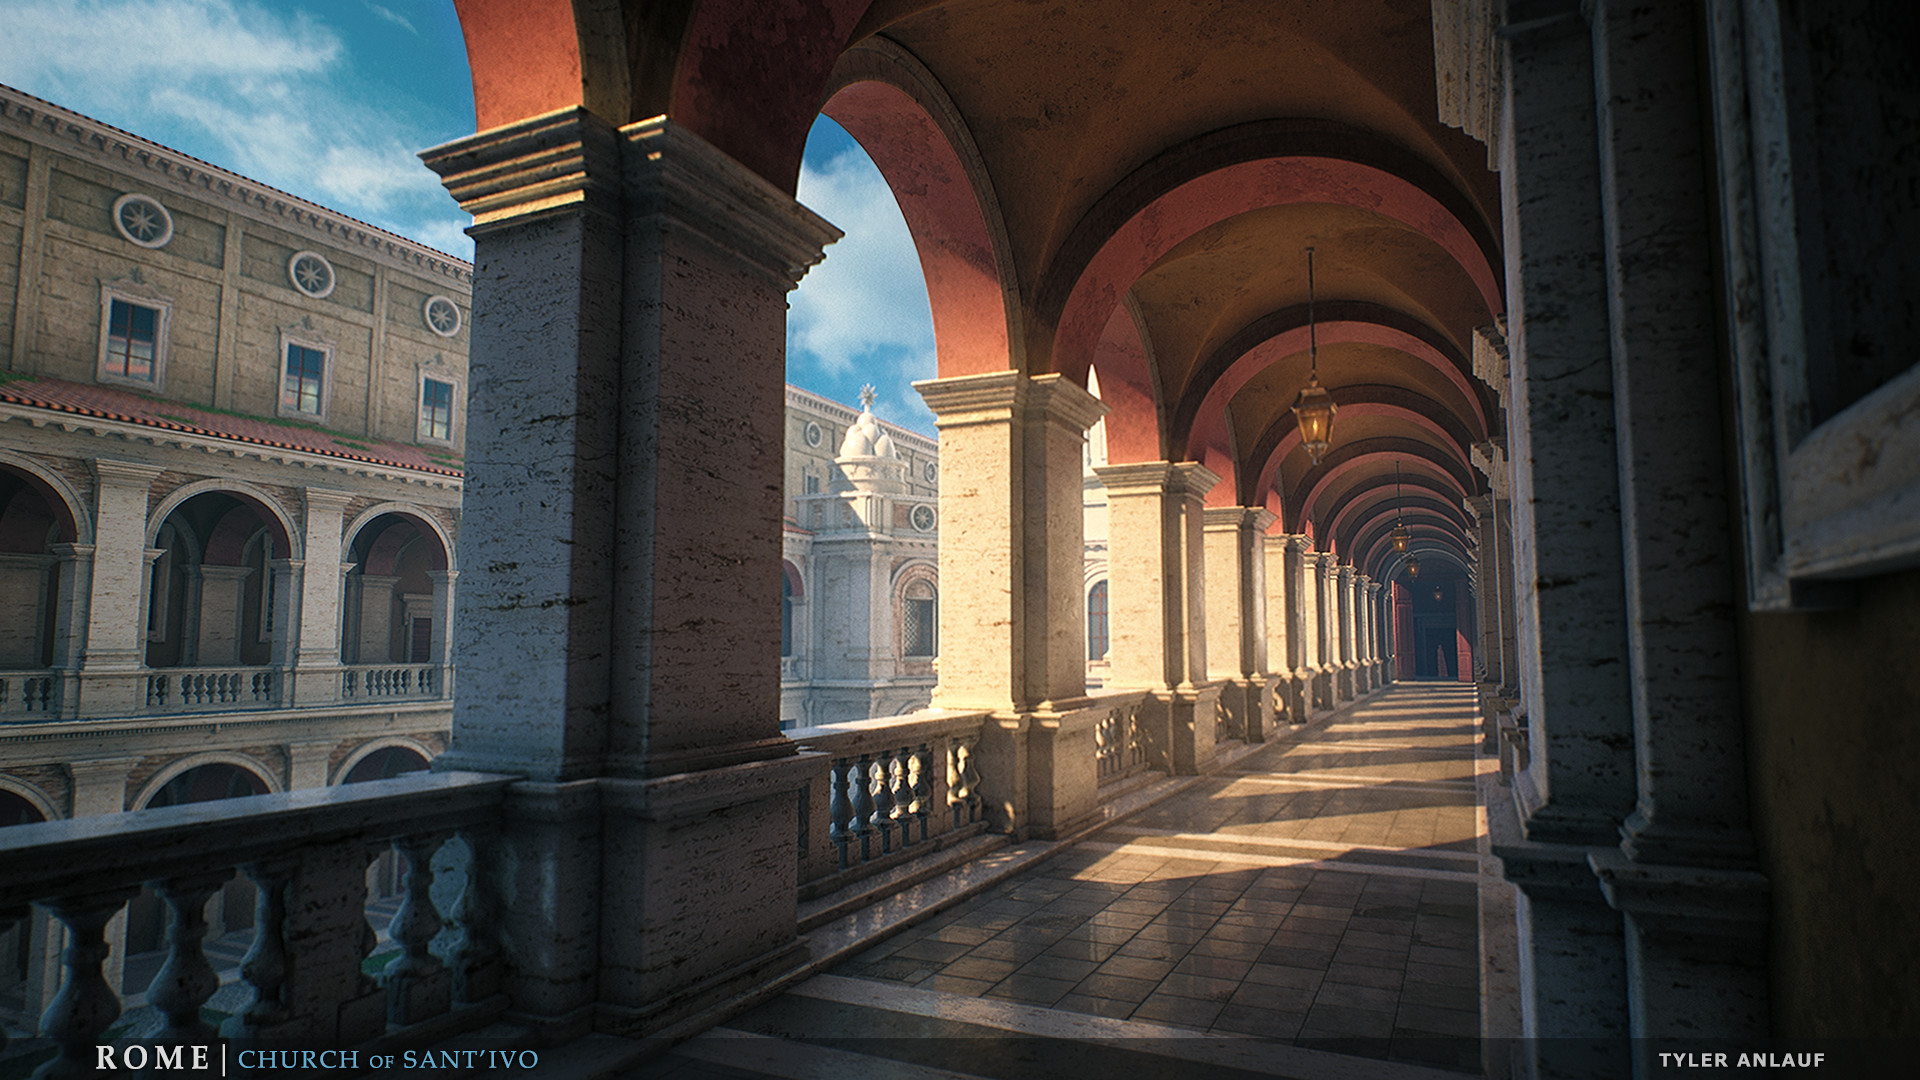
In this analysis, I will share with you my process of working on ROME: Church of Sant'Ivo , the tricks I learned, the difficulties I encountered during my work, and the plans for further improving the scene, because it has not yet been completed.
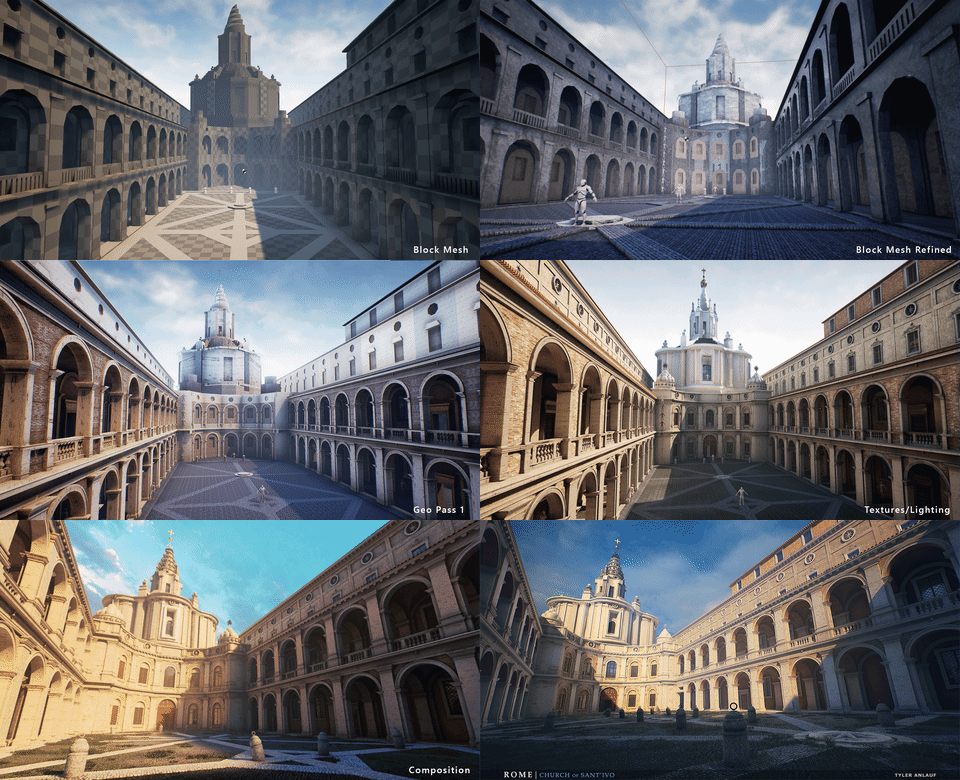
The objectives of this project were to improve my process of working on graphics, studying the Unreal Engine, and improving my skills in working with lighting, color, and composition. The Sant'Ivo alla Sapienza temple is in line with the objectives of the project - it clearly shows the possibilities of working with a modular structure, lighting, color and composition.
It was useful to choose a place that would resonate with me and inspire me. This architectural masterpiece of the early Roman Baroque period has a rich history, a majestic architectural language and scale that I find intriguing. This scale also caused difficulties due to time constraints, so I had to plan everything carefully.
Any project must begin with a good collection of references. It is useful to collect more references than required, because they can be useful or inspire ideas for further work on the project. Without references, many opportunities can be missed. In addition, it is useful to look for references at each stage of the project, and not to be limited to the original collection.
Here is an example of several references from my collection.
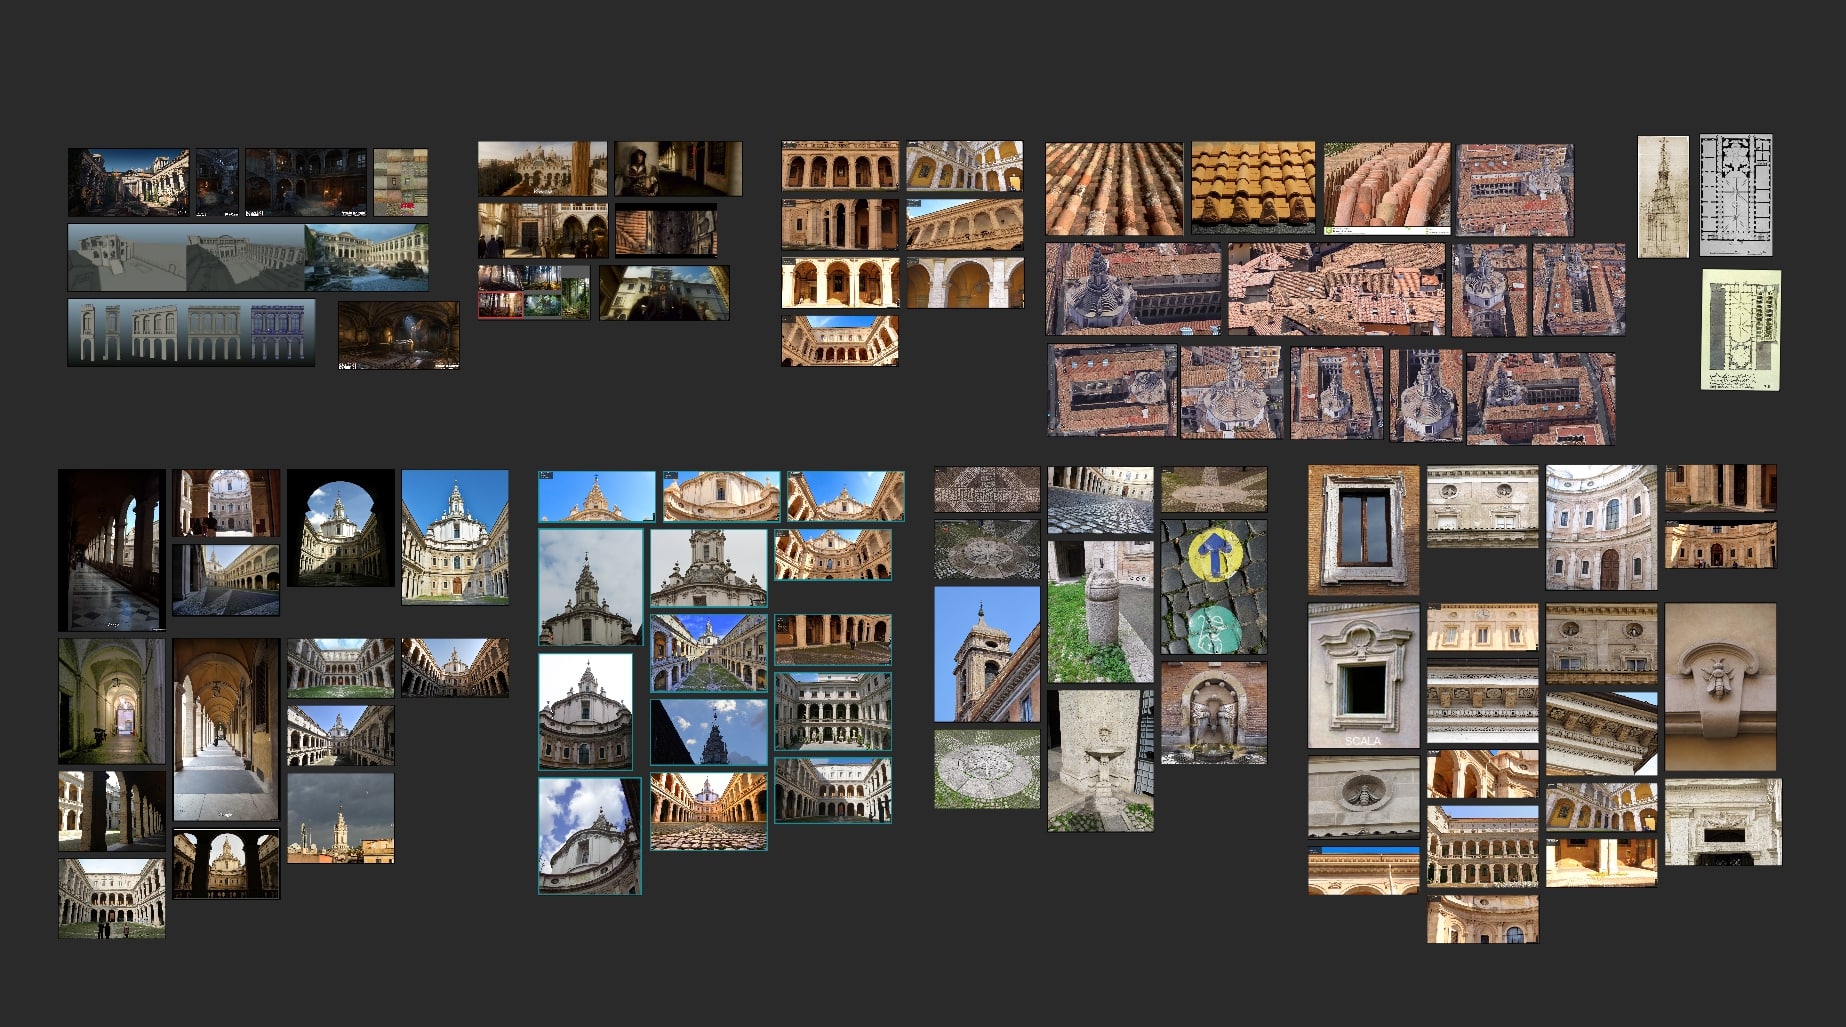
To coordinate references at each stage of production, they should be streamlined. To do this, you can effectively use Trello, Photoshop, or simply distribute references by folders.
I found out that it is convenient for me to use a free product called PureRef, because it is a powerful but lightweight program. All reference materials can be viewed at the same time, or quickly switch to full screen mode to examine a single image. In this program, you can conveniently organize references in groups, or even collect unique boards with references.
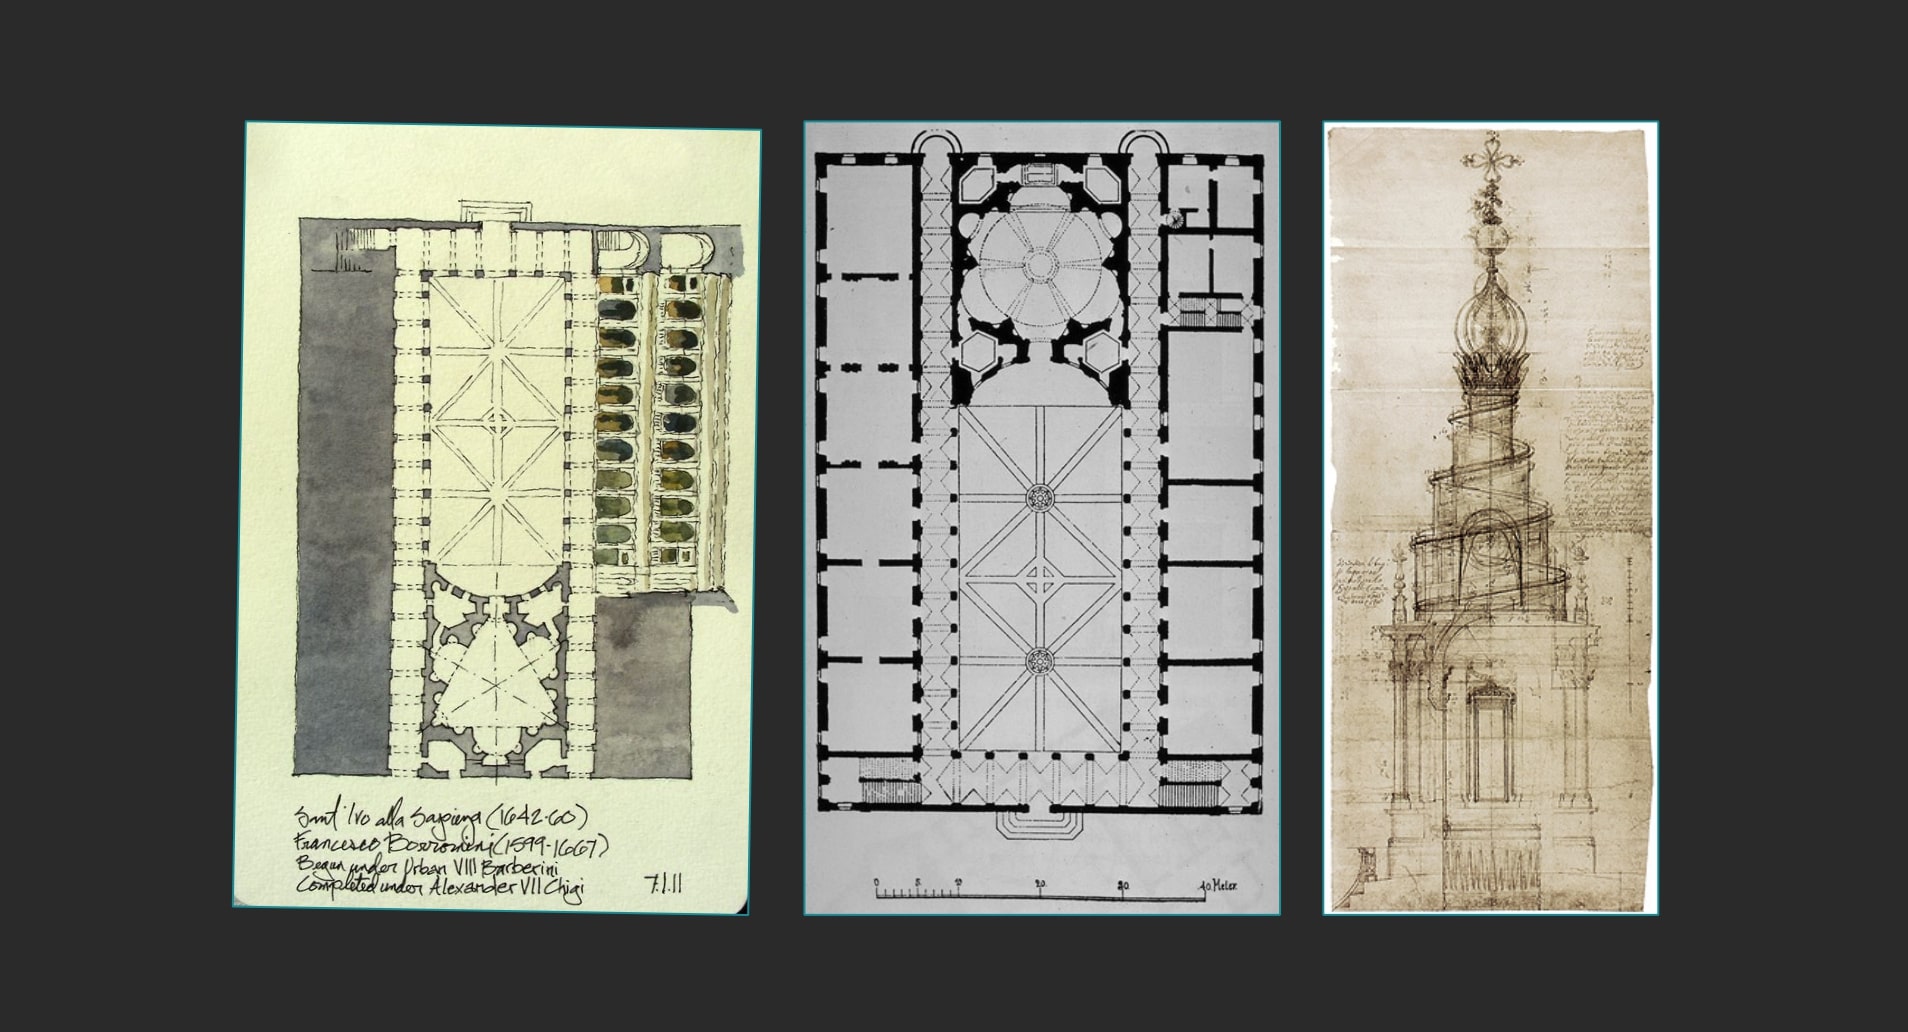
Even old drawings proved useful for this project, especially when it came to level design and scale determination. They also gave me an understanding of how the church and the courtyard were built during the Baroque period.
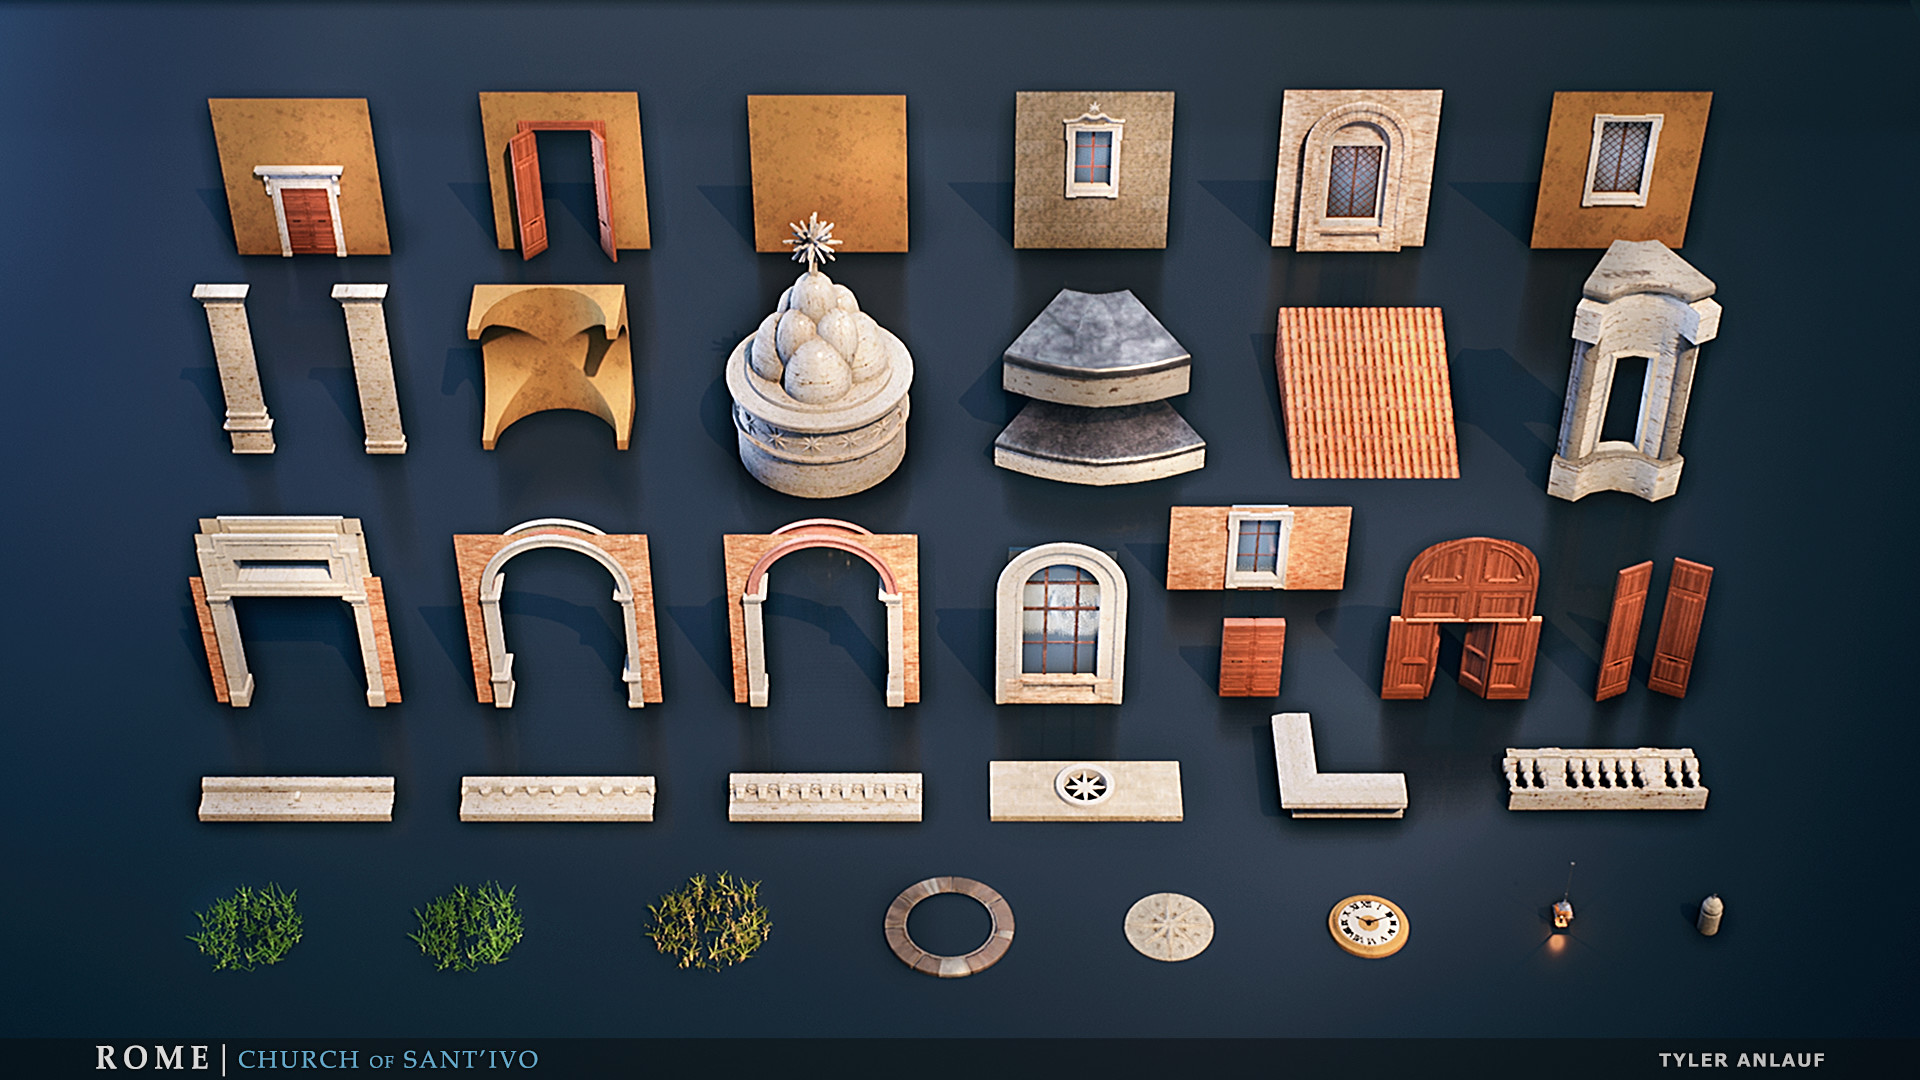
Next, I began to break down references into modular elements and began to develop metrics for individual resources. At this point, I created a list with the number of items to create. I also determined the number of different materials and thought about their effective creation.
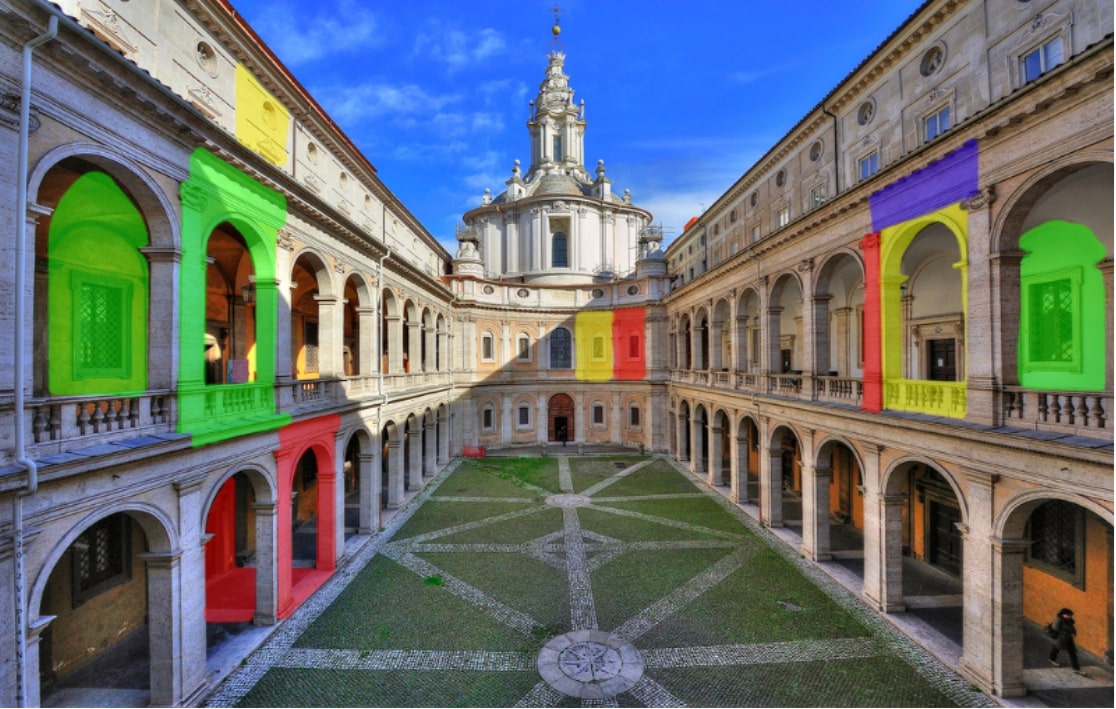
Here we are already starting to see how huge the space is in reality. Notice that the woman in the lower right corner is about the height of the bottom of the window.
The scale of the project was one of the difficulties over which it was interesting to work. Everything in architecture is enlarged, creating a sense of the grandeur of space. For example, the window here is about four times larger than the standard home window. Since the scale and architecture here is so unique, it was useless to look for dimensions from the real world in order to create my objects based on them.
Therefore, I needed to find references with people in the frame to understand the scale. It was necessary to study a variety of reference images to ensure proper selection of the scale.
A blockout is one of the most important steps in building an environment that is often overlooked or underestimated. A quality draft can lay the foundation for success, especially if you work in a team and on large projects.

There are many ways to create draft plans, but as I found out, BSP brushes from UE4 are great for my plan. The BSP tools made the creation of this draft a very fast process, because they allow the use of boolean operations to build the simplest forms of the environment.
Thanks to the use of BSP, I didn’t want so much to add details until the draft was completed, which allowed me to focus on the level design and building metrics.
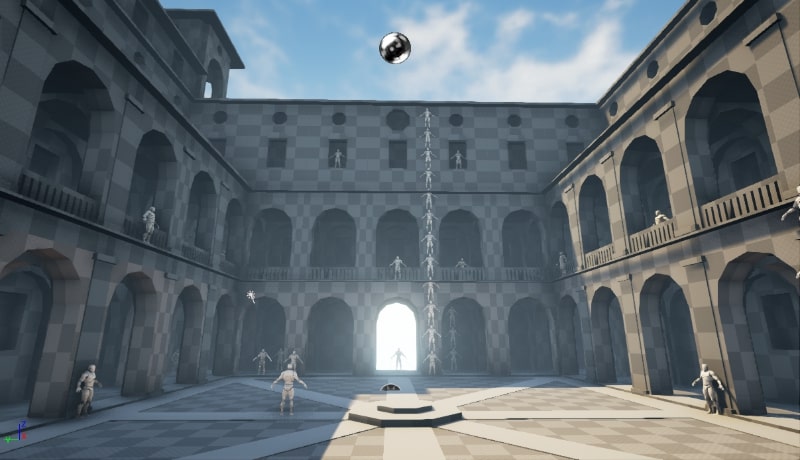
Below you can see how close my draft plan is to the final stage of the modular set.
Draft plan:
Ready modular set:
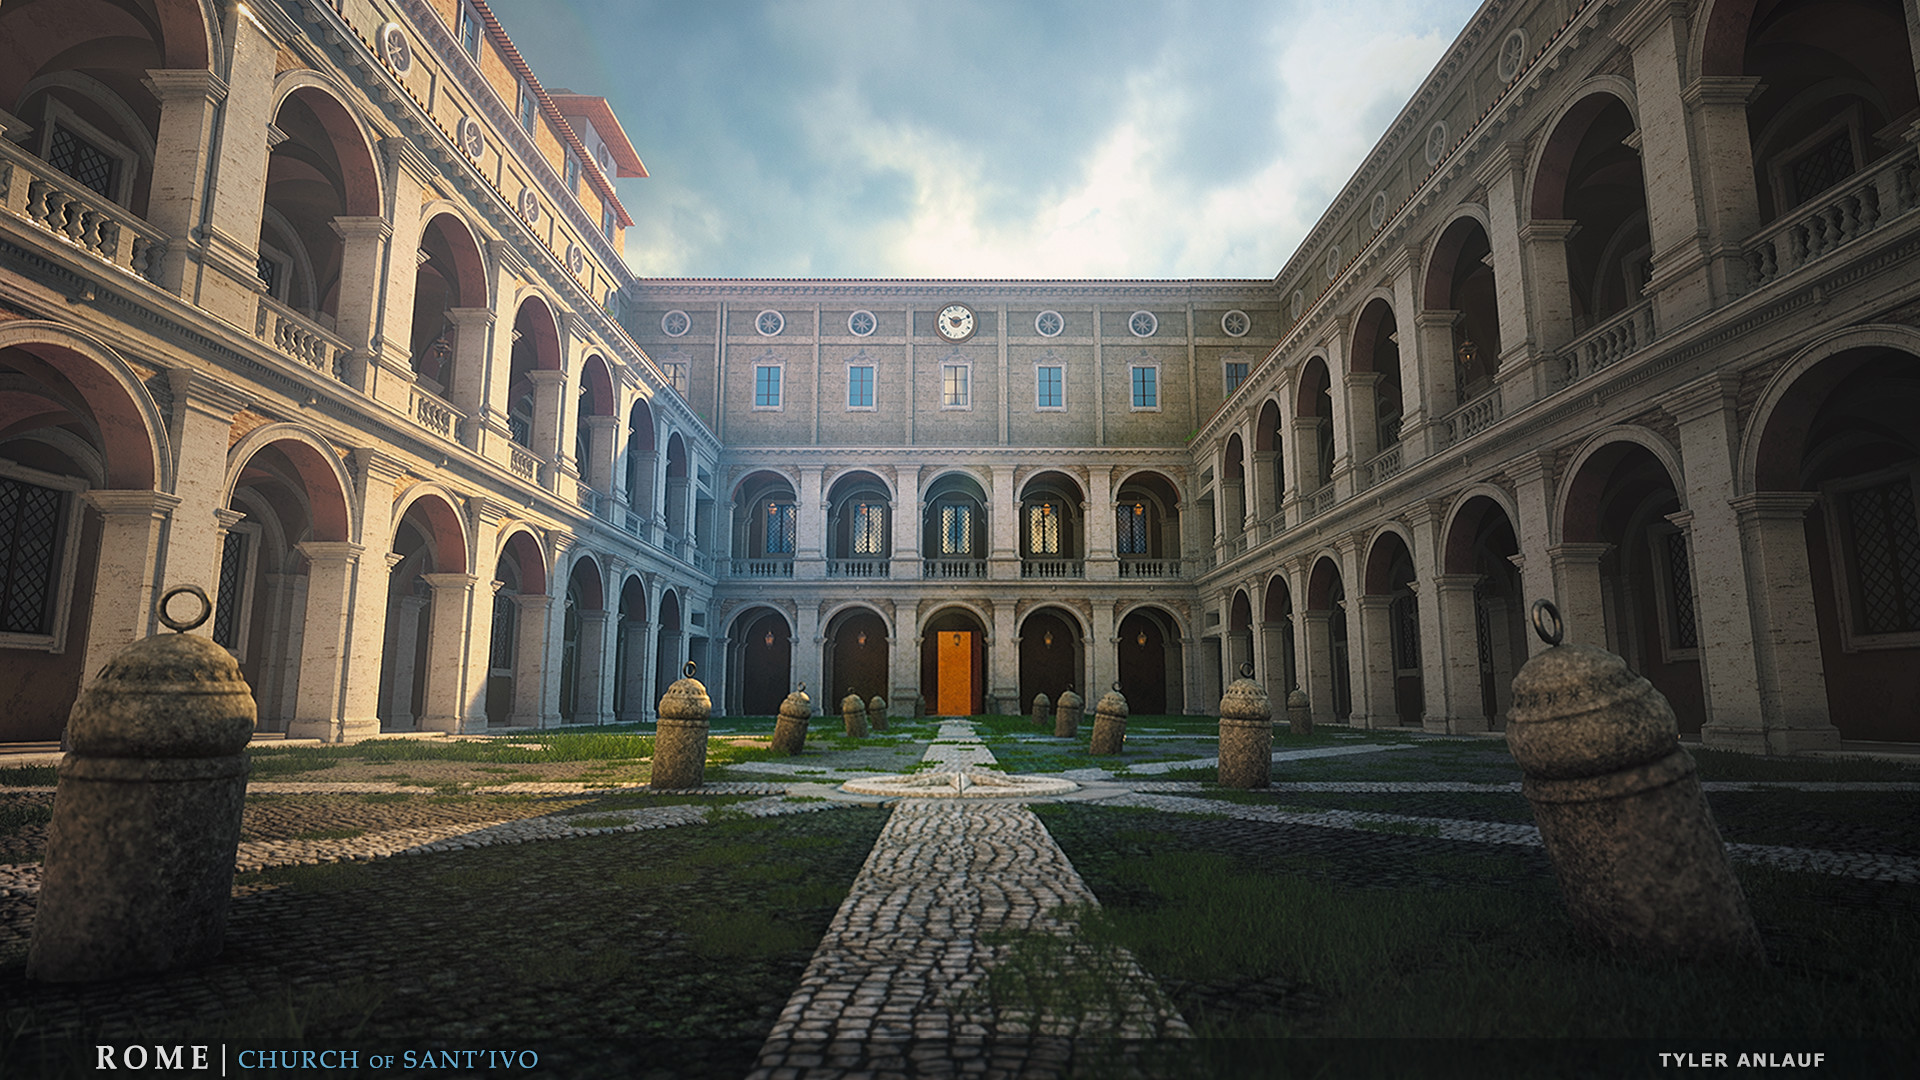
Thanks to the properties of the BSP at this stage, you can make any major changes. After testing and fitting the metrics in UE4, I figured out how the modular set will work with the finished geometry even before I started creating detailed models in 3ds Max or other packages.
Below is an image of the early stages of defining project metrics. He went through several iterations before the level was correct, and the draft was completed.
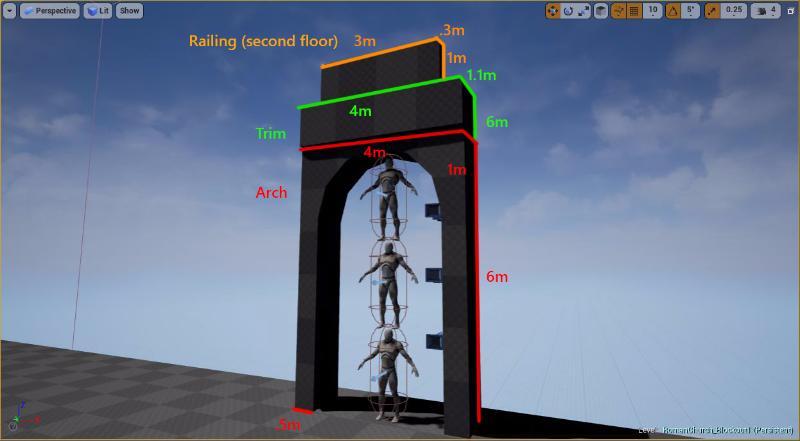
Additionally, I performed a preliminary pass of lighting and compositing to make sure that the selected forms fit. In addition, it helped me to prioritize the detail of resources depending on the distance to the camera.
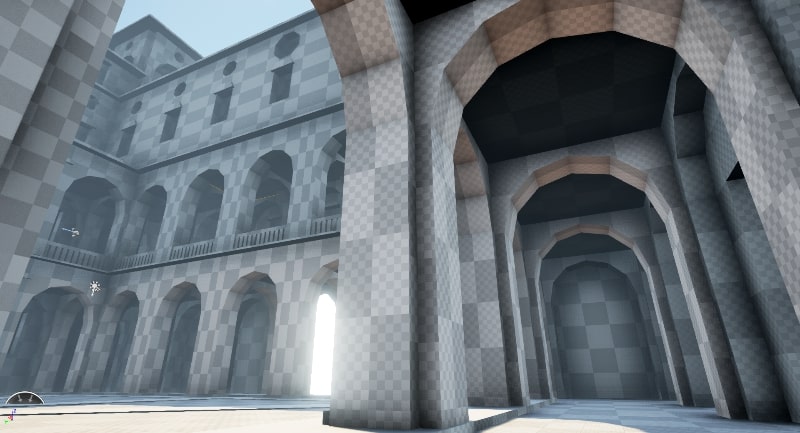
Having scribbled some simple materials onto the stage, I was able to better understand its mood and scale. This preliminary review of the materials also helped me understand how I will plan the final materials, and better understand what I need.

Having got rid of controversial issues in the draft plan, I could use it as a reference point for creating the final geometry. Since I thought about the metrics of modular resources from the very beginning, they were already connected to the grid, making the geometry fast and efficient.
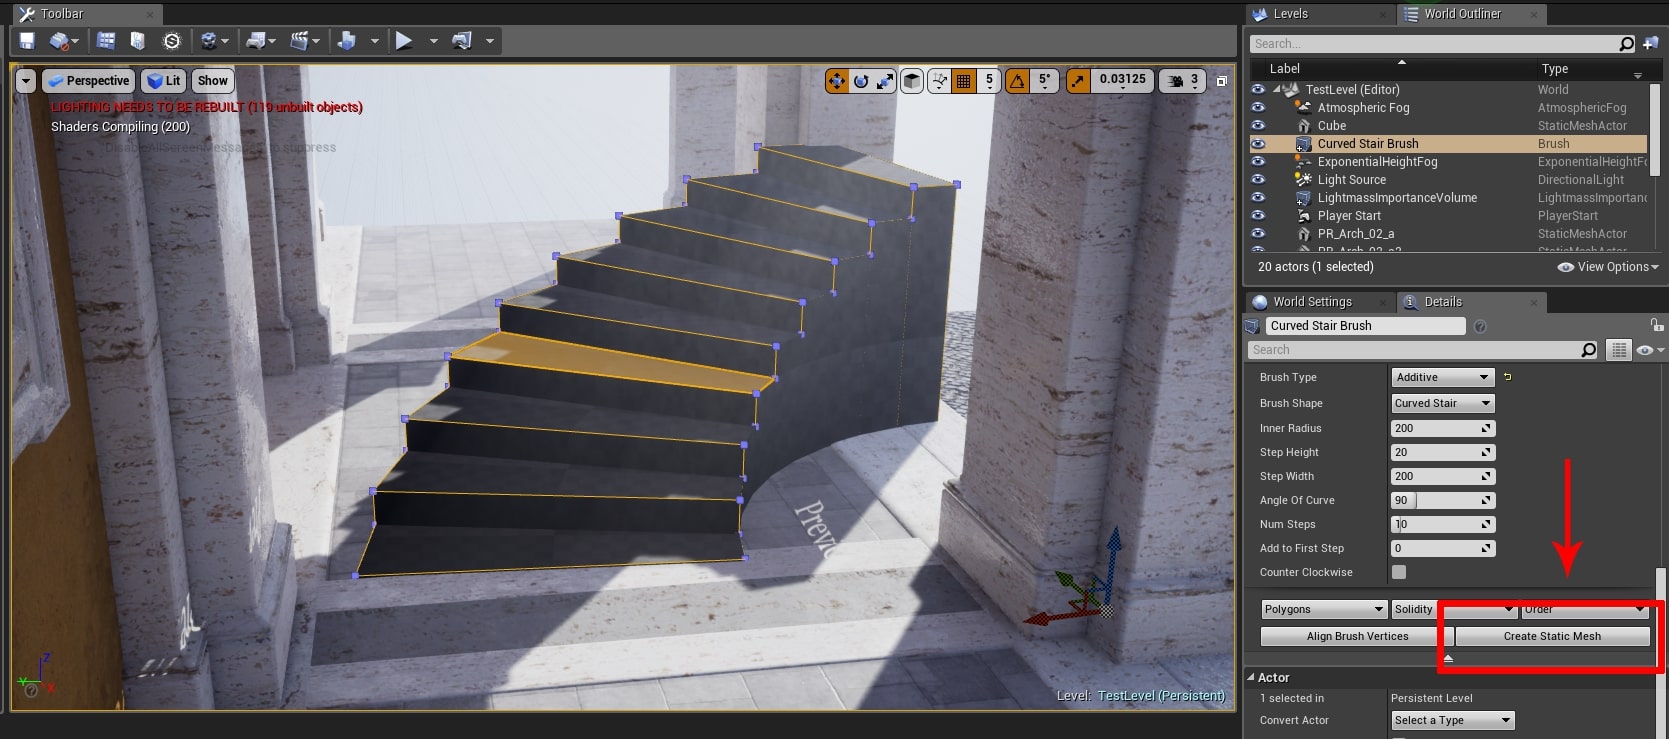
In most cases, BSP in UE4 is not as effective as static meshes. So I converted my BSP draft into static meshes, and then imported them to 3ds Max to build the final geometry.
In UE4, converting a BSP into a static mesh is very simple:
Building a modular set in 3ds Max began with the definition of large and medium-sized parts with their parallel testing in UE4. There is nothing worse than believing that you’ve finished a resource, and then realizing that you made a mistake at an early stage. Having improved the large and medium parts, I could focus on the fine details and optimization.
After testing, I realized that I needed to add more elements to the modular set than expected. Finding this error immediately, I was able to save time in the future because it was possible to schedule the addition of additional elements.
Perform testing from the very beginning of the project and do it often!
Since I actively used seamless, repetitive textures, it was extremely important to maintain the same density of texels for all resources. I achieved this with the help of the 3ds Max script called TexTools, although there are many other tools and scripts.
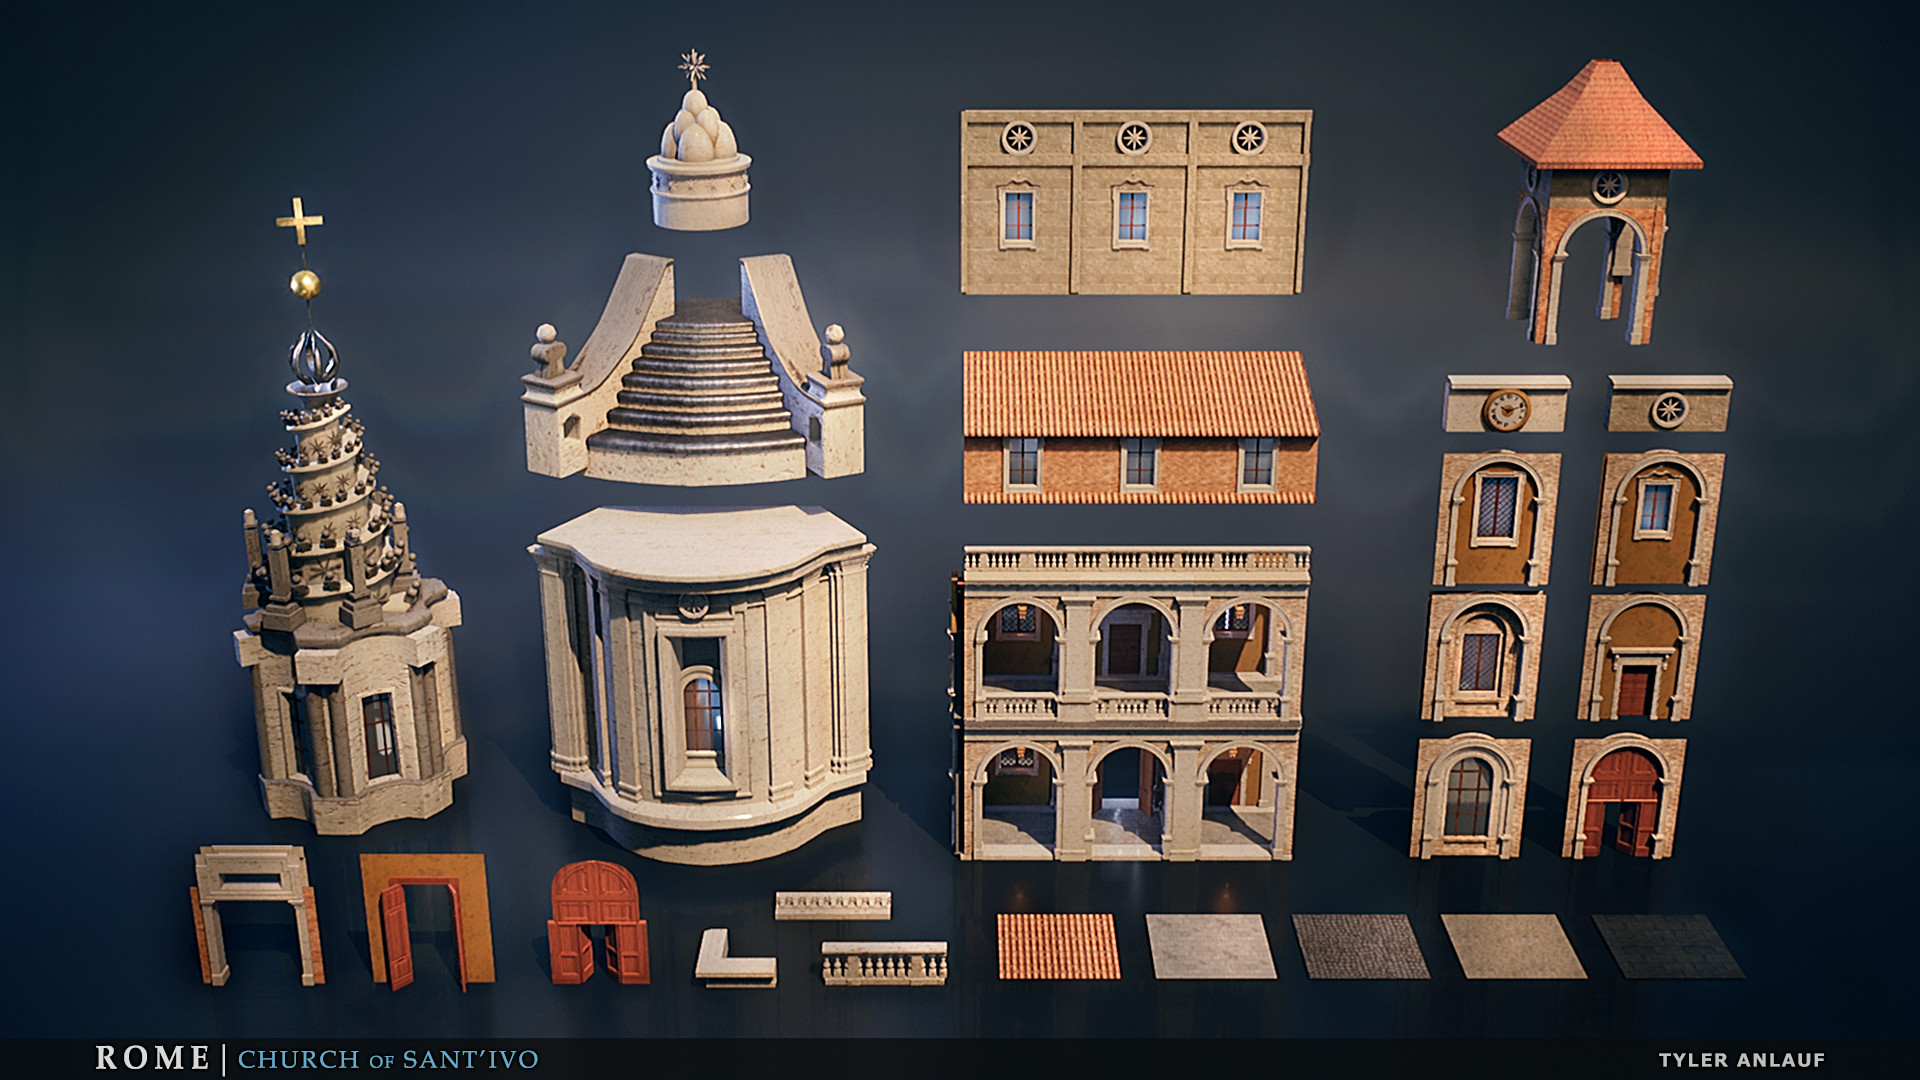
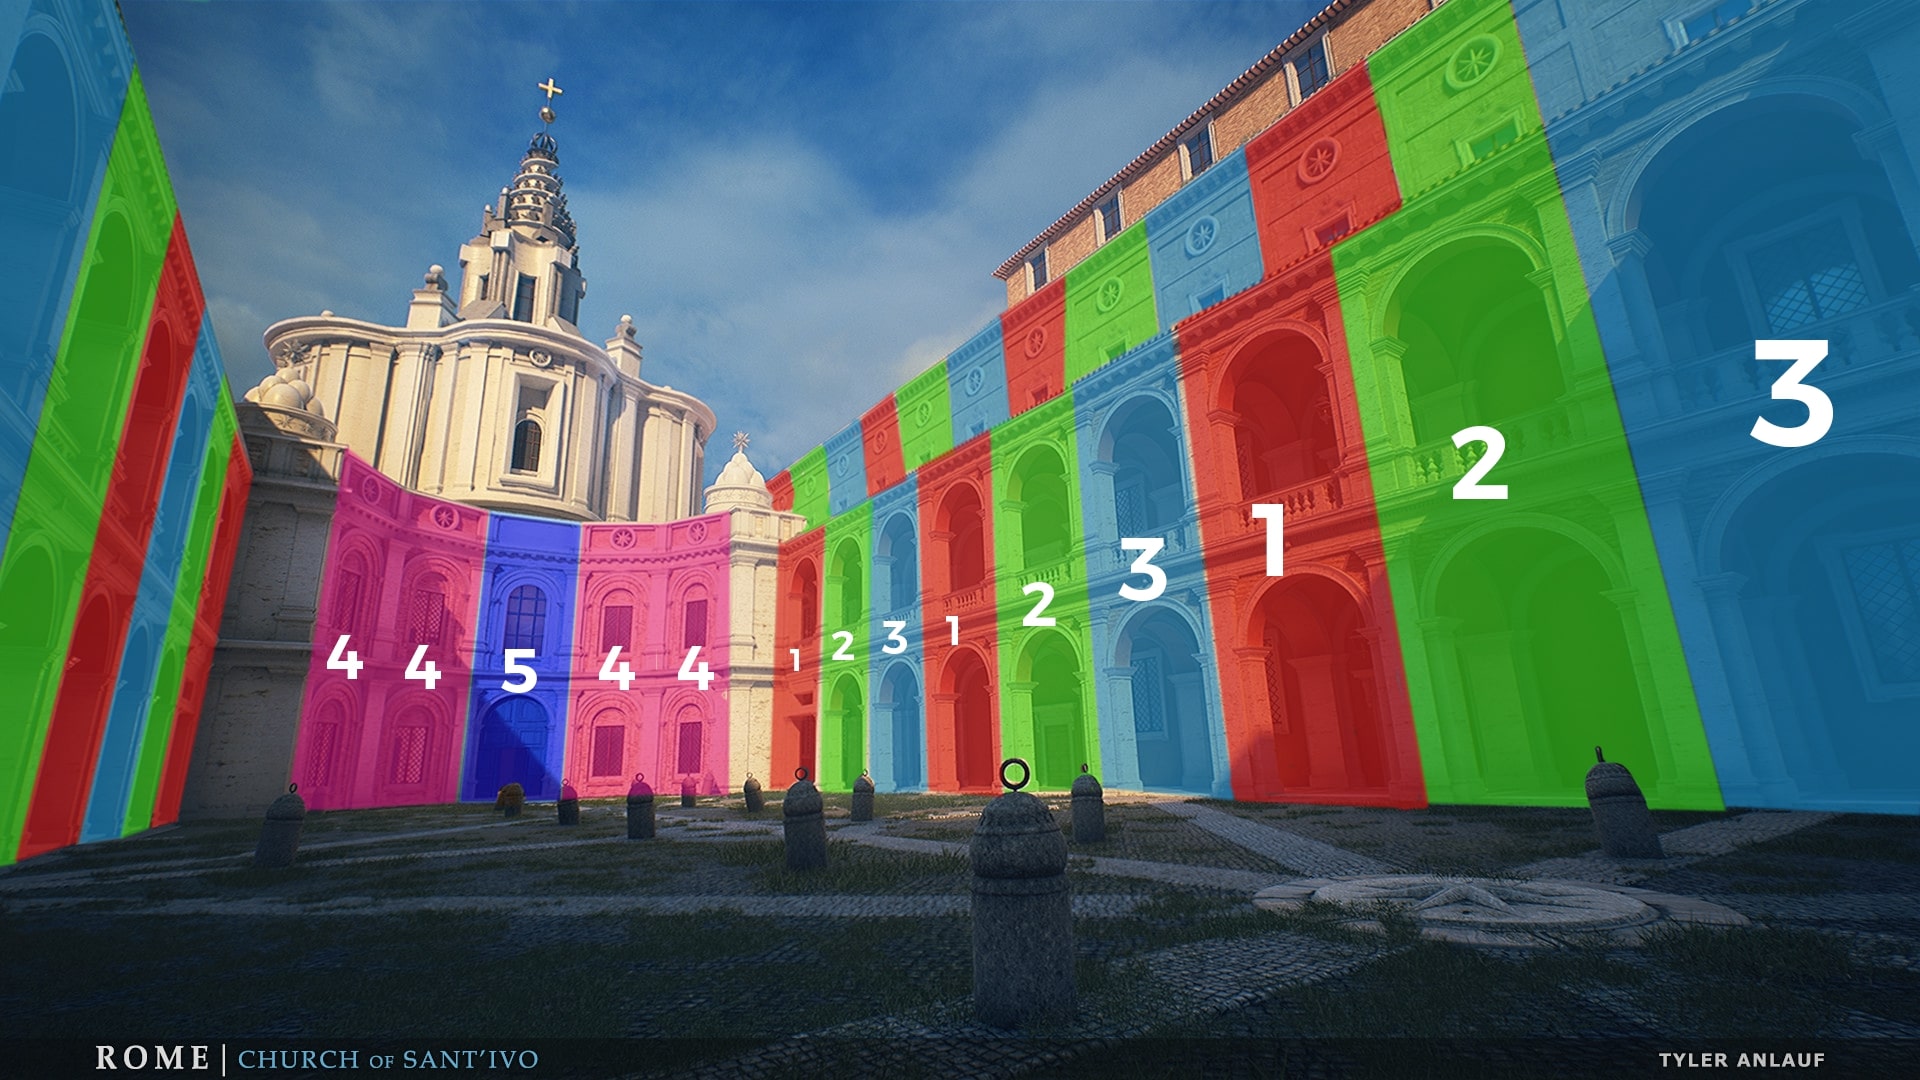
To make production more efficient, I created blueprints for repetitive parts of the scene. For corridors, I created 3 options in blueprint, shown in the picture below in red, green, and blue. Each has its own type of doors, windows and other details. Thus, it was enough for me to update not 48, but only 3 sections of the corridor.
This saved me a lot of time, because real-time changes were displayed for the entire project. The entrance to the church has two blueprints, because the middle part is different from everything else, which allows me to provide greater variability, shown in purple.
I created several materials in a bundle from Substance Designer and Substance Painter . However, due to limited time, I also used Substance Source and Quixel Megascans . It saved a lot of time.
In this project, I used master materials to speed up the editing of materials and make it more efficient. Through the use of copies of materials from the master material, it was enough for me to replace the textures, and not to rewrite a unique shader for each material.
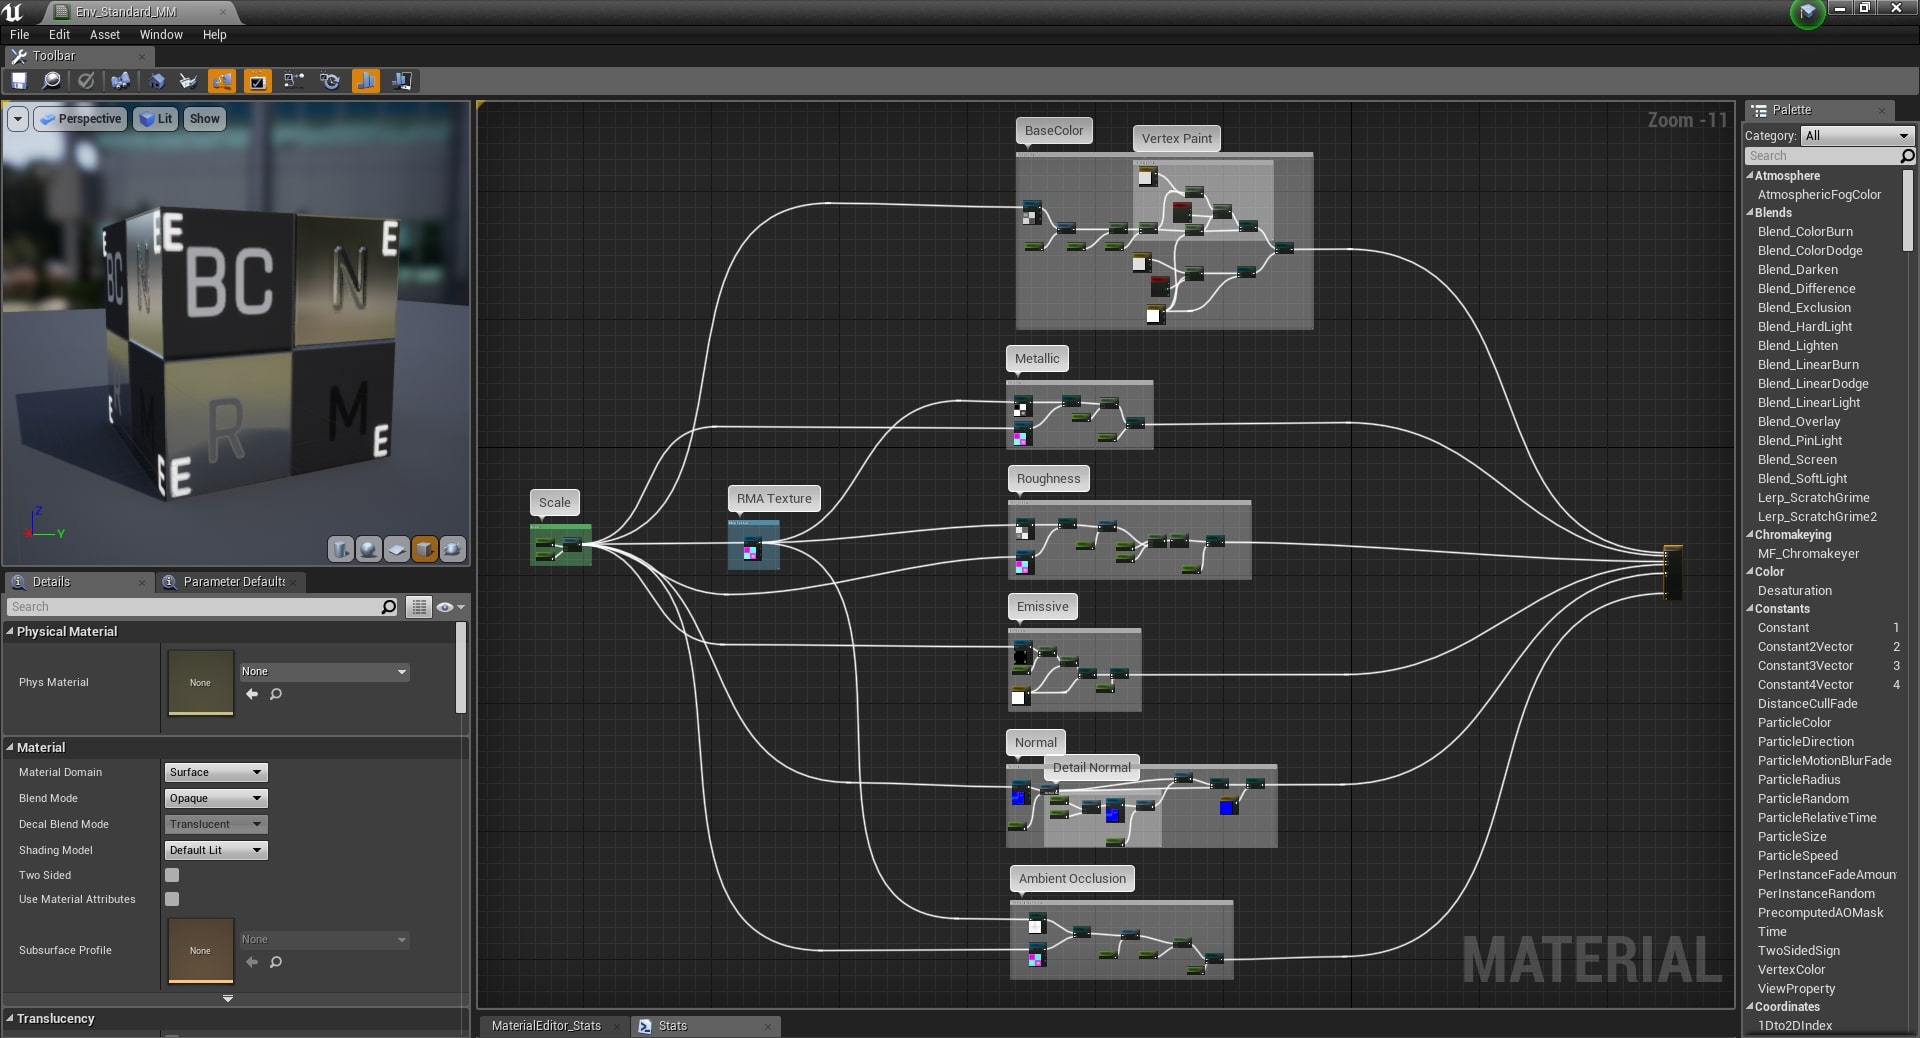
The functional, prescribed by me in the master material, allowed editing textures as in Photoshop, but in real time and without leaving UE4. In addition, I could turn on features such as drawing vertices and add detail normals if necessary for a specific instance of the material.
To optimize the master material, static switches were used to compile only those functions that are needed in each instance. This optimizes materials because only the included options are calculated. Therefore, I can create simple shaders driven by fixed values, or fully managed textures with more complex functions and settings.
Lighting was one of the biggest challenges, but at the same time one of the most exciting aspects. High-quality lighting can turn a good scene into a fantastic one, so you need to understand at least its basics.
I began working on the lighting of this scene by studying photographs, films, and lighting artists to understand how light helps create composition and liven up models and materials in UE4. I recommend that you first see UE4 Lighting Masterclass, Lighting Academy by 51Daedalus, and The Art of Lighting with Boon Cotter on YouTube.
Materials play an important role in lighting, because they determine how photons of light are reflected from surfaces. Carefully check the primary colors to ensure that they are calibrated as close as possible to the PBR standards. A good idea would be to make maps of primary colors no darker than 0.02 in linear space. Darker colors turn into a “black hole” for photons, which leads to strange results in lighting.
And in the master class on lighting in UE4, and in the video 51Daedalus says about it.

The lighting in this scene is organized quite simply. I began to solve the problem of setting up lighting by creating a clear calibrated lighting foundation, as recommended in the UE4 Lighting Masterclass. After calibrating the lighting and getting a clear base, one could build on these parameters in order to achieve something more graphically pleasing.
Parameters for normalized illumination:
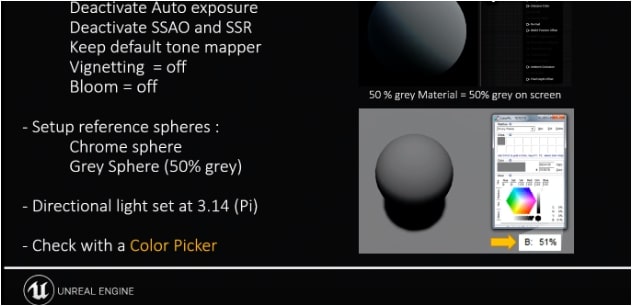
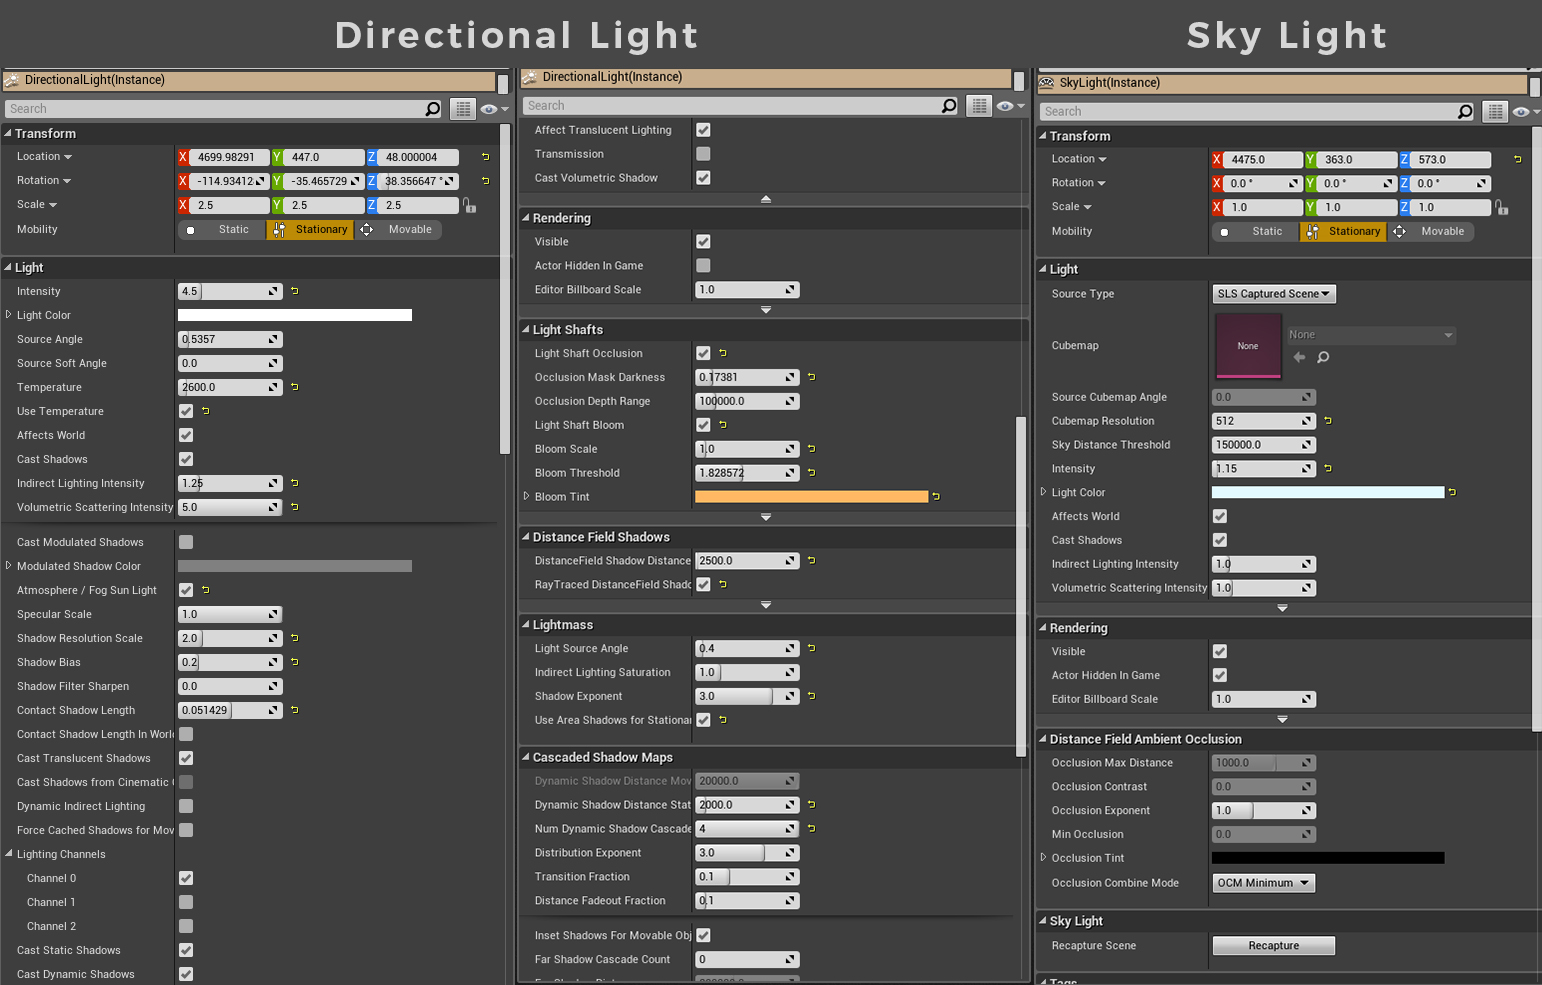
One of the most important elements was the dome of the sky, because it affects the whole scene, especially its mood. I created a simple but effective sky material to improve its rotation and brightness. I made it so that the amount of light from my dome of the sky was calibrated and exactly matched the real world, and it was reflected in the scene in a natural way. Parameters were applied to the surrounding level of the inverted sphere.
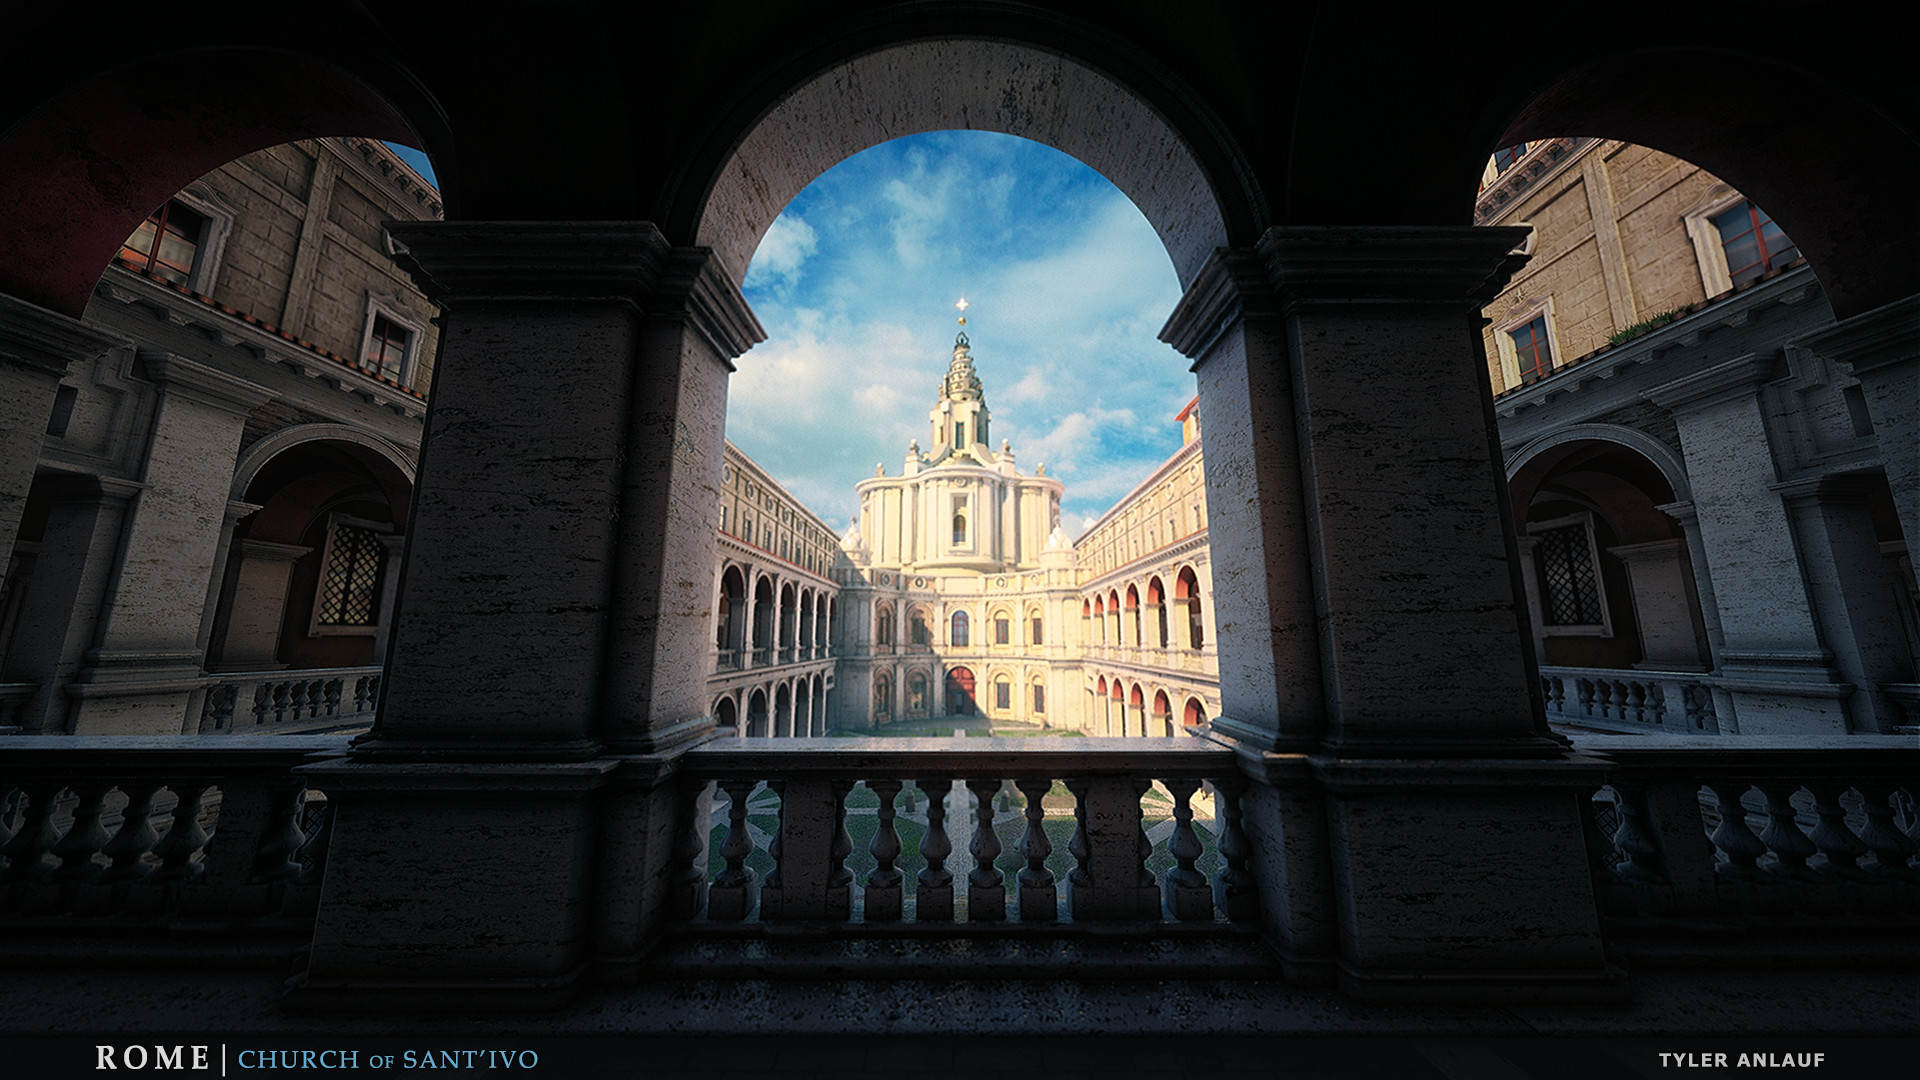
The trick was to adjust the direction of the sun as if the action takes place in the middle of the sunset. This sets the mood of the scene, and also creates interesting rhythms of light and shadow from most viewing angles.
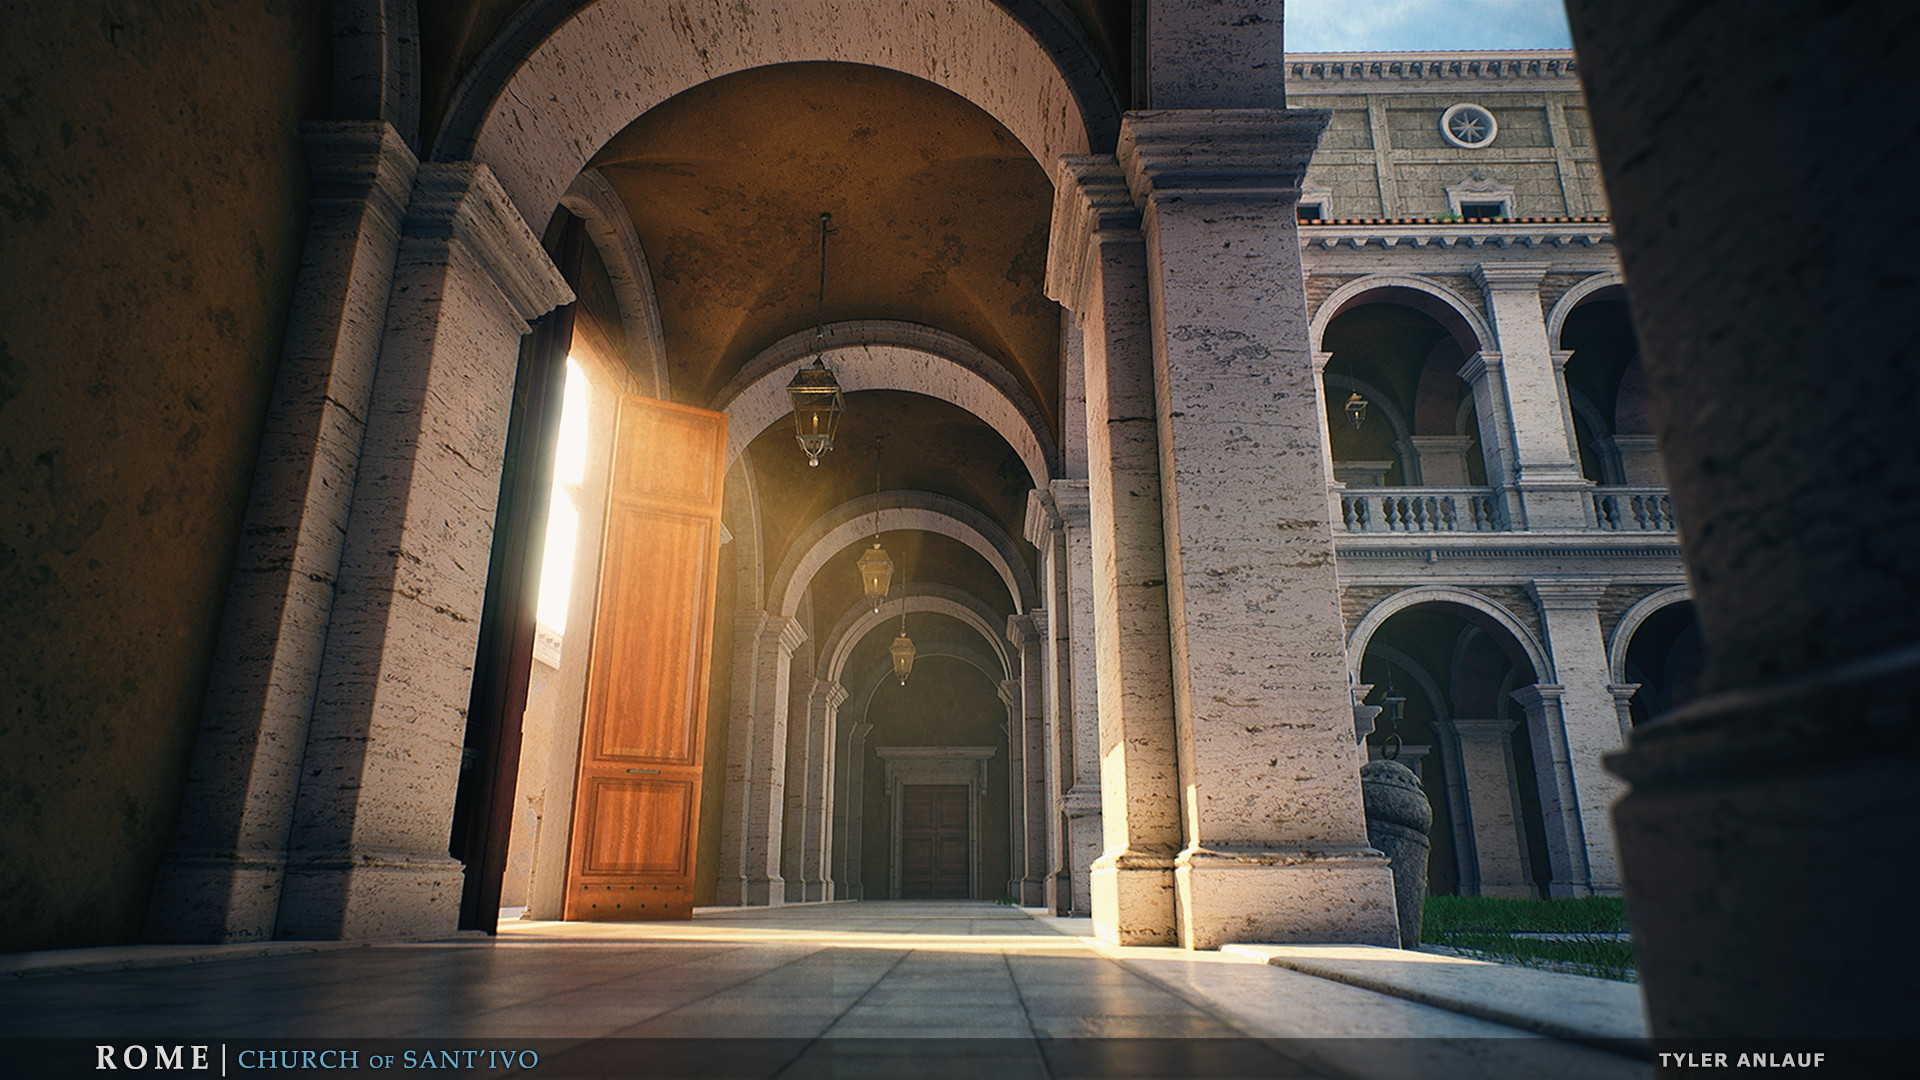
To enhance the impression by adding volumetric rays, I used volumetric fog. It was also necessary to adjust the color of the fog volume, because it has a huge impact on the color palette and mood. Finally, the fog density helped give the scene a sense of scale, depth, and atmosphere.
The next tool for creating appearance and mood is post-processing. One of my favorite features was the convolution bloom, because it mimics a more natural and detailed light bloom, but at the cost of reduced performance.
I also had control over the colors of the shadows, midtones and light areas. This is needed to adjust the color palette and underline the details in the scene, enriching the frames.
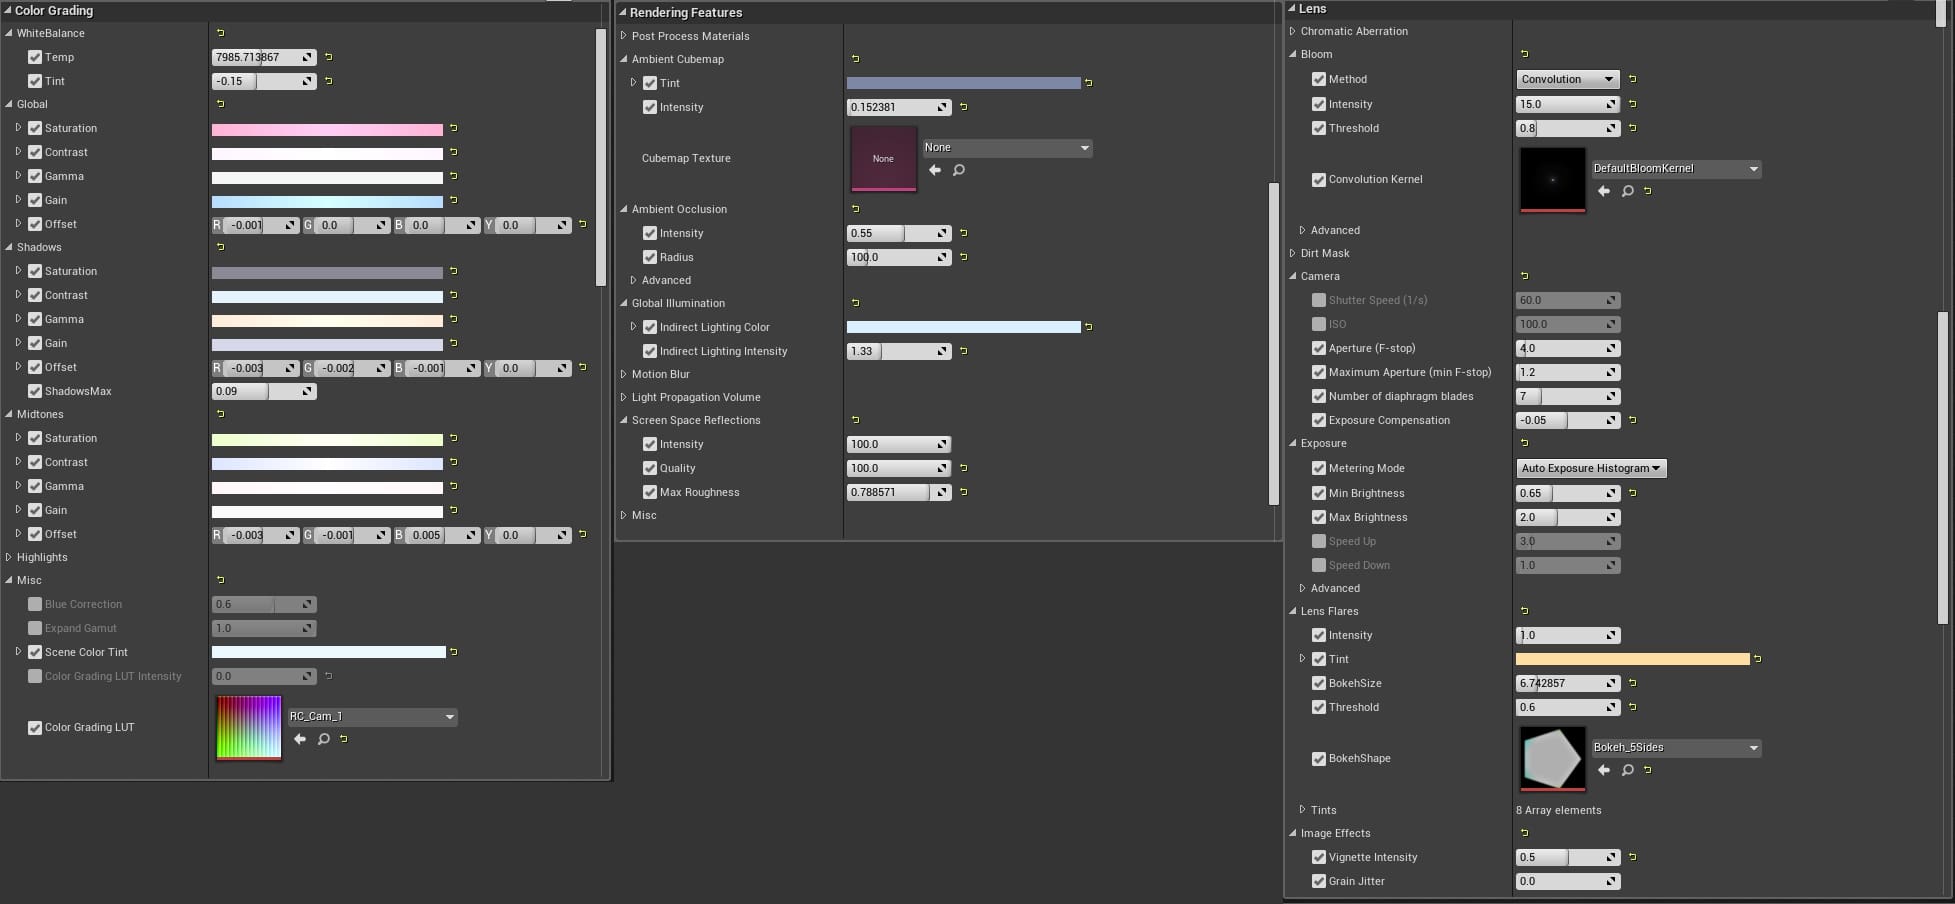
Do not be afraid that this stage will have to spend a lot of time. Just a few changes can significantly change the feeling and mood of the scene, adding to the finished product the final touches.
You must also define a color palette. To check the palette, I used a simple way: blurred the image. Just took one of the screenshots and applied blur in Photoshop. So the color palette becomes much clearer, and I can use this information to improve the color palette, creating a quality composition.
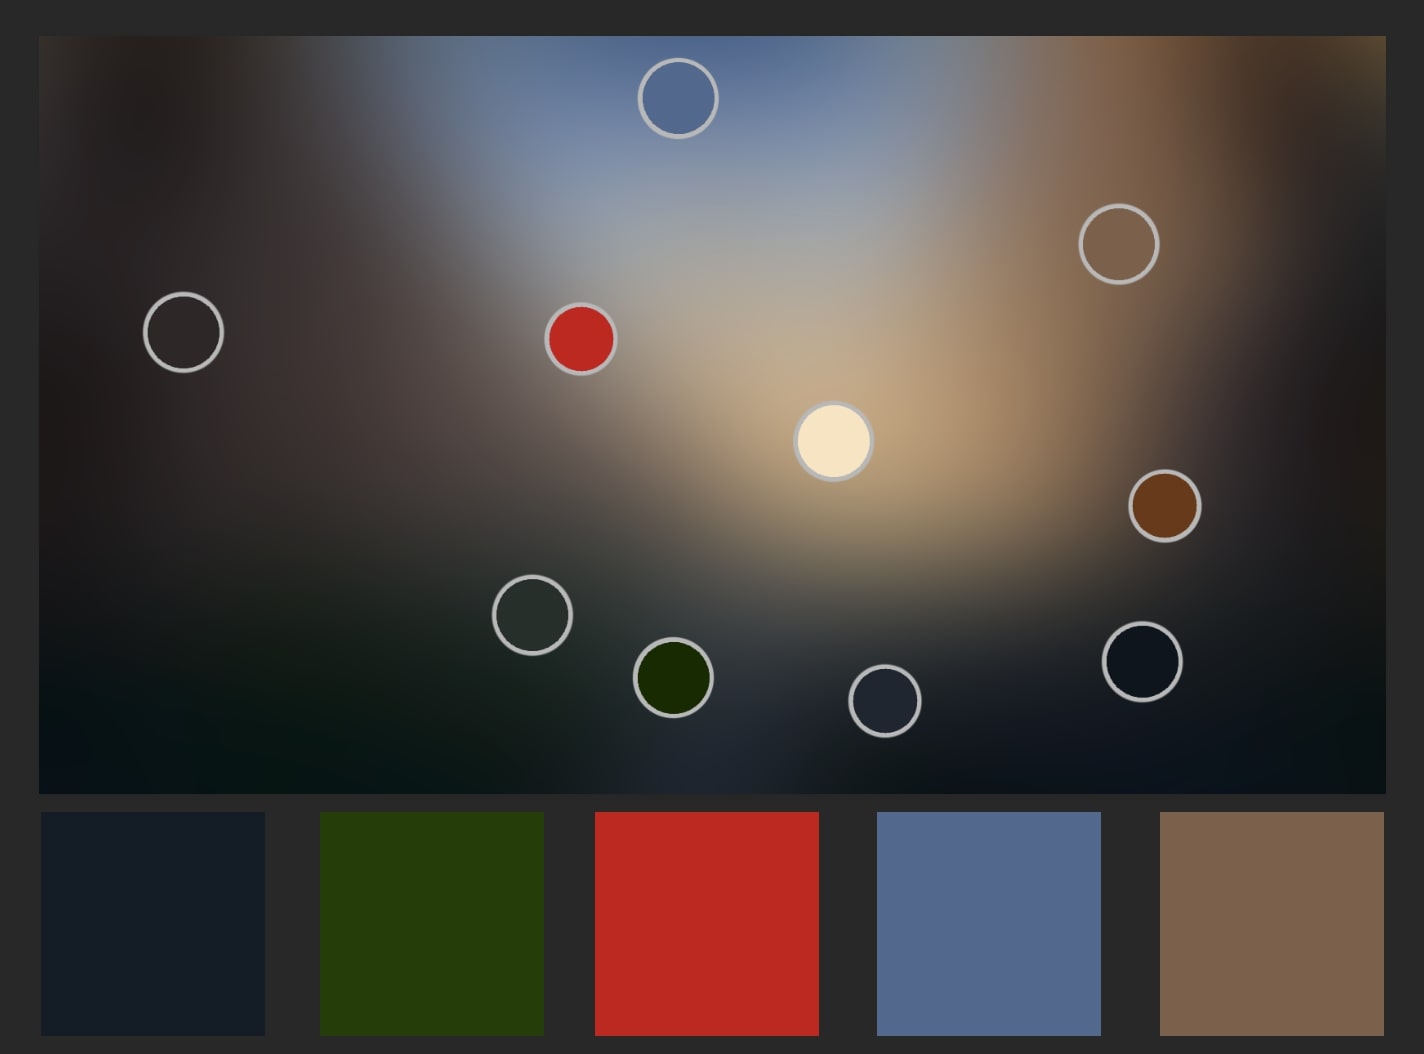
Creating a strong composition is as important as other parts of the project. A good composition allows the viewer's eye to move through the image in a pleasant way. To achieve this, I took screenshots that took advantage of the shapes of the geometry I created, the rhythms of light and the shadow of the lighting, fragments of warm and cold shades from my color palette, so that they all work together with the selected angle of the camera.
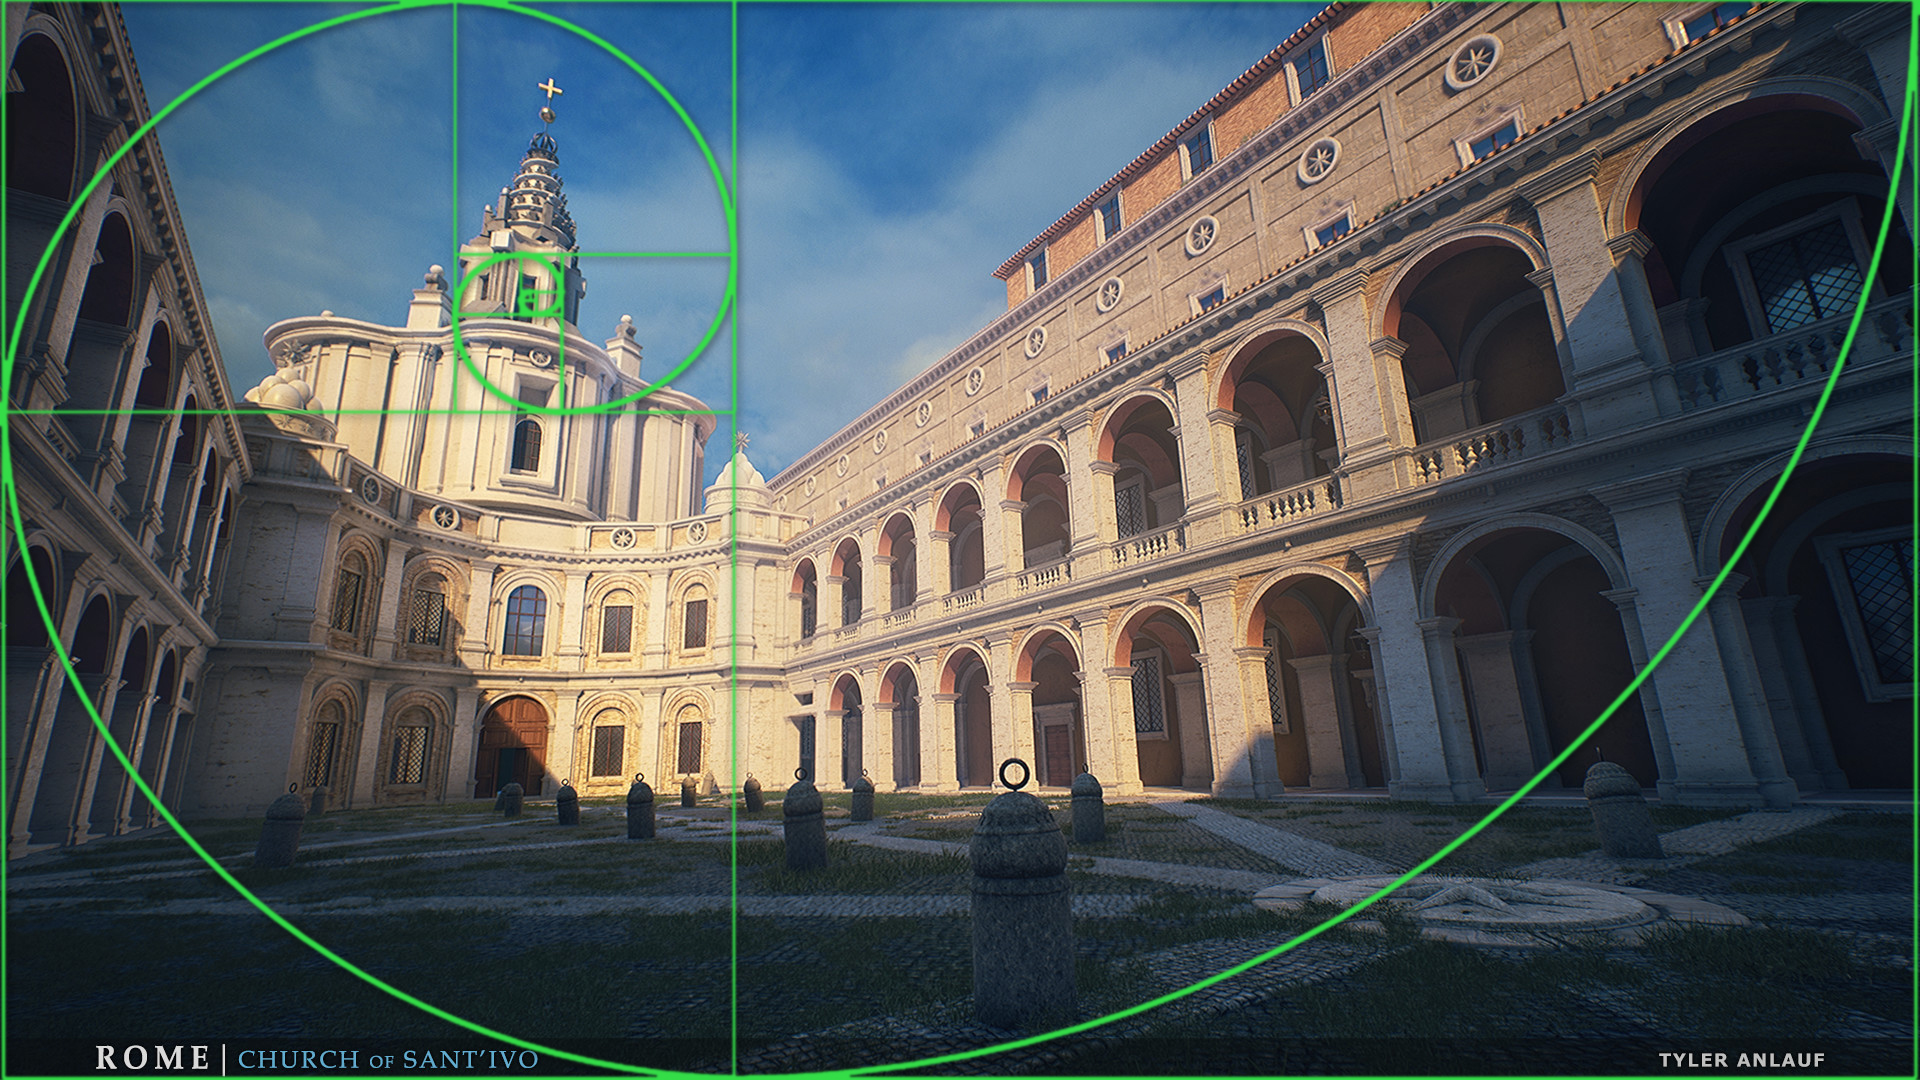
To create an interesting camera angle, I used the principles of the rule of thirds and the golden spiral.
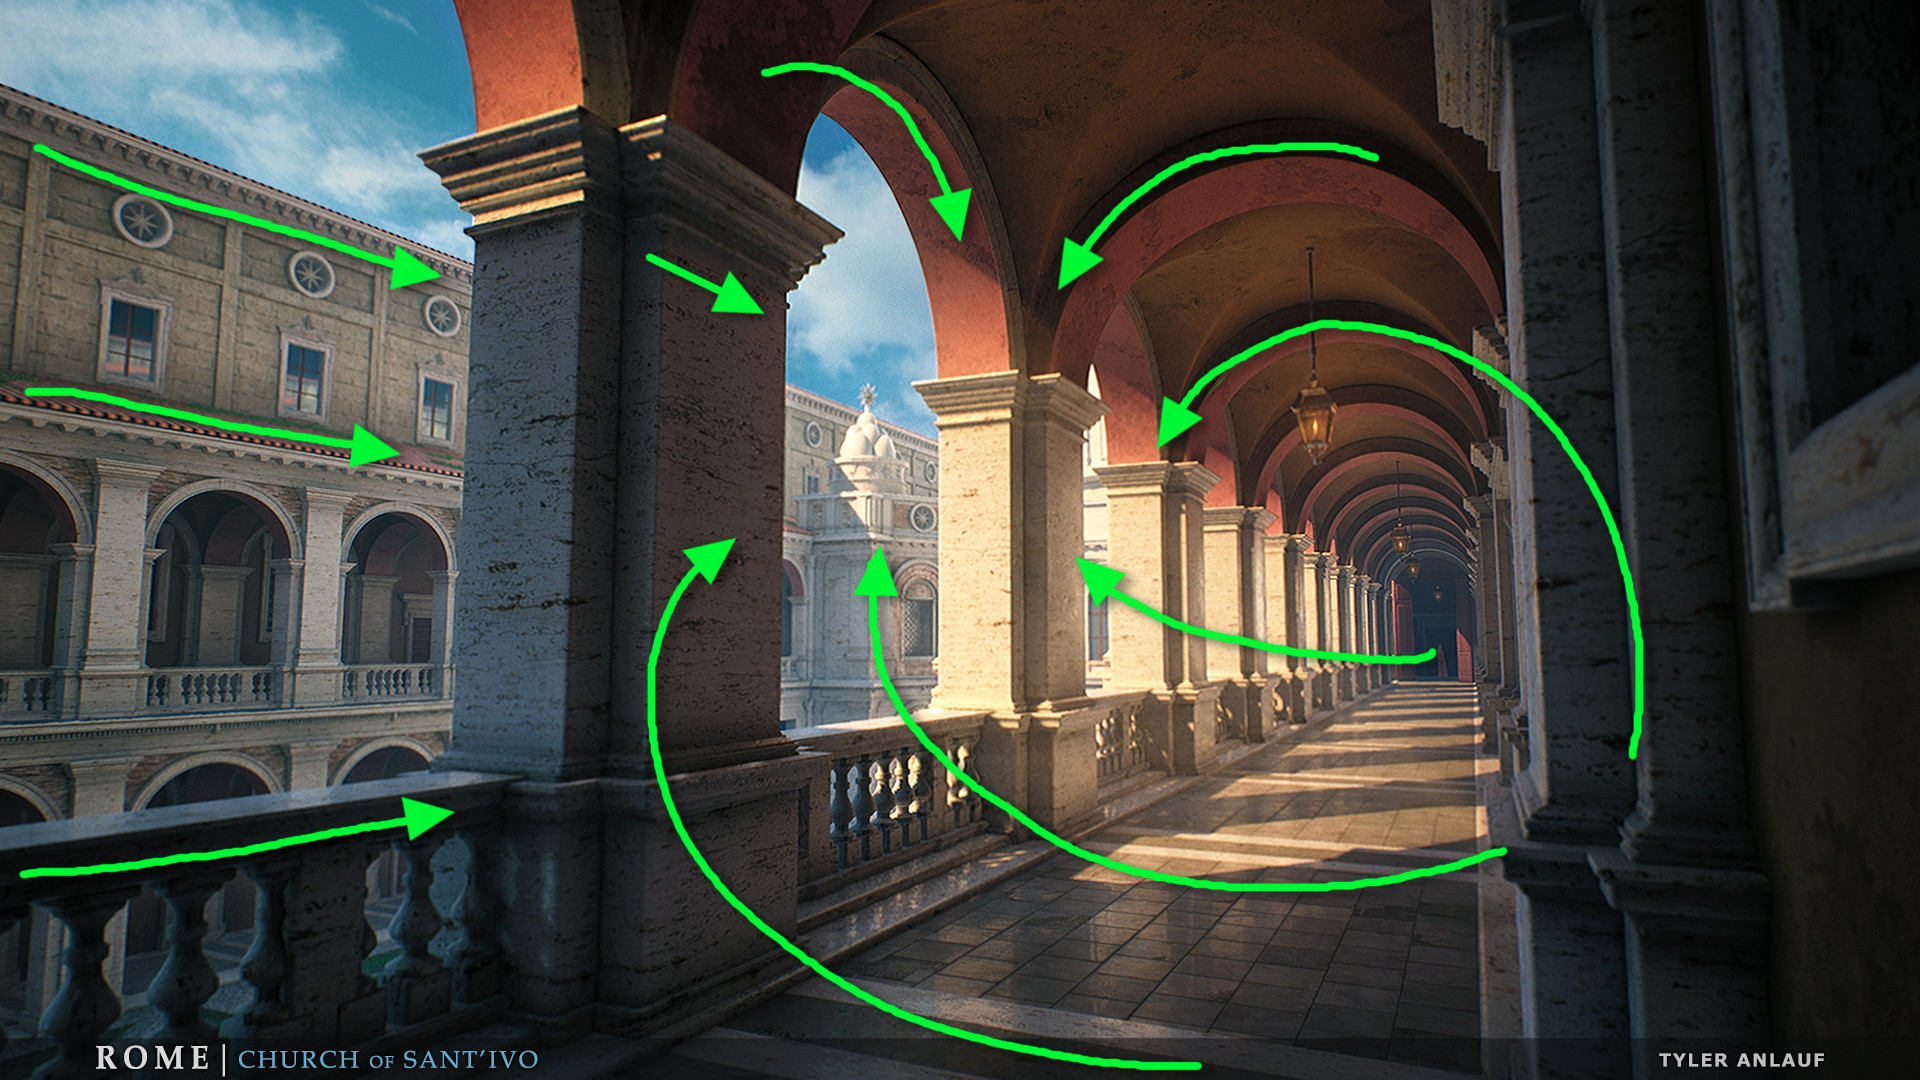
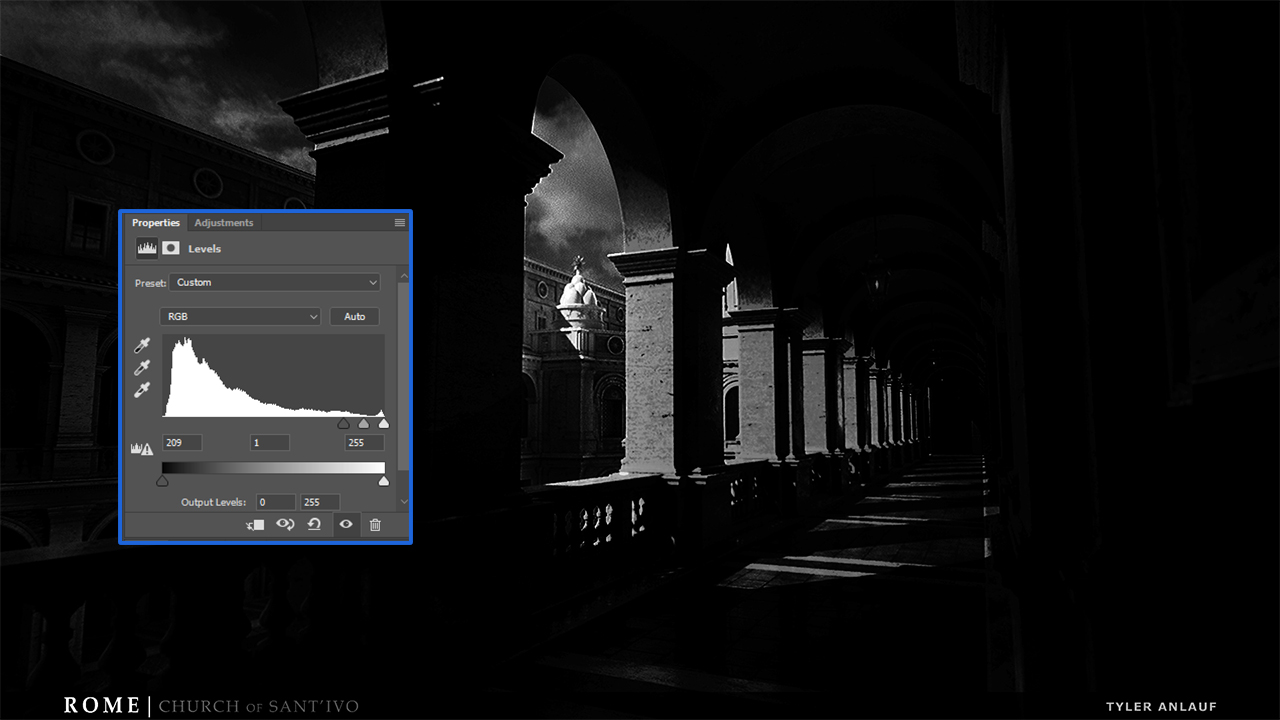
The brightest area in the scene, which is also the most contrasting, is usually the focal point. To check if the focus point I chose works, I suppressed the levels to find the brightest area with the greatest contrast in the scene. I adjusted the lighting so that the focus point is clearly visible. A clear focus point also reduced the sense of natural repeatability of architecture, because there were areas in the image where the eye can relax.
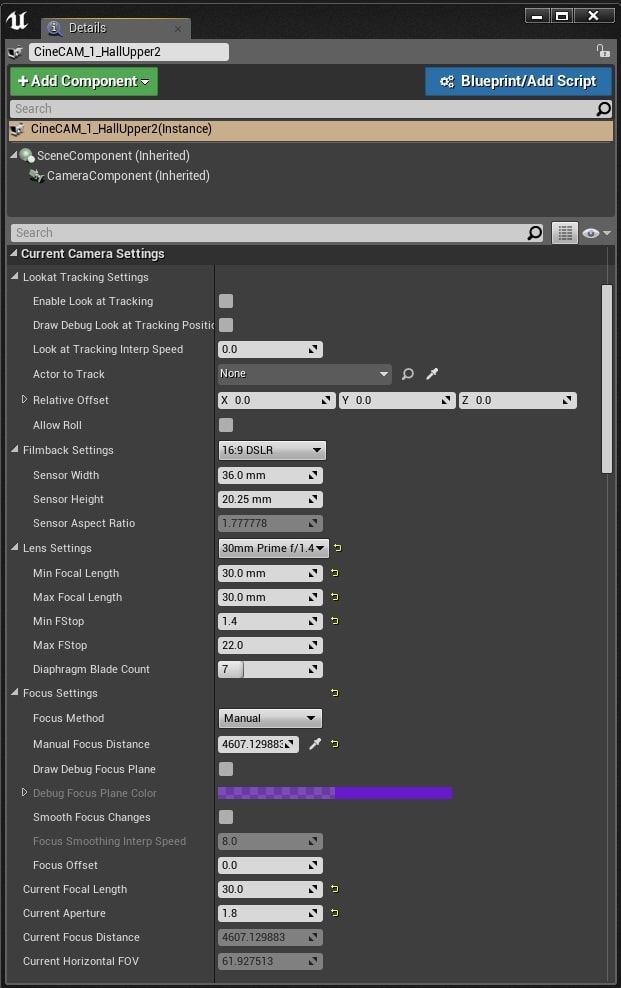
For a good composition, it was useful to use the UC4 instead of the standard camera actor Cine Camera Actor, because it allows you to change additional camera parameters to create a high-quality image. In this case, I used the 16: 9 DSLR filmback setting, because it provided good results in my environment shots. Experiments with the filmback parameters can give different interesting results, so I advise you to play with them. Changing the focal distance allows you to achieve a more cinematic sensation. In my environment shots, I usually use a wide-angle lens. However, for characters or close-ups of small objects, a portrait lens or telephoto may be suitable.
Since the work on this scene is not finished yet, I can improve it in many aspects. I have already decided on the basics, and now I want to add details and elements of the plot transmission through the environment. Including I want to “tell” about how the environment was exposed to nature, and what potential conflicts could occur here. This can give me the opportunity to add new propsy, detail models and create richer materials.
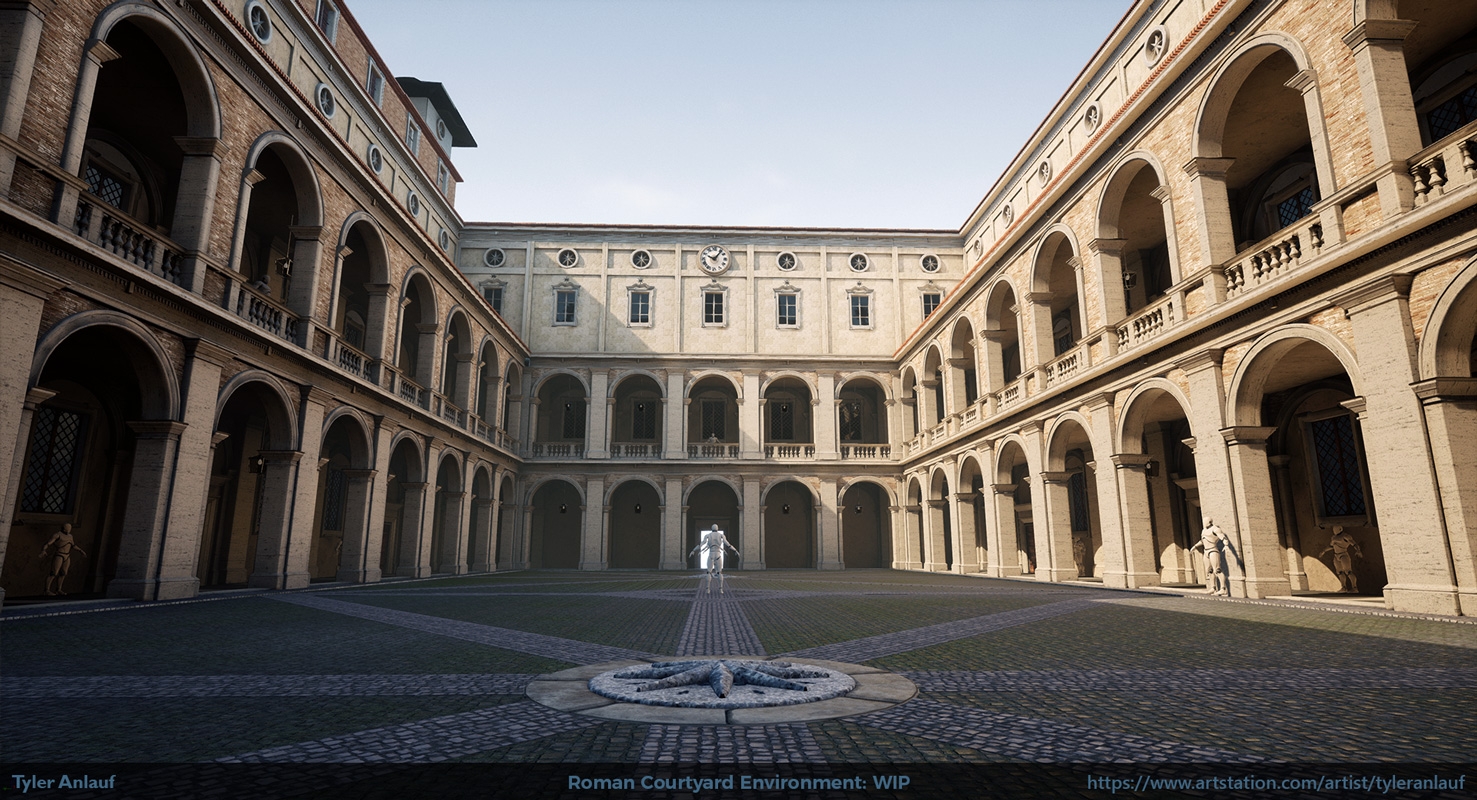
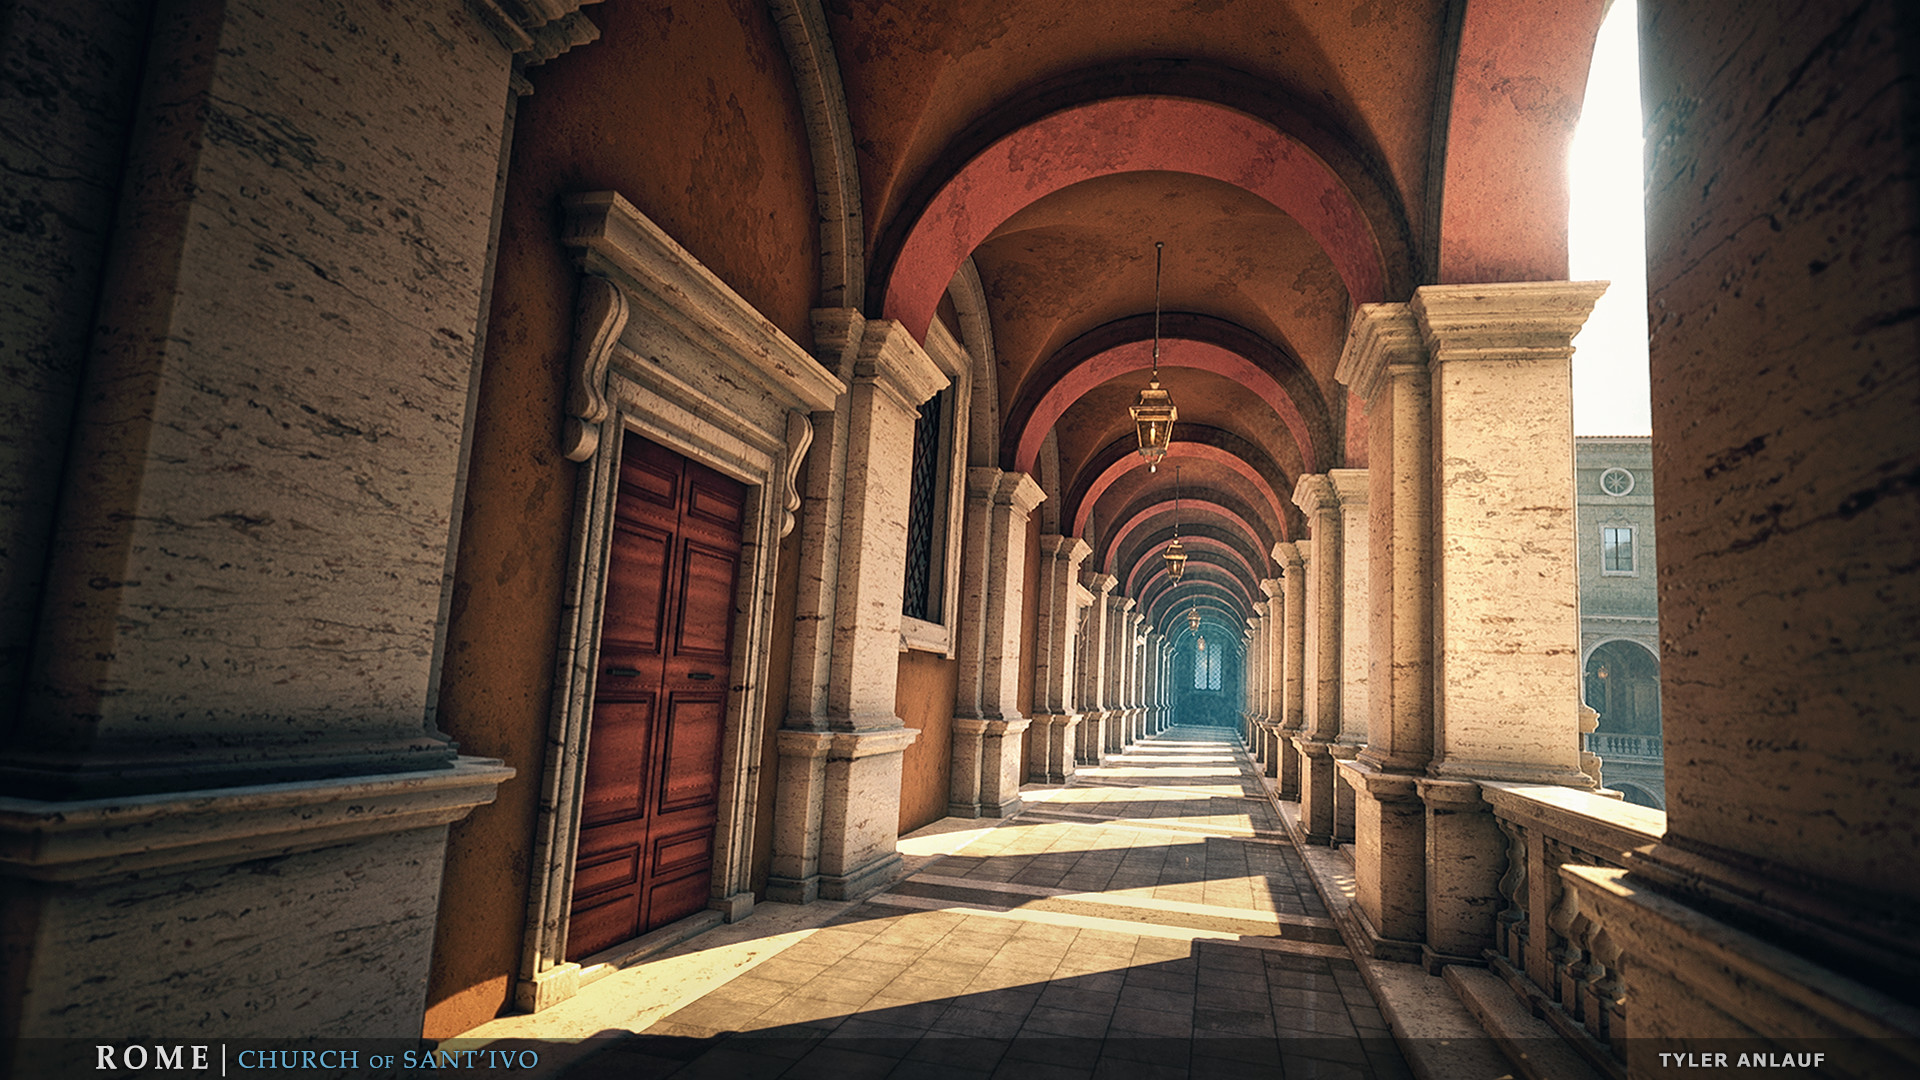
Finished images:


In conclusion, I want to say that for the time being I really enjoy working on this project. He was and remains an excellent source of experimentation, research, and self-improvement outside of my professional work. There is still much to do, and looking back at what I started with, I understand that I learned a lot.
The most important conclusion from this project is that the most important thing is not the complexity of the scene itself, but the initial creation of a solid foundation over which complexity can be built in layers.
My other works can be viewed in my portfolio .
My name is Tyler Anlauf , I work as an environmental artist at Human Head Studios in Madison, Wisconsin. We have a very talented team that has created many games. I had the pleasure of working on Call of Duty: Online, Rune, The Quiet Man and on a game that has not yet been announced.
Before joining Human Head Studios, I first became acquainted with digital art in high school, where I studied photo editing in Photoshop . Soon after, I independently learned 3ds Max, CryEngine, Unity, programming, and video compositing. Having decided to start a career in 3D, I began to study the development of animations and concepts (Animation and Concept Development) at Madison College , where I was trained by industry veterans like Ed Binkley, Jeff Dewitt and Nathaniel Albright. I also managed to get a job and internship at Gear Learning , Field Day Lab and Scooter Software , where I developed mobile games, PC games and UI software.
During college, my mentors were Chris Hartmann and Ethan Heili of Raven Software . They helped to hone my skills, criticizing my work and broadened my knowledge of AAA games graphics. In the end, I was lucky to get a job at Human Head Studios right after graduation.
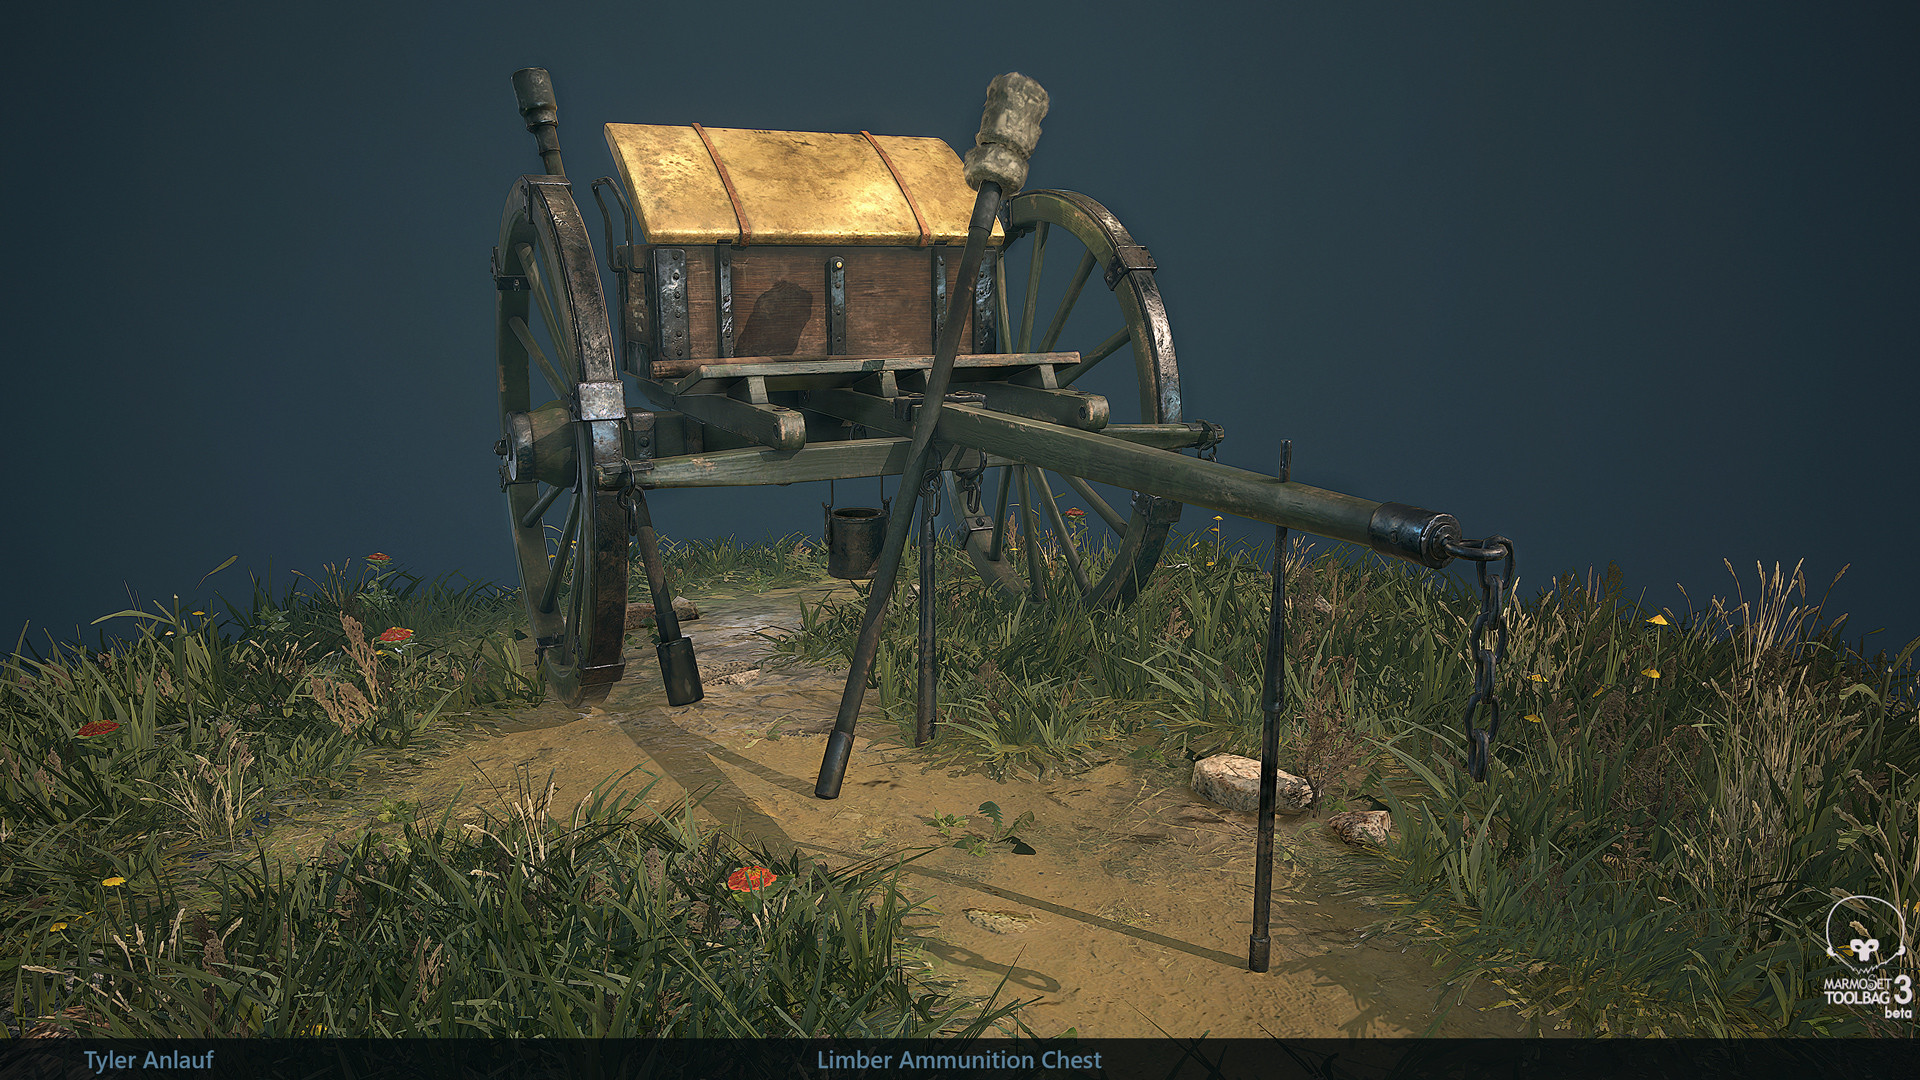
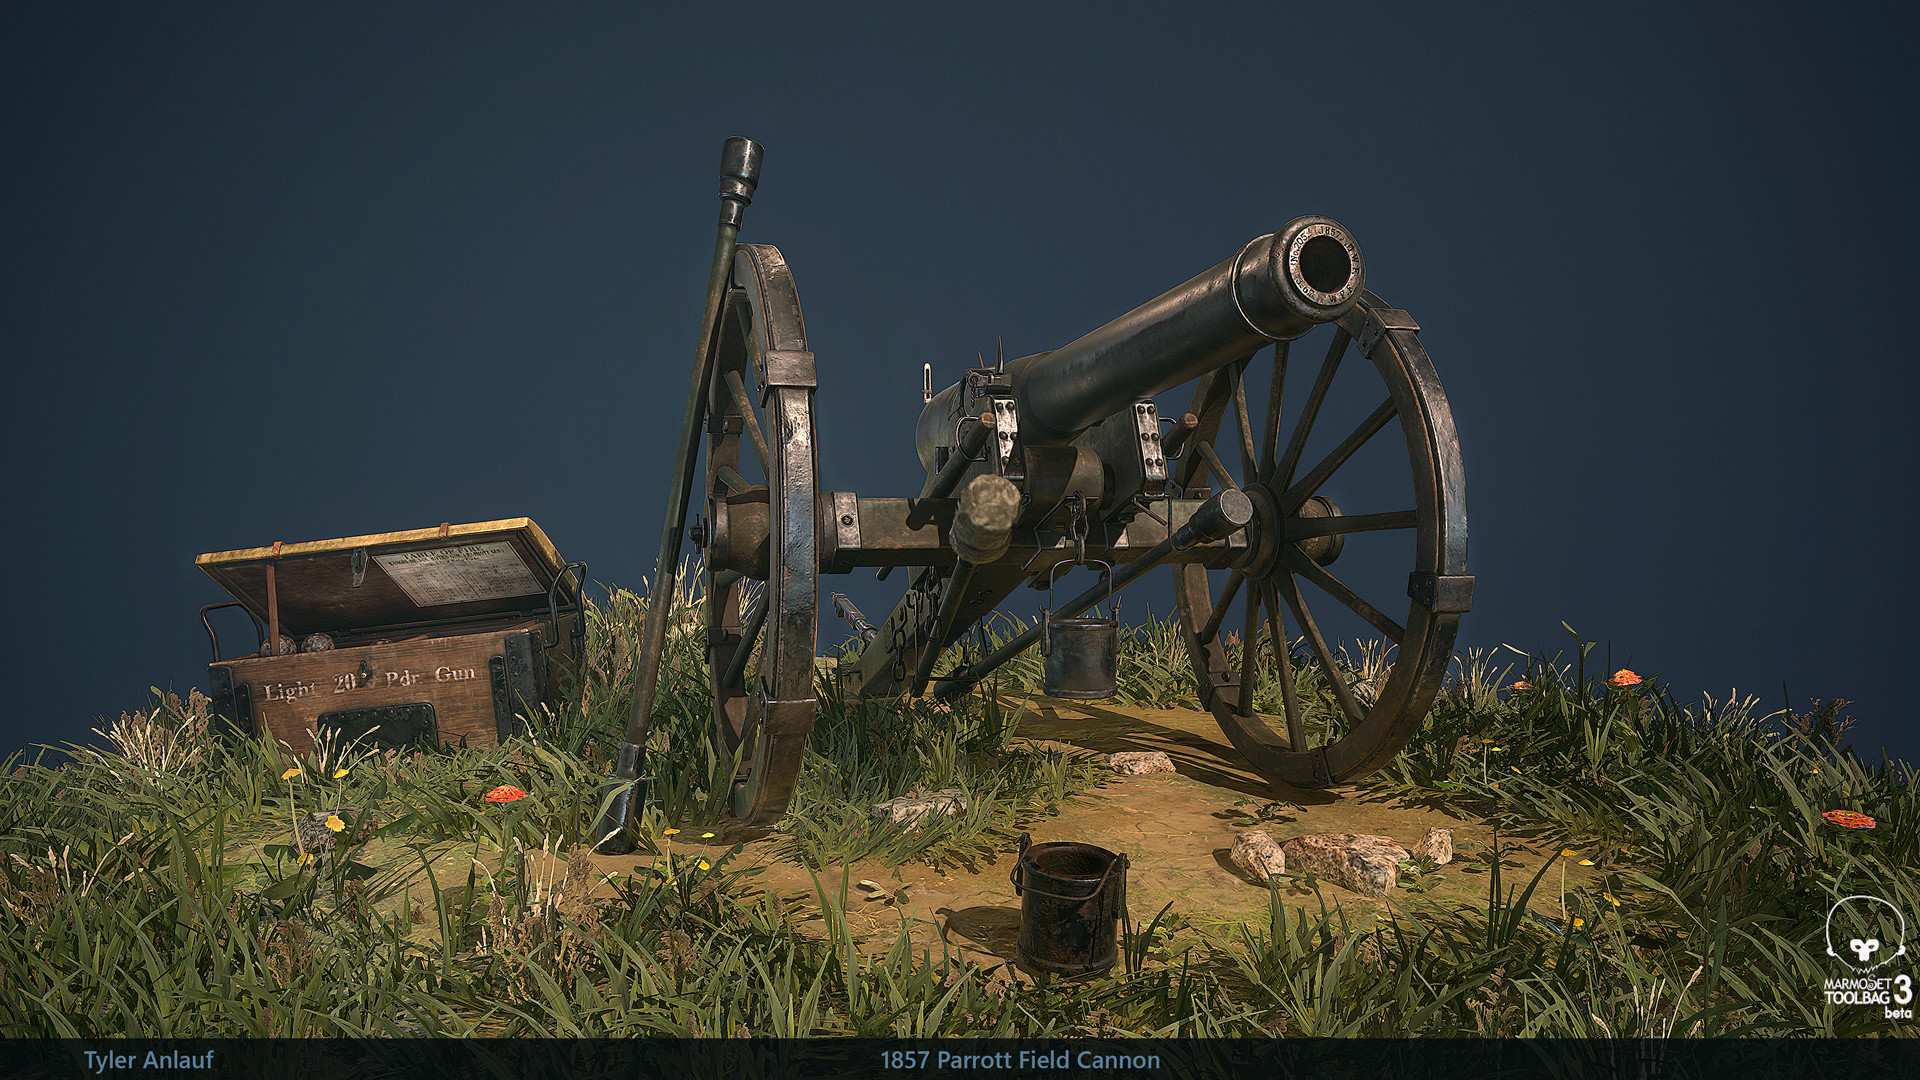
Below is a couple of examples of my work, the creation of which I learned from Chris and Ethan.
Interview conducted by Cyril Tokarev .

ROME: Church of Sant'Ivo
In this analysis, I will share with you my process of working on ROME: Church of Sant'Ivo , the tricks I learned, the difficulties I encountered during my work, and the plans for further improving the scene, because it has not yet been completed.

Project Goals
The objectives of this project were to improve my process of working on graphics, studying the Unreal Engine, and improving my skills in working with lighting, color, and composition. The Sant'Ivo alla Sapienza temple is in line with the objectives of the project - it clearly shows the possibilities of working with a modular structure, lighting, color and composition.
It was useful to choose a place that would resonate with me and inspire me. This architectural masterpiece of the early Roman Baroque period has a rich history, a majestic architectural language and scale that I find intriguing. This scale also caused difficulties due to time constraints, so I had to plan everything carefully.
Good references solve problems visually.
Any project must begin with a good collection of references. It is useful to collect more references than required, because they can be useful or inspire ideas for further work on the project. Without references, many opportunities can be missed. In addition, it is useful to look for references at each stage of the project, and not to be limited to the original collection.
Here is an example of several references from my collection.

To coordinate references at each stage of production, they should be streamlined. To do this, you can effectively use Trello, Photoshop, or simply distribute references by folders.
I found out that it is convenient for me to use a free product called PureRef, because it is a powerful but lightweight program. All reference materials can be viewed at the same time, or quickly switch to full screen mode to examine a single image. In this program, you can conveniently organize references in groups, or even collect unique boards with references.
Even old drawings proved useful for this project, especially when it came to level design and scale determination. They also gave me an understanding of how the church and the courtyard were built during the Baroque period.

Project planning
Next, I began to break down references into modular elements and began to develop metrics for individual resources. At this point, I created a list with the number of items to create. I also determined the number of different materials and thought about their effective creation.

Here we are already starting to see how huge the space is in reality. Notice that the woman in the lower right corner is about the height of the bottom of the window.
The scale of the project was one of the difficulties over which it was interesting to work. Everything in architecture is enlarged, creating a sense of the grandeur of space. For example, the window here is about four times larger than the standard home window. Since the scale and architecture here is so unique, it was useless to look for dimensions from the real world in order to create my objects based on them.
Therefore, I needed to find references with people in the frame to understand the scale. It was necessary to study a variety of reference images to ensure proper selection of the scale.
Draft plan
A blockout is one of the most important steps in building an environment that is often overlooked or underestimated. A quality draft can lay the foundation for success, especially if you work in a team and on large projects.

There are many ways to create draft plans, but as I found out, BSP brushes from UE4 are great for my plan. The BSP tools made the creation of this draft a very fast process, because they allow the use of boolean operations to build the simplest forms of the environment.
Thanks to the use of BSP, I didn’t want so much to add details until the draft was completed, which allowed me to focus on the level design and building metrics.
Below you can see how close my draft plan is to the final stage of the modular set.
Draft plan:

Ready modular set:

Thanks to the properties of the BSP at this stage, you can make any major changes. After testing and fitting the metrics in UE4, I figured out how the modular set will work with the finished geometry even before I started creating detailed models in 3ds Max or other packages.
Below is an image of the early stages of defining project metrics. He went through several iterations before the level was correct, and the draft was completed.

Additionally, I performed a preliminary pass of lighting and compositing to make sure that the selected forms fit. In addition, it helped me to prioritize the detail of resources depending on the distance to the camera.

Having scribbled some simple materials onto the stage, I was able to better understand its mood and scale. This preliminary review of the materials also helped me understand how I will plan the final materials, and better understand what I need.

Modular construction
Having got rid of controversial issues in the draft plan, I could use it as a reference point for creating the final geometry. Since I thought about the metrics of modular resources from the very beginning, they were already connected to the grid, making the geometry fast and efficient.
In most cases, BSP in UE4 is not as effective as static meshes. So I converted my BSP draft into static meshes, and then imported them to 3ds Max to build the final geometry.
In UE4, converting a BSP into a static mesh is very simple:

Building a modular set in 3ds Max began with the definition of large and medium-sized parts with their parallel testing in UE4. There is nothing worse than believing that you’ve finished a resource, and then realizing that you made a mistake at an early stage. Having improved the large and medium parts, I could focus on the fine details and optimization.
After testing, I realized that I needed to add more elements to the modular set than expected. Finding this error immediately, I was able to save time in the future because it was possible to schedule the addition of additional elements.
Perform testing from the very beginning of the project and do it often!

Since I actively used seamless, repetitive textures, it was extremely important to maintain the same density of texels for all resources. I achieved this with the help of the 3ds Max script called TexTools, although there are many other tools and scripts.


Blueprints for modular assembly
To make production more efficient, I created blueprints for repetitive parts of the scene. For corridors, I created 3 options in blueprint, shown in the picture below in red, green, and blue. Each has its own type of doors, windows and other details. Thus, it was enough for me to update not 48, but only 3 sections of the corridor.
This saved me a lot of time, because real-time changes were displayed for the entire project. The entrance to the church has two blueprints, because the middle part is different from everything else, which allows me to provide greater variability, shown in purple.

Materials
I created several materials in a bundle from Substance Designer and Substance Painter . However, due to limited time, I also used Substance Source and Quixel Megascans . It saved a lot of time.
In this project, I used master materials to speed up the editing of materials and make it more efficient. Through the use of copies of materials from the master material, it was enough for me to replace the textures, and not to rewrite a unique shader for each material.

The functional, prescribed by me in the master material, allowed editing textures as in Photoshop, but in real time and without leaving UE4. In addition, I could turn on features such as drawing vertices and add detail normals if necessary for a specific instance of the material.
To optimize the master material, static switches were used to compile only those functions that are needed in each instance. This optimizes materials because only the included options are calculated. Therefore, I can create simple shaders driven by fixed values, or fully managed textures with more complex functions and settings.
Lighting
Lighting was one of the biggest challenges, but at the same time one of the most exciting aspects. High-quality lighting can turn a good scene into a fantastic one, so you need to understand at least its basics.

I began working on the lighting of this scene by studying photographs, films, and lighting artists to understand how light helps create composition and liven up models and materials in UE4. I recommend that you first see UE4 Lighting Masterclass, Lighting Academy by 51Daedalus, and The Art of Lighting with Boon Cotter on YouTube.
Materials play an important role in lighting, because they determine how photons of light are reflected from surfaces. Carefully check the primary colors to ensure that they are calibrated as close as possible to the PBR standards. A good idea would be to make maps of primary colors no darker than 0.02 in linear space. Darker colors turn into a “black hole” for photons, which leads to strange results in lighting.
And in the master class on lighting in UE4, and in the video 51Daedalus says about it.

The lighting in this scene is organized quite simply. I began to solve the problem of setting up lighting by creating a clear calibrated lighting foundation, as recommended in the UE4 Lighting Masterclass. After calibrating the lighting and getting a clear base, one could build on these parameters in order to achieve something more graphically pleasing.
Parameters for normalized illumination:

One of the most important elements was the dome of the sky, because it affects the whole scene, especially its mood. I created a simple but effective sky material to improve its rotation and brightness. I made it so that the amount of light from my dome of the sky was calibrated and exactly matched the real world, and it was reflected in the scene in a natural way. Parameters were applied to the surrounding level of the inverted sphere.

The trick was to adjust the direction of the sun as if the action takes place in the middle of the sunset. This sets the mood of the scene, and also creates interesting rhythms of light and shadow from most viewing angles.

To enhance the impression by adding volumetric rays, I used volumetric fog. It was also necessary to adjust the color of the fog volume, because it has a huge impact on the color palette and mood. Finally, the fog density helped give the scene a sense of scale, depth, and atmosphere.

Post processing
The next tool for creating appearance and mood is post-processing. One of my favorite features was the convolution bloom, because it mimics a more natural and detailed light bloom, but at the cost of reduced performance.
I also had control over the colors of the shadows, midtones and light areas. This is needed to adjust the color palette and underline the details in the scene, enriching the frames.

Do not be afraid that this stage will have to spend a lot of time. Just a few changes can significantly change the feeling and mood of the scene, adding to the finished product the final touches.
You must also define a color palette. To check the palette, I used a simple way: blurred the image. Just took one of the screenshots and applied blur in Photoshop. So the color palette becomes much clearer, and I can use this information to improve the color palette, creating a quality composition.

Composition
Creating a strong composition is as important as other parts of the project. A good composition allows the viewer's eye to move through the image in a pleasant way. To achieve this, I took screenshots that took advantage of the shapes of the geometry I created, the rhythms of light and the shadow of the lighting, fragments of warm and cold shades from my color palette, so that they all work together with the selected angle of the camera.

To create an interesting camera angle, I used the principles of the rule of thirds and the golden spiral.

The brightest area in the scene, which is also the most contrasting, is usually the focal point. To check if the focus point I chose works, I suppressed the levels to find the brightest area with the greatest contrast in the scene. I adjusted the lighting so that the focus point is clearly visible. A clear focus point also reduced the sense of natural repeatability of architecture, because there were areas in the image where the eye can relax.

For a good composition, it was useful to use the UC4 instead of the standard camera actor Cine Camera Actor, because it allows you to change additional camera parameters to create a high-quality image. In this case, I used the 16: 9 DSLR filmback setting, because it provided good results in my environment shots. Experiments with the filmback parameters can give different interesting results, so I advise you to play with them. Changing the focal distance allows you to achieve a more cinematic sensation. In my environment shots, I usually use a wide-angle lens. However, for characters or close-ups of small objects, a portrait lens or telephoto may be suitable.

Next steps
Since the work on this scene is not finished yet, I can improve it in many aspects. I have already decided on the basics, and now I want to add details and elements of the plot transmission through the environment. Including I want to “tell” about how the environment was exposed to nature, and what potential conflicts could occur here. This can give me the opportunity to add new propsy, detail models and create richer materials.
Finished images:


Conclusion
In conclusion, I want to say that for the time being I really enjoy working on this project. He was and remains an excellent source of experimentation, research, and self-improvement outside of my professional work. There is still much to do, and looking back at what I started with, I understand that I learned a lot.
The most important conclusion from this project is that the most important thing is not the complexity of the scene itself, but the initial creation of a solid foundation over which complexity can be built in layers.
My other works can be viewed in my portfolio .
about the author
My name is Tyler Anlauf , I work as an environmental artist at Human Head Studios in Madison, Wisconsin. We have a very talented team that has created many games. I had the pleasure of working on Call of Duty: Online, Rune, The Quiet Man and on a game that has not yet been announced.
Before joining Human Head Studios, I first became acquainted with digital art in high school, where I studied photo editing in Photoshop . Soon after, I independently learned 3ds Max, CryEngine, Unity, programming, and video compositing. Having decided to start a career in 3D, I began to study the development of animations and concepts (Animation and Concept Development) at Madison College , where I was trained by industry veterans like Ed Binkley, Jeff Dewitt and Nathaniel Albright. I also managed to get a job and internship at Gear Learning , Field Day Lab and Scooter Software , where I developed mobile games, PC games and UI software.
During college, my mentors were Chris Hartmann and Ethan Heili of Raven Software . They helped to hone my skills, criticizing my work and broadened my knowledge of AAA games graphics. In the end, I was lucky to get a job at Human Head Studios right after graduation.
Below is a couple of examples of my work, the creation of which I learned from Chris and Ethan.


Interview conducted by Cyril Tokarev .
